Have you ever gazed at your flourishing rubber plant and thought, "I wish I had more of this lush greenery around my home"? You’re not alone. The desire to propagate a beloved plant is a quest many plant lovers embark on, not only to enhance their home’s aesthetic but also to share their prized greenery with family and friends. Rubber plants, with their broad and glossy leaves, are particularly prized for their robust beauty and air-purifying qualities. But, the process of propagation can seem daunting to the uninitiated. Fear not, for this guide is here to demystify the art of multiplying your rubber plant successfully. Whether you’re a seasoned green thumb looking to expand your collection or a budding enthusiast wanting to delve into the rewarding world of plant propagation, understanding the nuances of this process can transform the way you nurture nature in your living space. Dive in to discover the secrets of rubber plant propagation and unlock the potential of your indoor garden.
Preparing Your Rubber Plant for Propagation
Preparing your rubber plant for propagation is a rewarding process that involves a few key steps to ensure success. Rubber plants, or Ficus elastica, are popular for their glossy leaves and adaptability, making them an excellent choice for propagation. Here’s how to propagate a rubber plant effectively:
Step 1: Choosing the Right Time
The best time to propagate a rubber plant is during the growing season, typically in spring or early summer. During these months, the plant is more likely to develop robust roots, increasing your chances of successful propagation.
Step 2: Selecting a Healthy Parent Plant
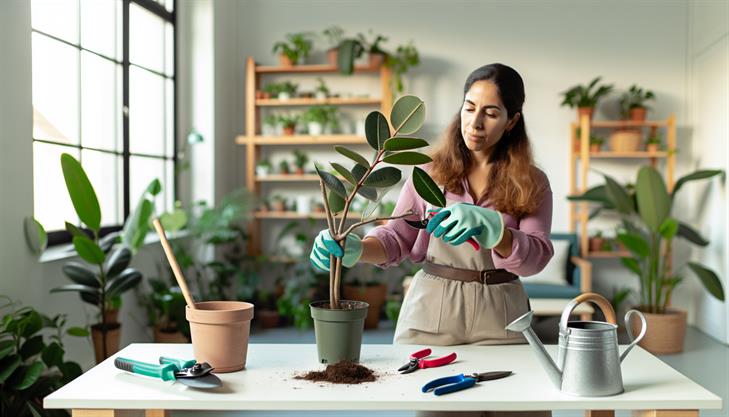
Start with a healthy rubber plant free from diseases or pests. Look for vibrant, full leaves, and ensure the plant is well-watered a day or two before propagation. This will help the cuttings to remain hydrated and boost their chances of thriving.
Step 3: Preparing Your Tools
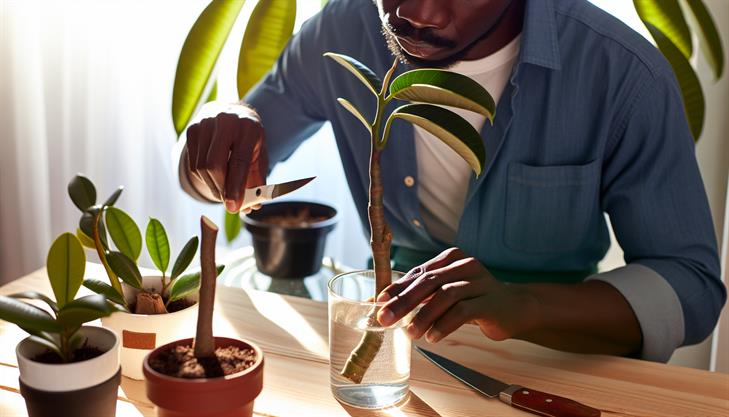
Use a clean, sharp knife or pruning shears to take cuttings. Sterilize the tools with rubbing alcohol to prevent transferring any pathogens to the cuttings.
Step 4: Taking Cuttings
Identify a healthy stem with at least 2-3 mature leaves. Make a clean cut just below a node, where the leaf meets the stem, ensuring the cutting is approximately 6 inches long. Remove the lower leaves, leaving a couple of leaves at the top. The node is crucial as it’s where new roots will grow.
Step 5: Applying Rooting Hormone
Dipping the cut end of your rubber plant cutting into rooting hormone can encourage faster root growth. Although optional, it can significantly enhance the success rate by promoting root development more quickly.
Step 6: Potting the Cutting
Fill a small pot with a well-draining potting mix, such as one part peat moss and one part perlite or sand. Plant the cutting so that the node is buried in the soil, and gently firm the soil around it. Ensure the pot has drainage holes to prevent waterlogging.
Step 7: Creating the Right Environment
Place the cutting in a warm, indirect light location, avoiding direct sunlight that can scorch the tender leaves. Maintain a humid environment by covering the cutting with a plastic bag or using a humidity dome, but ensure there’s enough airflow to prevent mold growth.
Step 8: Watering and Monitoring Growth
Water the cutting thoroughly, allowing excess water to drain out, and keep the soil consistently moist but not soggy. Within 4-6 weeks, you should see new growth, indicating successful rooting.
Common Issues and Tips
- Wilting Leaves: If you notice wilting, it might indicate low humidity or excessive direct sunlight. Adjusting the environment can help the cutting recover.
- Root Rot: Be cautious of overwatering, as rubber plant cuttings are susceptible to root rot. Ensure proper drainage to allow soil to dry out between waterings.
- Pest Control: Check periodically for pests such as fungus gnats, which can be attracted to moist soil.
Final Advice
Patience is key when propagating rubber plants. Provide optimal conditions, and avoid the temptation to tug at the cuttings to check for roots. Enjoy the process of watching your new rubber plants grow from these propagated cuttings, bringing greenery and nature into your space.
Step-by-Step Guide to Propagating Rubber Plant Cuttings
Propagating a rubber plant can be a rewarding way to expand your collection or share with friends. With its shiny leaves and sturdy stems, the rubber plant (Ficus elastica) is both attractive and resilient, making it an ideal candidate for propagation. Follow these straightforward steps to successfully propagate your rubber plant cuttings.
Step 1: Gather Your Materials
Before you begin the process of propagating rubber plants, make sure you have the necessary materials on hand:
- A sharp, clean pair of pruning shears or a knife
- A small pot with drainage holes
- Potting mix or soilless rooting medium
- A plastic bag or a clear plastic container
- Rooting hormone (optional)
- Watering can or spray bottle
Step 2: Choose the Right Stem
Select a healthy stem from your rubber plant. Ensure the stem has at least one or two leaves and is about 4-6 inches long. It’s best to choose a young, supple stem as older, woody stems may root slower.
Step 3: Make the Cut
Using your sterilized pruning shears or knife, cut the stem below a leaf node at a 45-degree angle. This angle increases the surface area for rooting and helps the cutting absorb water more effectively.
Step 4: Prepare the Cutting
Remove the leaves from the lower half of the cutting, leaving only the top one or two leaves intact. Optionally, dip the cut end of the stem in rooting hormone to enhance root development, though rubber plants often root successfully without it.
Step 5: Pot the Cutting
Fill your pot with a well-draining potting mix or a soilless medium like perlite or vermiculite. Insert the lower end of the cutting into the potting mix, ensuring it’s secure enough to stand upright.
Step 6: Create a Greenhouse Environment
Moisture is key when learning how to propagate rubber plant cuttings. Cover the pot with a plastic bag or place it under a clear plastic container to create a greenhouse-like environment, which helps retain humidity.
Step 7: Provide Proper Conditions
Place the pot in a warm area with bright, indirect light. Avoid direct sunlight as it may overheat and dry out the cutting. Maintain a temperature between 65-75°F (18-24°C).
Step 8: Monitor and Maintain
Check the cutting regularly for signs of growth and water it lightly to keep the soil moist but not soggy. After about 4-6 weeks, gently tug on the cutting. If you feel resistance, roots have formed.
Step 9: Transition to Regular Care
Once the cutting has developed a robust root system, usually in about 8-10 weeks, gradually acclimate it to normal atmospheric conditions by removing the plastic cover. Continue to care for it like a mature rubber plant.
Troubleshooting Common Issues
-
Leaf Drop: If the cutting loses leaves, it may be due to low humidity. Ensure the plastic cover is in place and check the soil moisture.
-
Stem Rot: This occurs if the soil is too wet. Use a well-draining medium and water sparingly.
By following these steps on how to propagate rubber plant cuttings, you should achieve a high success rate and enjoy the satisfaction of watching a new plant grow from a small cutting. Practice patience, as the propagation process can take several weeks to show results. Happy gardening!
Tips for Successful Rubber Plant Propagation
Propagating a rubber plant, scientifically known as Ficus elastica, is a rewarding process that allows you to grow new plants from existing ones, enhancing your indoor or outdoor greenery. Below, we provide a detailed guide on how to propagate rubber plants effectively at home. By following these simple steps, you can increase your chances of successful propagation.
Materials Needed:
- A healthy rubber plant
- Clean, sharp pruners or scissors
- A clean pot or container
- Well-draining potting soil
- Rooting hormone (optional)
- Water
- A plastic bag or a transparent cover (optional for humidity)
Step-by-Step Guide to Propagate Rubber Plants
-
Choose the Right Time:
The best time to propagate a rubber plant is during its active growing season, typically in spring or early summer. This timing allows the plant to establish roots more efficiently due to the increased growth activity. -
Select a Healthy Stem:
Identify a healthy stem that is at least 6 inches long and has a few leaves. Ideally, select a segment without any signs of pests or disease damage. -
Make the Cut:
Using clean, sharp pruners or scissors, cut the stem at a 45-degree angle just below a node (the point where the leaf attaches to the stem). This ensures maximum surface area for root development. -
Prepare the Cutting:
Remove the lower leaves, leaving at least two to three leaves on the upper part of the stem. This reduces moisture loss and encourages root growth. Optionally, you can dip the bottom end of the cutting in a rooting hormone to facilitate quicker root formation. -
Plant the Cutting:
Fill a pot with well-draining potting soil. Make a small hole in the soil and gently insert the cutting. Firmly but gently pack the soil around the cutting to hold it in place. Ensure the cutting is upright and stable. -
Watering and Humidity:
Water the cutting thoroughly until water drains out of the bottom of the pot. Ensure the soil remains consistently moist but not waterlogged. To maintain humidity, which is vital for root development, cover the cutting with a plastic bag or a transparent cover, ensuring it does not touch the leaves. -
Provide the Right Environment:
Place the pot in a warm, bright location, but avoid direct sunlight which can scorch the cutting. A temperature range of 65-75°F (18-24°C) is ideal. -
Monitor for Growth:
Roots typically develop in four to six weeks. During this period, monitor the cutting for signs of new leaf growth, which indicates root establishment. Once new growth appears, you can gradually acclimate the plant to drier air by removing the cover.
Common Issues and Troubleshooting
- Yellowing Leaves: This can be a sign of overwatering. Allow the soil to dry slightly between waterings.
- No Root Development: Ensure that the cutting receives adequate humidity and warmth. If using rooting hormone, ensure it hasn’t expired or been degraded.
- Wilting or Dropping Leaves: This might occur in low humidity environments. Increasing humidity can help remedy this.
Additional Tips
- Sanitation: Always sterilize your tools before cutting to prevent disease transmission.
- Patience: Rubber plant cuttings can take a while to show progress, so patience is key.
- Rooting in Water: Some prefer to start propagating a rubber plant in water until roots form, then transfer to soil. Change the water regularly to prevent stagnation and algae buildup.
By following these detailed steps, you are well on your way to successfully propagating rubber plants, enriching your plant collection with minimal cost and effort.
Tools and Materials Needed for Rubber Plant Propagation
Propagating a rubber plant is a rewarding way to expand your collection or share this beautiful plant with friends. The process involves several straightforward steps, and with the right tools and materials, you can ensure a successful propagation. Here’s how to propagate a rubber plant step-by-step:
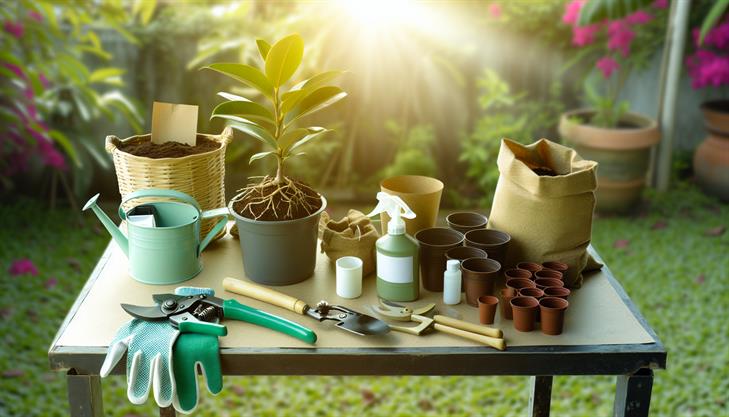
Tools and Materials Needed
- Sharp Knife or Pruning Shears: Essential for cutting healthy stems cleanly.
- Rooting Hormone: Encourages faster and healthier root development (optional but recommended).
- Potting Mix: A well-draining soil mix, such as a blend of peat, sand, and perlite.
- Small Pots (4-6 inches): For planting cuttings as they root and grow.
- Plastic Bag or Cling Wrap: To create a mini greenhouse effect and maintain humidity.
- Spray Bottle: For misting and keeping the soil and leaves moist.
- Water: Preferably distilled or filtered to support healthy growth.
Step-by-Step Propagation Instructions
-
Select a Healthy Stem: Choose a branch from your rubber plant that is healthy, with several leaves, and appears vigorous. The best time to do this is during the growing season, ideally in spring or early summer.
-
Make the Cut: Use a sharp knife or pruning shears to cut a 4- to 6-inch section from the chosen stem. Ensure that the cutting includes at least two leaves and a node (the point on the stem where leaves emerge).
-
Prepare the Cutting: If desired, dip the cut end of the stem into a rooting hormone. This step stimulates root growth but isn’t strictly necessary if you don’t have any on hand.
-
Plant the Cutting: Fill a small pot with a well-draining potting mix. Insert the cut end of the rubber plant cutting about 1 inch into the soil. Firmly press the soil around the base of the cutting to secure it.
-
Create a Humid Environment: Cover the pot with a plastic bag or wrap it with cling wrap, ensuring the plastic does not touch the leaves. This setup maintains humidity, which is vital for root development.
-
Place in Bright, Indirect Light: Position the potted cutting in a location where it will receive bright, indirect light. Avoid direct sunlight as this can scorch the leaves.
-
Maintain Moisture: Check the soil regularly, keeping it consistently moist but not soggy. Use a spray bottle to mist the leaves and soil surface to ensure adequate humidity.
Common Issues and Additional Tips
-
Root Rot: To avoid overwatering and potential root rot, ensure your pot has drainage holes. Remove the plastic covering occasionally to allow airflow.
-
Slow Growth: Be patient! It can take several weeks for roots to form. If progress seems sluggish, double-check that your environment is sufficiently humid and that light conditions are ideal.
-
Leaf Loss: It’s normal for some leaves to drop during the propagation process. Focus on the health of the remaining leaves and stem for signs of success.
By following these detailed instructions, propagating your rubber plant should be a straightforward and rewarding endeavor. Remember to monitor your plant as it grows and adjust care routines as necessary to ensure a thriving rubber plant.
Troubleshooting Common Issues in Rubber Plant Propagation.
Propagating a rubber plant, also known as Ficus elastica, can be a rewarding endeavor for plant enthusiasts. This easy-to-follow guide will walk you through the process while addressing common issues that might arise during rubber plant propagation. Whether you’re growing new plants for your collection or sharing them with friends, these steps and tips will help ensure success.
Step 1: Gather Your Materials
To propagate a rubber plant, you’ll need the following materials:
- A healthy rubber plant with robust stems
- A sharp, clean knife or pruning shears
- A small pot with drainage holes
- Well-draining potting soil
- Rooting hormone (optional)
- Plastic wrap or a clear plastic bag
Step 2: Select the Cutting
Choose a healthy stem with a few leaves from the rubber plant. Make sure it is free from pests and diseases. Ideally, your selected stem should be at least 4-6 inches long and have a few nodes where new roots can grow.
Step 3: Make the Cut
Using your clean knife or pruning shears, make a clean cut below a node on the chosen stem. Ensure that your cutting includes at least one leaf to support photosynthesis. If you notice any white sap oozing from the cut, gently wipe it with a damp cloth.
Step 4: Prepare the Cutting
Remove any leaves on the lower part of the cutting to expose a few inches of stem. This will be where your new roots develop. Dipping the cut end into rooting hormone is optional, but it can encourage quicker root formation.
Step 5: Plant the Cutting
Fill your pot with well-draining potting soil and create a small hole in the center. Place the prepared cutting into the hole, ensuring the node is buried in the soil. Gently press the soil around the cutting for stability.
Step 6: Provide the Right Environment
Rubber plant propagation thrives in a humid environment. Cover the pot with plastic wrap or place it inside a clear plastic bag to create a mini greenhouse. This helps maintain higher humidity and can speed up the root development process.
Step 7: Manage Light and Water
Position the pot in a location with bright, indirect sunlight. Avoid direct sunlight, which can scorch the cutting. Keep the soil consistently moist but not soggy, as overly wet soil can cause root rot.
Step 8: Watch for New Growth
After a few weeks, check for new signs of growth. This indicates successful root development. Once your rubber plant cutting has established a robust root system, you can remove the plastic covering.
Troubleshooting Common Issues
-
Wilting or Leaf Drop: This typically results from overwatering or insufficient humidity. Ensure drainage is effective and adjust watering habits. Increasing humidity, especially in dry climates, can help.
-
No Root Development: If roots are slow to develop, consider using rooting hormone or re-evaluating the cutting’s environment. Sometimes, re-cutting below a node and replanting can prompt root growth.
-
Fungal Issues: Excessive moisture can encourage fungus. Make sure the pot and soil have good drainage and avoid water collecting in excess around the cutting.
Remember, patience is key when learning how to propagate rubber plants. Not every attempt may succeed, but following these steps and troubleshooting tips will improve your chances of propagating a healthy rubber plant successfully.
In conclusion, propagating a rubber plant is a rewarding endeavor that allows you to expand your indoor garden with minimal effort. By following the steps outlined—choosing a healthy parent plant, making precise cuts, and ensuring optimal rooting conditions—you’re well on your way to successfully growing new rubber plants. Remember to be patient, as plant growth can take some time, and ensure the environment remains consistent in temperature and humidity to encourage healthy root development.
Now that you’ve learned the fundamentals of propagation, why not give it a try? With a bit of care and attention, you’ll soon enjoy the vibrant greenery of your newly propagated plants. Finally, a helpful tip: Consider labeling your cuttings with the date of propagation. This small step will help track progress and ensure you provide the necessary care just when it’s needed. Happy gardening!