As the sun casts its warm embrace over your outdoor space, the allure of a vibrant patio garden beckons. Imagine stepping outside to a burst of color and fragrance, transforming your patio into an oasis of natural beauty. Whether you’re a seasoned gardener or a budding enthusiast, preparing a patio pot for planting is a rewarding endeavor that can bring life and joy to your living area.
But why is this seemingly simple task so crucial? The secret lies in creating the perfect foundation to ensure your plants thrive in striking displays of nature’s artistry. Proper preparation is the difference between flourishing blooms and lackluster growth, impacting not just the aesthetics but also the vitality of your potted paradise.
In this comprehensive guide, we’ll unveil the steps and tips for setting up your patio pots to maximize their potential. With our expert advice, you’ll learn how to choose the right containers, curate nutrient-rich soil, and master the art of plant arrangement. Get ready to delve into the world of container gardening and transform your patio into a sanctuary of sights and scents that are sure to captivate every visitor. Let’s dig in!
Selecting the Right Pot and Location for Your Patio
Preparing a patio pot for planting is a crucial step to ensure healthy plant growth and enhance the beauty of your outdoor space. This guide will walk you through the process with simple, easy-to-follow steps. Whether you’re a novice gardener or a green-thumbed enthusiast, you’ll find tips and solutions for common issues as well.
Step 1: Selecting the Right Pot
Begin with choosing a pot that suits both your plant’s needs and your patio’s aesthetic. Consider the following factors:
- Material: Pots come in various materials like terracotta, ceramic, plastic, and metal. Terracotta is breathable but dries out quickly, while plastic retains moisture well and is lightweight.
- Size: Ensure the pot is proportional to the plant. Small pots may limit root growth, whereas overly large pots can hold too much water, leading to root rot.
- Drainage: Opt for pots with drainage holes to prevent waterlogging, a common issue that can harm plant roots.
Step 2: Preparing the Pot
After selecting the suitable pot, it’s time to get it ready for planting. Here’s how:
-
Clean the Pot: Wash the pot with mild soap and water, especially if it’s been used before. This eliminates pests and diseases that could harm new plants.
-
Layer the Base: Place a layer of gravel or small stones at the bottom. This helps improve drainage and prevents soil from washing out through the holes.
-
Add Quality Potting Mix: Fill the pot with a well-draining potting mix, which provides essential nutrients and good aeration. Avoid garden soil as it can be too heavy and compact, impacting drainage.
Step 3: Planting
Now, it’s time to plant:
-
Moisten the Soil: Lightly water the soil to ensure it’s evenly moist, which helps reduce transplant shock for new plants.
-
Arrange Your Plants: Gently remove plants from their nursery containers and loosen the roots. Create a hole in the soil large enough to accommodate the entire root ball.
-
Position Plants: Place the plant in the hole, ensuring that the top of the root ball is slightly below the pot’s rim. Backfill with soil and gently press it down to eliminate air pockets.
Step 4: Watering and Placement
After planting, focus on proper watering and pot placement:
-
Water Thoroughly: Once your plants are positioned, water the pot thoroughly until you see water draining out from the bottom. This ensures the entire root system gets hydrated.
-
Choose the Right Location: Place your pot in a spot that meets your plants’ light requirements, whether that’s full sun, partial shade, or full shade. Additionally, consider the pot’s weight when filled with soil and water, especially if you plan to move it frequently.
Additional Tips
-
Fertilization: Regularly feed your plants with a suitable fertilizer to boost growth and health. Slow-release fertilizers are a practical option for patio pots.
-
Monitor for Pests: Regularly check for pests which are common in container gardening. Early detection can prevent significant damage.
-
Seasonal Adjustments: In colder months, consider moving pots to more protected areas or using plant covers to shield them from harsh weather.
By following these steps, you’ll be well on your way to creating a thriving patio garden. Remember that the key to successful patio planting is selecting the proper components and performing regular upkeep to maintain plant health.
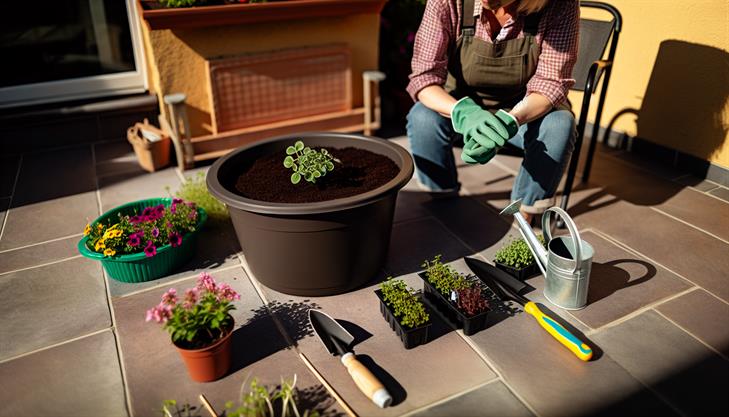
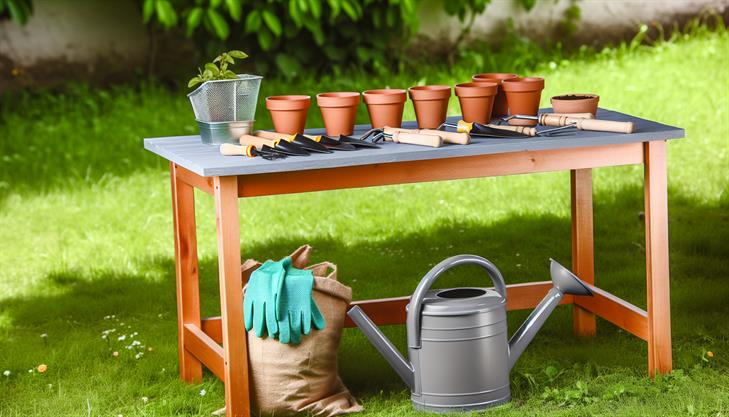
Essential Tools and Materials for Pot Preparation
Preparing a patio pot for planting is a straightforward yet crucial task that ensures your plants thrive. Here’s a detailed guide to set you on the right path:
Step 1: Choose the Right Pot
Start by selecting the appropriate pot for your plants. Consider the following:
- Size: Ensure the pot is large enough to accommodate your plant’s root system with room to grow.
- Material: Choose from options such as terracotta, ceramic, or plastic. Each material affects water retention and insulation differently.
- Drainage: Essential for healthy plants, so make sure your pot has adequate drainage holes to prevent waterlogging.
Step 2: Gather Essential Tools and Materials
Before you begin planting, collect all necessary tools and materials:
- Potting Mix: A high-quality mix that suits your plant type. General-purpose mixes usually suffice, but specific mixes are available for plants like succulents or orchids.
- Drainage Material: Such as gravel or small stones to keep soil from clogging the drainage holes.
- Gardening Tools: Including a trowel, gloves, and a watering can or hose.
Step 3: Prepare the Pot
-
Clean the Pot: Whether new or used, clean the pot with water to remove dust or residue. If previously used, a mild detergent and scrubbing brush will help disinfect the pot.
-
Add Drainage Layer: Place a few inches of gravel or small stones at the bottom of the pot. This acts as a drainage layer to prevent water from stagnating.
Step 4: Fill the Pot with Soil
-
Add Potting Mix: Fill the pot about two-thirds full with your chosen potting mix, leaving enough room for the plant and a top layer of soil.
-
Moisten the Soil: Lightly moisten the potting mix before planting. This helps settle the soil and reduces transplant shock.
Step 5: Plant Your Flowers or Vegetables
-
Create a Well for Your Plant: Make a small depression in the center of the soil to accommodate the plant’s root ball.
-
Plant Depth: Carefully remove the plant from its nursery pot, gently teasing out any circled roots. Position it in the pot, ensuring the top of the root ball is level with the surrounding soil.
-
Backfill and Firm Gently: Fill any gaps around the plant with additional potting mix, pressing down slightly to remove air pockets.
Step 6: Water and Position
-
Initial Watering: After planting, water thoroughly to help settle the soil around the roots.
-
Positioning: Place your pot in its designated spot on the patio, considering the plant’s sunlight and temperature needs.
Troubleshooting Common Issues
- Overwatering: Ensure the pot drains well; if plants appear waterlogged, check for blocked drainage holes.
- Nutrient Deficiencies: Consider a slow-release fertilizer if your plant shows sluggish growth or discolored leaves.
Additional Tips
- Test the weight of your pot before planting. Once filled with soil, they can become very heavy, and moving them later might be challenging.
- Consider the aesthetics of your patio pot. Match pot colors and shapes to your patio design for a cohesive look.
- Rotate pots occasionally to ensure all sides receive even sunlight, promoting balanced plant growth.
By following these steps, you prepare your patio pot properly, setting a strong foundation for a vibrant and healthy plant display. Happy planting!
Preparing the Soil for Optimal Plant Growth
Preparing a patio pot for planting is a crucial first step to ensure your plants thrive. Whether you’re a seasoned gardener or a beginner, following the right process can make all the difference. Here’s a comprehensive guide on how to prepare a patio pot for planting effectively, maximizing plant health and growth.
Step 1: Choose the Right Pot
- Size Matters: Select a pot that’s appropriate for the plant’s mature size. Larger pots allow for more soil, which retains moisture and supports root growth.
- Material Considerations: Whether clay, plastic, or ceramic, choose a material based on your climate and the plant’s needs. Clay pots are breathable, while plastic retains moisture better.
- Drainage: Ensure the pot has drainage holes to prevent waterlogging, which can lead to root rot—a common issue in patio pots.
Step 2: Clean the Pot
- Remove Residue: If reusing a pot, scrub away any old soil and residue. This prevents disease transfer.
- Sanitize: Use a mild bleach solution (1 part bleach to 9 parts water) to disinfect and rinse thoroughly before use.
Step 3: Select the Right Soil
- Potting Mix: Use a high-quality potting mix designed for container plants. These mixes often contain peat moss, perlite, and vermiculite for optimal aeration and moisture retention.
- Avoid Garden Soil: Garden soil is too heavy and compact for pots. It can inhibit drainage and root growth.
Step 4: Add a Base Layer
- Drainage Layer: Add a layer of stones, gravel, or broken pottery at the bottom to facilitate drainage. This is especially useful if the pot’s drainage is inadequate.
- Tip: Use landscape fabric over the drainage layer to prevent soil from clogging the holes.
Step 5: Fill with Soil
- Pre-moisten the Soil: Slightly dampen the potting mix before filling the pot. Pre-moist soil will help reduce stress when planting.
- Fill Properly: Leave about an inch of space below the rim to allow for watering without overflow.
Step 6: Planting and Final Touches
- Plant Depth: Plant at the same depth as the plant was in its nursery pot. Burying too deep or shallow can stress the plant.
- Spacing: If planting multiple plants, ensure adequate space for air circulation and growth.
- Watering: After planting, water thoroughly. Ensure water drains well to check the setup’s effectiveness.
Maintenance Tips
- Watering Schedule: Containers dry out more quickly than garden beds. Water regularly but ensure the top inch of soil dries out somewhat between waterings.
- Location: Place the pot where it will get the right amount of sun exposure needed for the plant species.
- Feeding: Container plants often need more frequent feeding. Consider a liquid fertilizer every 4-6 weeks during the growing season.
By following these comprehensive steps on how to prepare a patio pot for planting, your container garden will have a strong foundation for optimal growth. Remember, regular monitoring and adjustments ensure that your plants remain healthy and vibrant in their patio pots.
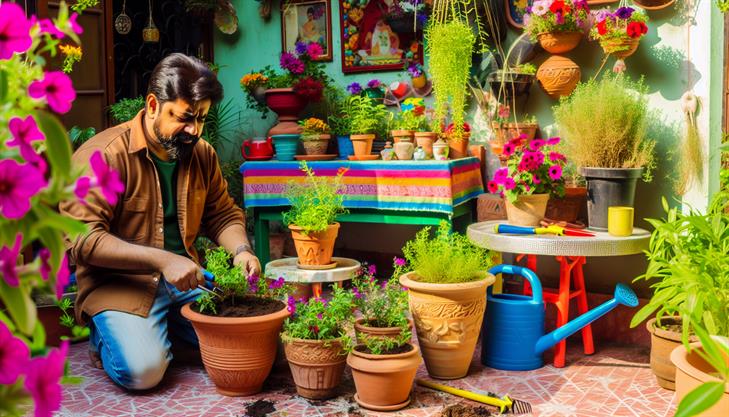
Planting Techniques for a Flourishing Patio Garden
Preparing a patio pot for planting is a crucial step to ensure your garden flourishes. Follow these easy steps to get your patio pots primed for success.
1. Choose the Right Pot:
Select pots made of durable materials like clay, ceramic, or plastic. Ensure there’s at least one drainage hole at the bottom to prevent waterlogging—a common issue that can harm plant roots. The pot size should accommodate the mature size of the plants you intend to grow.
2. Clean Your Pot:
Whether new or reused, clean the pot with soapy water and a brush to remove any dirt, residue, or pathogens. Rinse thoroughly and allow it to dry completely before use.
3. Set Up Drainage Layer:
Place a layer of coarse gravel, pebbles, or broken pottery shards at the bottom of the pot. This aids drainage and ensures excess water can escape, helping prevent root rot.
4. Prepare the Potting Mix:
Use a high-quality potting mix rather than garden soil. Potting mix is lightweight, drains well, and is typically enriched with nutrients. Consider adding perlite or vermiculite for enhanced aeration and drainage.
5. Add the Soil:
Fill the pot with the prepared potting mix, leaving about 2-3 inches from the top. This ensures enough space for watering and root growth. Gently pat the soil to eliminate air pockets.
6. Plan Your Plant Layout:
Before planting, arrange your plants on top of the soil to visualize their final placement. Consider factors like plant height and spread to ensure they won’t overcrowd each other as they grow.
7. Plant Properly:
Remove plants from their nursery pots and gently loosen any tangled roots. Insert them into the soil at the same depth they were in their original containers. Around each plant, fill the remaining gaps with soil, and press lightly to secure them.
8. Water Thoroughly:
After planting, water the pot thoroughly until you see water draining from the bottom. This ensures that soil and plants settle properly and eliminates any remaining air pockets.
9. Add Mulch (Optional):
To retain moisture and reduce weed growth, add a layer of mulch to the top of the soil. Organic mulch like shredded bark or compost works well for pots.
10. Place Your Pot:
Position your pot in an appropriate area on your patio that meets the sunlight and temperature needs of your plants. Some may require full sun, while others thrive in partial shade.
Additional Tips:
- Monitor moisture levels; patio pots dry out faster than garden soil and may require more frequent watering.
- Fertilize as needed, following the specific requirements of your plants.
- Watch out for pests and diseases, especially in pots with poor drainage or those placed in overly humid conditions.
By following these steps on how to prepare a patio pot for planting, you’ll lay the groundwork for a thriving patio garden, brimming with healthy, vibrant plants.
Troubleshooting Common Patio Pot Planting Issues
Preparing a patio pot for planting is a crucial step in ensuring that your container garden thrives. Whether you’re an experienced gardener or a beginner, setting up your pot properly will support healthy growth and prevent common issues. Here’s a step-by-step guide to help you prepare your patio pot effectively for planting:
Choosing the Right Pot
-
Material: Select a pot made from durable materials, such as terracotta, ceramic, or high-quality plastic. Each material has its pros and cons; for instance, terracotta is breathable but can dry out quickly.
-
Size: Choose a pot size that accommodates the root system of your plants. For larger plants or combinations, bigger pots are ideal to prevent overcrowding.
-
Drainage: Ensure the pot has adequate drainage holes to prevent waterlogging, which is a common issue that can lead to root rot.
Prepping the Pot
-
Cleaning: Before planting, clean the pot thoroughly if it’s been used previously, to remove any diseases or pests. A mixture of water and mild dish soap usually works well, followed by a rinse with a vinegar solution for extra sanitation.
-
Drainage Layer: Add a layer of coarse materials, like gravel or broken pot shards, at the bottom of the pot. This layer helps facilitate drainage and avoid soil compaction, which can impede water flow.
Adding Soil
-
Soil Selection: Use a high-quality potting mix appropriate for the specific plants you’re growing. Potting soil is specially formulated to retain moisture and nutrients better than garden soil.
-
Filling the Pot: Fill the pot with soil, leaving 1-2 inches of space from the rim. This space will make watering easier and prevent soil from spilling out.
Planting Process
-
Arrange Plants: If planting multiple species, arrange them in the pot while they’re still in their nursery containers to visualize the final layout.
-
Planting Depth: Ensure plants are set at the right depth, generally at the soil level they were in their nursery pot. Avoid burying them too deeply or leaving roots exposed.
-
Watering: After placing the plants, water them thoroughly to help settle the soil around the roots and eliminate air pockets.
Final Touches
-
Surface Dressing: Add a layer of mulch on top of the soil to conserve moisture, reduce weed growth, and provide a finished look.
-
Placement: Position the patio pot in an area that matches the light requirements of your plants, whether full sun, partial shade, or full shade.
Additional Tips
-
Monitor water needs regularly. Potted plants usually require more frequent watering than garden plants due to faster evaporation.
-
Watch for signs of nutrient deficiency and apply appropriate fertilizers as needed. Reduce the risk of over-fertilizing by following package instructions closely.
-
Handle pest problems early. Common issues include aphids or spider mites, which can be managed with insecticidal soap or neem oil.
Having your patio pot properly prepared sets a strong foundation for a beautiful and healthy container garden. By following these steps and paying close attention to your plant’s needs throughout the growing season, you can maximize success and enjoy vibrant patio pot displays.
In conclusion, preparing a patio pot for planting is a rewarding process that enhances both the aesthetic and functional appeal of your outdoor space. By choosing the right pot size and material, selecting high-quality potting soil, and ensuring adequate drainage, you set a solid foundation for your plants to thrive. Remember to consider the specific needs of your plants, such as sunlight and water requirements, and to arrange them creatively with an eye for balance and contrast. Regular maintenance, including watering, fertilizing, and pruning, will keep your patio pot vibrant and healthy.
As you apply these tips, you’ll find that a well-prepared patio pot not only beautifies your outdoor area but also brings a sense of tranquility and accomplishment. As a final tip, consider adding a layer of mulch on top of the soil. This can help retain moisture, suppress weeds, and provide a tidy appearance. Embrace the process, experiment with different plant combinations, and enjoy the flourishing oasis you’ve created right at your doorstep.