Imagine stepping outside on a sunny morning, coffee in hand, and being greeted by the sight of your very own potato plants, their vibrant green leaves reaching for the sky. No sprawling backyard? No problem. Cultivating potatoes in a pot is the perfect solution for gardeners with limited space or those seeking the satisfaction of growing fresh produce right on their balcony or patio. As we increasingly turn towards sustainable living, this compact gardening method not only brings joy but also offers a steady supply of nutritious tubers, free from harmful chemicals. In this blog post, we’re going to peel back the layers (pun intended!) and walk you through each step of transforming a humble pot into a thriving potato patch. Whether you’re an apartment dweller craving a taste of the countryside or a gardening enthusiast eager to try something new, this guide is here to help you reap a bountiful harvest and enjoy the unparalleled flavor of homegrown potatoes. Let’s dig in!
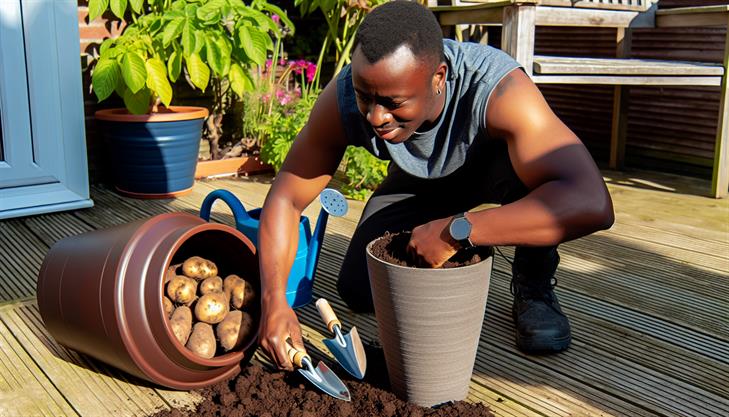
Choosing the Right Pot and Soil for Growing Potatoes
Growing potatoes in pots is an excellent way to bring fresh produce to your home, especially if space is limited. To successfully plant potatoes in a pot, follow these easy steps and be mindful of the common issues to ensure a healthy harvest.
Selecting the Right Pot:
-
Size and Material: Choose a pot that is at least 15-20 gallons in size. This allows ample room for root development. Ensure the pot has adequate drainage holes to prevent waterlogging, which can lead to rot.
-
Preferred Materials: Lightweight materials like plastic or fabric pots are ideal because they retain moisture and are easy to move. Consider a dark-colored pot, which absorbs heat and aids in quicker sprouting.
Choosing the Right Soil:
-
Nutrient-Rich Mixture: Use a high-quality potting mix rich in organic matter. Potatoes thrive in loose, well-draining soil to allow for expansion and nutrient absorption.
-
Boost with Fertilizer: A slow-release organic fertilizer mixed with the soil can provide continuous nutrients. Aim for a balanced N-P-K ratio to foster healthy growth.
Planting Instructions:
-
Seed Potatoes: Start with certified seed potatoes, which are disease-free. Cut them into smaller pieces, ensuring each has at least one ‘eye’ – a spot where a sprout will grow.
-
Pre-Sprout (Optional): Allow the cut pieces to sit for a day or two to ‘chit’ (sprout) in a cool, well-lit area before planting. This can speed up the growth process.
-
Initial Planting:
- Fill your pot with about 4-6 inches of your prepared soil mix.
- Place the seed potatoes on the soil surface, cut side down, and cover with an additional 3-4 inches of soil.
-
Watering: After planting, water the soil until it is moist but not soggy. Maintain a consistent watering schedule as potatoes require evenly moist soil throughout their growth.
-
Hilling Up: As the potato plants grow, keep adding soil to the pot to cover the new stems. Leave the top few leaves exposed. This process encourages more tubers to form.
Caring for Your Potato Plants:
- Sunlight: Position your pot in a location that receives at least 6-8 hours of sunlight daily.
- Pest Management: Keep an eye out for aphids or potato beetles, which can be managed with organic insecticides or by handpicking.
Common Issues and Tips:
- Overwatering: Avoid letting water stand in the pot’s saucer. Excess moisture can cause rot and disease.
- Pot Rotation: Rotate the pot periodically to promote even growth and prevent plants from leaning toward the sun.
- Temperature Fluctuations: If you’re growing in cooler climates, insulating the pot or placing it against a sunny wall can protect against cold spells.
By carefully selecting the right pot and soil, and following these planting instructions, you can enjoy a bountiful harvest of home-grown potatoes. Remember to monitor your plants regularly and adjust care as needed for the best results.
Preparing and Planting Seed Potatoes: A High-Quality Approach
Planting potatoes in a pot is a rewarding way to grow your own fresh produce, especially if you lack the garden space for traditional planting. This method is relatively simple and can yield a generous harvest with a few careful steps. Here’s a comprehensive guide to help you successfully plant potatoes in a pot.
1. Choosing the Right Pot
To start, select a pot with a minimum depth of 12 inches and a width of at least 15 inches. Ensure that the pot has several drainage holes to prevent waterlogging, which can lead to tuber rot. Potatoes require ample room to grow, so larger containers are beneficial for maximizing your yield.
2. Selecting Seed Potatoes
Opt for certified seed potatoes from a garden center to avoid diseases. Varieties like Yukon Gold, Red Pontiac, and Fingerlings are often recommended for container planting due to their manageable size and yield potential.
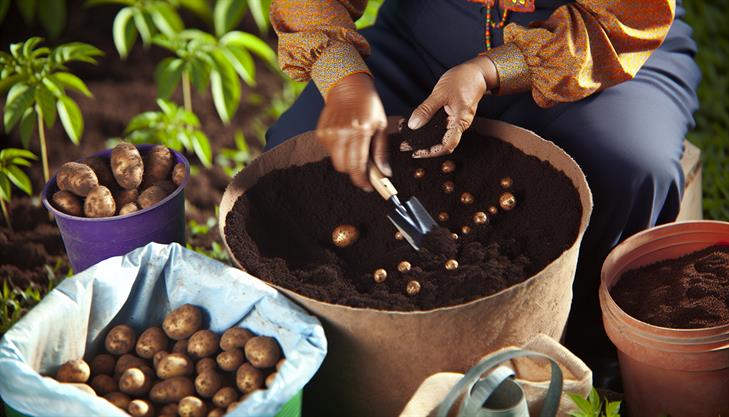
3. Preparing Seed Potatoes
Before planting, cut larger seed potatoes into pieces, making sure each piece has at least one ‘eye’ or budding spot. Let these cuts dry for a day or two in a cool, dark place to form a protective callous, reducing the risk of rot once planted.
4. Potting Mix Preparation
Fill the pot with about 4-6 inches of quality potting mix. A blend specifically formulated for container gardening is ideal. You can improve drainage by mixing in some coarse sand or perlite. Additionally, enriching the soil with organic matter like compost or well-rotted manure will boost nutrient content.
5. Planting the Potatoes
Place the prepared seed potato pieces, eyes facing up, on top of the soil layer in the pot. Space them evenly and cover them with another 4 inches of potting mix. Do not fill the pot to the top; you will add more soil as the plants grow.
6. Watering and Care
Water the pot thoroughly after planting, keeping the soil consistently moist but not waterlogged. Potatoes need adequate moisture for optimal growth. As shoots emerge and grow to about 6 inches, add more soil around the stems, leaving about half of the plant exposed. This process, known as “hilling,” encourages tuber formation.
7. Positioning and Sunlight
Place your pot in a location that receives at least 6-8 hours of direct sunlight daily. Potatoes thrive in sunny conditions, which helps in promoting healthy tuber development.
8. Monitoring Pests and Diseases
Regularly check for signs of pests such as aphids or potato beetles, and treat them with organic insecticides if necessary. Also, be mindful of diseases like late blight; ensuring good air circulation and avoiding overhead watering can mitigate these risks.
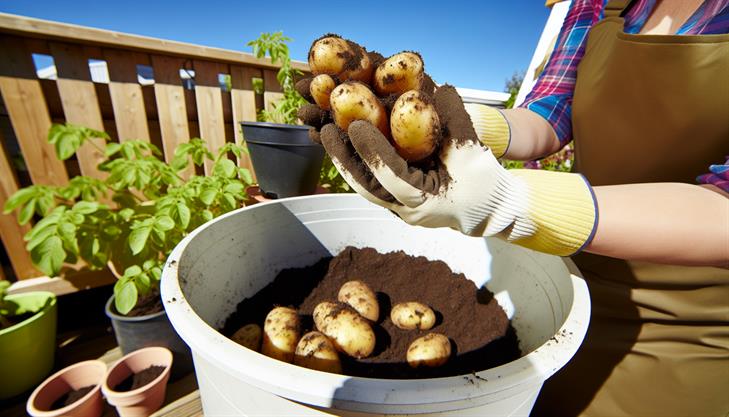
9. Harvesting Your Potatoes
Your potatoes will be ready to harvest approximately 10-12 weeks after planting, when the foliage begins to yellow and die back. Gently dig into the soil to reveal your crop. For new potatoes, harvest a bit earlier when plants are still green.
Common Issues and Tips
- Overwatering: Avoid waterlogged soil by ensuring proper pot drainage and a balanced watering schedule.
- Nutrient Deficiency: Use a balanced fertilizer every few weeks, following product instructions, to replenish soil nutrients.
- Container Size: The larger the pot, the more potatoes you can grow.
By following these steps on how to plant potatoes in a pot, you can enjoy a bountiful harvest even with limited space. This method is not only convenient but also allows gardeners to savor the taste of home-grown potatoes virtually anywhere.
Tips for Watering and Care to Maximize Growth
Planting potatoes in a pot is an excellent way to enjoy home-grown produce, even if you’re limited on space. Follow these easy steps to successfully grow potatoes in containers and maximize your yields.
Choose the Right Pot
Start by selecting a large, sturdy pot, ideally 10 gallons or more, to give your potatoes ample room to grow. Make sure the container has drainage holes to prevent waterlogging, which can lead to root rot. Grow bags, large buckets, or patio tubs are all suitable options.
Select Seed Potatoes
Use certified seed potatoes rather than store-bought potatoes, which may be treated with growth inhibitors. Choose a variety that suits your climate and preferences, whether it’s waxy potatoes for boiling or fluffy types for baking.
Prepare the Potting Mix
Potatoes thrive in well-draining soil. Create a mix using equal parts of quality potting soil and compost. You can also include a handful of bone meal to increase phosphorus levels, which supports root development.
Prepare and Plant Seed Potatoes
Before planting, cut your seed potatoes into pieces with at least one eye (a sprouted indent) each, and let them cure for a day or two. This process helps prevent rot. Plant your potato pieces by adding 4 inches of potting mix to the bottom of your container. Place the potato pieces, cut side down, spaced 6 inches apart, and cover them with approximately 4 inches of soil.
Watering the Potatoes
Watering is crucial when learning how to plant potatoes in a pot. Keep the soil consistently moist but not soggy. In dry climates, you may need to water more frequently. As the potato plants grow, you’ll notice they require more water, particularly when they bloom and start forming tubers.
Hilling for Growth
As the plants grow to about 6 inches, add more soil around the stems, leaving only the top few inches exposed. This process, known as hilling, encourages more tubers to develop upward. Repeat hilling until the soil reaches the top of the pot.
Monitor and Maintain
Keep the pot in a location that receives 6-8 hours of direct sunlight daily. If temperatures are extreme, consider moving the pot to a shaded area during peak heat or providing partial covering. Regularly check for pests such as aphids or potato beetles, and remove them promptly.
Troubleshooting Common Issues
- Overwatering: Ensure the pot has adequate drainage to prevent waterlogging, which can lead to rotting.
- Nutrient Deficiency: Yellowing leaves may indicate a lack of nutrients; supplement with a balanced organic fertilizer.
- Crowding: Avoid overcrowding by planting only a few pieces in each pot to allow enough space for growth.
Harvesting Your Potatoes
After flowering, your plants will begin to yellow and die back. This indicates that it’s time to harvest. Gently dig into the pot to retrieve your potatoes, taking care not to damage them. Once harvested, allow the potatoes to dry in a cool, dark place.
By following these steps for planting potatoes in a pot, you’ll be well on your way to enjoying fresh, home-grown potatoes at your dining table. Happy gardening!
Harvesting and Storing Your Potted Potatoes for Best Results
Planting potatoes in a pot is an excellent way to grow fresh produce at home, especially if you’re limited on garden space. Here’s a comprehensive guide to help you understand how to plant potatoes in a pot effectively, with tips and advice for achieving the best results.
1. Choose the Right Pot:
To begin, select a container that’s at least 14-18 inches deep and wide. Potatoes develop their tubers under the soil, so they need space to grow. Containers made from breathable materials, like fabric grow bags, plastic, or terracotta, can help with drainage and aeration.
2. Select Suitable Potato Varieties:
Opt for certified seed potatoes rather than grocery store potatoes, as they are specifically meant for planting and are less likely to carry diseases. Consider early, mid-season, or late varieties based on your growing conditions and harvesting timeline.
3. Prepare for Planting:
Fill the bottom third of your pot with quality potting soil mixed with compost for added nutrients. Your soil should be well-draining and rich in organic matter.
4. Planting Potatoes:
Cut large seed potatoes into smaller pieces, ensuring each piece has at least 1-2 eyes (sprouting points). Let them dry for a day to form a callous. Place the potato pieces cut-side down and eyes facing up. Cover them with about 4-6 inches of soil.
5. Watering and Light Requirements:
Potatoes need regular watering but avoid overwatering as it can lead to rot. Place your pot in a spot that receives full sunlight for 6-8 hours daily.
6. Managing Growth:
As the plant grows, and the sprouts reach about 6 inches tall, add more potting mix around the stems, covering half their height. This process, known as "hilling," encourages more tuber production. Continue this until the soil reaches the top of the pot.
7. Common Issues & Troubleshooting:
- Pests: Watch out for pests like potato beetles and aphids. Regular inspections can help you manage infestations early.
- Diseases: Ensure good drainage and avoid overwatering to prevent diseases such as blight and rot. Use disease-resistant varieties when possible.
- Leggy Plants: If your plants become leggy, they may not be receiving enough light. Move them to a sunnier location.
8. Harvesting:
When the foliage turns yellow and begins to die back, usually after about 10-12 weeks, your potatoes are ready to be harvested. Pull up the plant and sift through the soil to gather your potatoes.
9. Storing Fresh Potatoes:
Store your harvested potatoes in a cool, dark place to extend their shelf-life. Avoid washing them until you’re ready to use them since moisture can lead to premature spoilage.
By following these steps on how to plant potatoes in pots, you can enjoy a bountiful harvest even with limited gardening space. Maintain consistent care and attention, and you’ll be rewarded with fresh, homegrown potatoes.
Troubleshooting Common Issues in Pot Potato Gardening
Growing potatoes in a pot is a rewarding venture that allows even those with limited space to enjoy fresh, home-grown potatoes. Follow these step-by-step guidelines to successfully plant potatoes in a pot, and navigate potential issues with ease.
Choosing the Right Pot and Potatoes:
-
Select the Right Container: Start with a container that’s at least 15 inches in diameter and has a depth of at least 12 inches. Ensure it has adequate drainage holes to prevent waterlogging. Fabric pots or plastic containers work particularly well for potatoes.
-
Pick Seed Potatoes: Use certified disease-free seed potatoes from a reputable garden center. Avoid using potatoes from your pantry, as they may carry diseases.
Preparing the Potting Mix:
-
Prepare the Soil: Use a quality potting mix that is well-draining and rich in organic matter. A combination of potting soil and compost helps provide essential nutrients and improve drainage.
-
Add Fertilizer: Before planting, mix a slow-release organic fertilizer into the soil to support potato growth.
Planting Potatoes in a Pot:
-
Prepare Seed Potatoes: Cut your seed potatoes into pieces, ensuring each piece has at least one or two eyes (sprouts). Let the cut pieces dry for 1-2 days to form a protective callus over the cuts.
-
Plant the Seed Potatoes: Fill the pot with 4 inches of potting mix. Place the potato pieces cut-side down, ensuring they are 6-8 inches apart. Cover them with another 3-4 inches of soil.
-
Watering: After planting, water your potatoes thoroughly. Keep the soil consistently moist but not soggy, as over-watering can lead to rot.
Caring for Potato Plants:
-
Earthing Up: As your potato plants grow and reach about 6 inches in height, add more soil to cover most of the stems, leaving only the top leaves exposed. This process, known as “earthing up” or “hilling,” encourages more potatoes to form.
-
Sunlight and Maintenance: Position your pot in a sunny location where it gets at least 6-8 hours of sunlight daily. Keep an eye on foliage for signs of pest activity or disease and promptly address any issues. Mulching around plants can help retain moisture and keep weeds at bay.
Troubleshooting Common Issues:
-
Overwatering: This is a frequent issue in pot gardening. Ensure your container has sufficient drainage and adjust watering if the soil feels too wet.
-
Pests and Disease: Watch for signs of pests like aphids or potato beetles. Regularly check foliage and consider using organic insecticides if necessary. Ensure seed potatoes are certified disease-free to prevent blight or rot.
-
Nutritional Deficiency: If leaves turn yellow, your plants may require additional nutrients. Supplement with a balanced fertilizer or a compost tea for a nutrient boost.
Harvesting:
- When to Harvest: Potatoes are ready to harvest once the foliage turns yellow and begins to die back. Gently dig through the soil to collect your potatoes, taking care not to damage them.
By following these steps, you can maximize your yields and enjoy a successful potato harvest right from your potted garden. With patience and attentive care, planting potatoes in a pot can lead to a bountiful supply of tasty tubers all season long.
In conclusion, planting potatoes in a pot is a rewarding and accessible endeavor that even those with limited space can enjoy. By selecting the right variety of potatoes, ensuring proper drainage in your pot, and using nutrient-rich, well-draining soil, you set the foundation for a bountiful harvest. Remember to plant your seed potatoes at the right depth and provide them with consistent watering and ample sunlight to support healthy growth. As your potato plants thrive, take care to mound soil up as they grow and watch for signs of pests or disease to address them promptly.
By applying these practical steps and nurturing your plants with attention, you’ll soon enjoy the satisfaction of harvesting your very own home-grown potatoes. As a final tip, consider experimenting with different potato varieties and pot sizes to refine your skills and perhaps discover new favorites, adding variety and personal touch to your future gardening endeavors. Happy planting!