If you’re a houseplant enthusiast looking to expand your indoor jungle with minimal expense, propagating your arrowhead plant (Syngonium podophyllum) may be your next exciting venture. Known for its lush, arrow-shaped leaves and vibrant hues, the arrowhead plant is a delightful addition to any home. But did you know it’s also one of the easiest and most rewarding houseplants to propagate? Whether you’re a seasoned green thumb or a budding plant lover, mastering the art of propagation offers an opportunity to multiply your plant collection, hone your gardening skills, and even share the joy of greenery with friends and family. This blog post delves into the step-by-step process of arrowhead plant propagation, revealing tried-and-true methods that ensure healthy growth and thriving results. By the end, you’ll not only have a deeper appreciation for this versatile plant but also the confidence to create and nurture an array of its leafy beauties. Get ready to watch your indoor garden flourish like never before!
Understanding Arrowhead Plant Propagation Basics
Propagating an arrowhead plant, also known as Syngonium podophyllum, is a rewarding way to expand your collection or share your plants with friends. This process is relatively straightforward and ideally suited for both novice and seasoned gardeners alike. Here’s a step-by-step guide on how to propagate arrowhead plants successfully:
Step 1: Gathering Your Tools and Materials
Before starting the propagation process, ensure you have the necessary tools and materials. You’ll need a healthy parent arrowhead plant, sharp scissors or pruning shears, a small container, fresh water, and rooting hormone (optional).
Step 2: Selecting the Cutting
Choose a healthy stem from your arrowhead plant. Look for a stem that has at least one or two nodes, as these are essential for root growth. Nodes are the small bumps you’ll notice where the leaves meet the stem.
Step 3: Making the Cut
Using your sterilized scissors or pruning shears, cut a 4 to 6-inch section of the stem just below a node. Ensuring your tools are clean reduces the risk of infections that could harm the plant.
Step 4: Preparing the Cutting
Remove any leaves that are close to the base of your cutting, leaving one or two leaves at the top. If you have rooting hormone available, you can dip the cut end into it. This step is optional but can facilitate faster root growth.
Step 5: Rooting in Water
Fill a small container with fresh water and place the cutting in it, ensuring that the nodes are submerged. Change the water once a week to keep it free from bacteria and algae. Within a few weeks, you should start to see roots developing.
Step 6: Transferring to Soil
Once the roots are about 2 inches long, your cutting is ready to be transferred to a pot with soil. Use a well-draining potting mix, and be gentle as you plant the rooted cutting. Water it lightly to settle the soil around the new roots.
Common Issues and Tips
- Root Rot: Avoid letting the plant sit in water for too long after roots have developed; prolonged exposure can lead to root rot.
- Humidity Needs: Arrowhead plants thrive in humidity. If your environment is dry, consider placing your new plant in a pebble tray with water or use a humidifier.
- Light Requirements: Place your newly propagated plant in indirect light. Too much direct sunlight can scorch the leaves, while too little can impede growth.
Propagating arrowhead plants can be a simple yet fulfilling process when done correctly. By following these steps, you’re more likely to achieve success and enjoy the vibrant beauty these plants can bring to your home. Remember to monitor your new plant closely for any signs of distress and adjust its environment as needed.
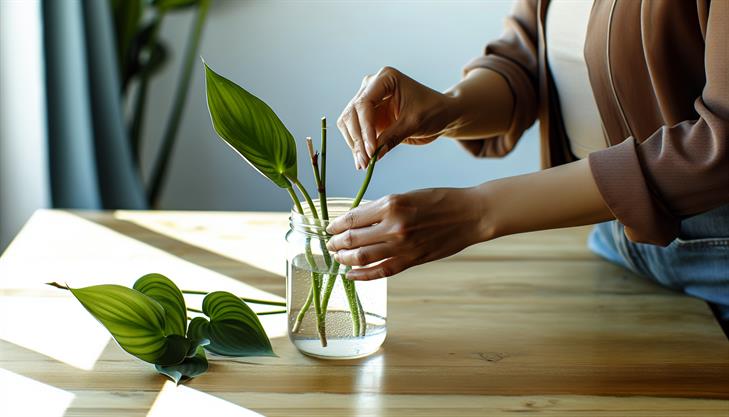
Step-by-Step Guide to Water Propagation
Propagating Arrowhead Plant (Syngonium podophyllum) through water propagation is an easy and fulfilling way to expand your indoor garden. Known for its attractive foliage and ease of care, the Arrowhead Plant can be propagated with just a few simple steps. Follow this step-by-step guide to successfully propagate an arrowhead plant:
Step 1: Gather Your Supplies
Before you begin, gather the tools you’ll need:
- A healthy Arrowhead Plant
- A clean, sharp pair of scissors or pruning shears
- A glass jar or container
- Fresh, room-temperature water
Step 2: Choose and Prepare Your Cutting
Select a healthy stem from the Arrowhead Plant, ideally one with several leaves and at least one node (the small bump where leaves emerge, as this is where roots will develop). Using your scissors, cut the stem at a 45-degree angle just below a node, trimming to roughly 4-6 inches in length.
Step 3: Remove Lower Leaves
Carefully remove any leaves from the bottom half of the cutting. This prevents them from sitting in water, which can cause rot.
Step 4: Submerge the Cutting
Fill your glass jar or container with clean, room-temperature water. Place the cutting into the water, ensuring that at least one node is submerged. Position the jar in a well-lit area, away from direct sunlight, to avoid overheating the plant.
Step 5: Monitor and Change Water Regularly
Check the water every few days, topping it up if necessary. It’s crucial to keep the water clean, so change it weekly to prevent bacterial growth which can hinder root development.
Step 6: Wait for Roots to Develop
Within 2-4 weeks, you should see roots emerging from the nodes on the stem. Once these roots are at least an inch long, the cutting is ready to be transplanted into soil.
Step 7: Transition to Soil
Prepare a pot with good-quality potting mix. Make a small hole in the soil with your finger. Carefully place the rooted cutting into the hole, covering the roots with soil, and gently pat it down to secure the plant. Water the newly potted plant thoroughly and continue to care for it as you would a mature Arrowhead Plant.
Troubleshooting and Tips
- Yellowing Leaves: If your cutting shows signs of yellowing leaves, it may be due to insufficient light or poor water quality. Adjust the light conditions and ensure you’re using fresh, clean water.
- Fungal Growth: If you notice any mold or unpleasant odor, it might be due to stagnant water. Promptly change the water and clean the container.
- Best Location: Optimal lighting falls under bright, indirect light. Direct sunlight can scorch the leaves as they are sensitive to intense light.
Using this method not only enhances your gardening skills but also adds a personal touch to your home decor with vibrant, lush green Arrowhead Plants.
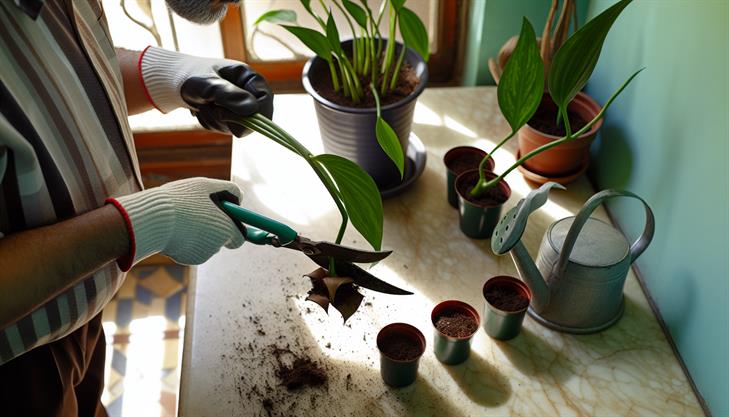
Soil Propagation Tips for Arrowhead Plants
Propagating an arrowhead plant (Syngonium podophyllum) can be a rewarding and straightforward process if done with the right techniques. This guide will provide you with easy-to-follow steps and helpful tips to ensure successful soil propagation, a popular method for these versatile houseplants.
Step-by-Step Guide to Propagating Arrowhead Plants in Soil
Step 1: Selecting the Right Time
The ideal time to propagate arrowhead plants is during their active growing season, usually in spring or early summer. This is when the plant is most vigorous and can recover quickly from cuttings.
Step 2: Preparing Your Tools and Materials
Gather the necessary tools and materials:
- A clean, sharp knife or pruning shears
- A small pot with drainage holes
- Well-draining potting mix (a mix of peat moss, perlite, and vermiculite works well)
- A plastic bag or humidity dome (optional)
Step 3: Taking the Cutting
Choose a healthy part of the plant with at least one node—these are small bumps where leaves meet the stem and roots will form. Cut a section of the stem below the node, ensuring the cutting is 4-6 inches long with a few leaves attached.
Step 4: Preparing the Cutting
Remove the lower leaves to expose the node. This part of the cutting will be planted in the soil, allowing for root development. If desired, you can dip the cut end in rooting hormone to encourage faster rooting, though it’s not essential.
Step 5: Planting the Cutting
Fill the pot with the well-draining potting mix, leaving about an inch from the top. Make a hole in the soil with your finger or a pencil and gently place the cutting in, ensuring the node is covered. Firmly press the soil around the cutting to hold it in place.
Step 6: Providing the Right Conditions
Place the pot in a warm area with bright, indirect sunlight. The cutting should be kept at a temperature between 65-75°F (18-24°C). Maintain high humidity by covering the pot with a plastic bag or using a humidity dome, which helps prevent excessive moisture loss.
Step 7: Watering and Care
Water the cutting lightly to keep the soil moist but not soggy. Overwatering can lead to rot, a common issue. Check the soil regularly and water when it feels dry to the touch. After a few weeks, you should start seeing new growth, indicating successful propagation.
Common Issues and Troubleshooting
- Yellowing Leaves: This may occur due to overwatering. Ensure your pot has good drainage and never let the cutting sit in water.
- Mold or Rot: High humidity and poor ventilation can lead to mold. Ensure good air circulation and remove any coverings if mold develops.
- No Root Development: Be patient; some cuttings can take longer to root. Double-check that the node is properly buried in the soil and that environmental conditions are suitable.
Additional Tips
- Multiple Cuttings: Increase your chances of success by propagating several cuttings at once. This provides a better opportunity for some cuttings to take root if others fail.
- Regular Monitoring: Check the cuttings regularly and remove any parts that show signs of decay or disease.
- Support Growth: Once propagated, consider moving the plant to a larger pot as it grows to support its development and prevent root-bound conditions.
By following these guidelines, you’ll proficiently propagate arrowhead plants and enjoy the beauty of thriving new plants in your home or garden.
Post-Propagation Care for Healthy Growth
Propagating an Arrowhead plant (Syngonium podophyllum) is a gratifying and straightforward process that allows you to expand your indoor plant collection effortlessly. This popular houseplant, known for its arrow-shaped leaves and vining growth habit, can be propagated using stem cuttings. Here’s a comprehensive guide to help you through the process.
Step-by-Step Guide to Propagate Arrowhead Plant:
1. Choose the Right Time
The ideal time for propagating your Arrowhead plant is during the growing season, typically spring or early summer. During this period, the plant is more vigorous and capable of developing roots quickly.
2. Select a Healthy Stem
Look for a healthy stem with at least 2-3 leaves. A stem with visible nodes (the area where leaves meet the stem) is particularly important as this is where roots will develop.
3. Cut the Stem
Using a sterilized pair of scissors or pruners, cut a segment of the stem just below a node. Ensure the cutting is about 4-6 inches long. Sterilization helps prevent the spread of diseases.
4. Remove Lower Leaves
Gently remove the leaves from the lower part of the cutting to prevent them from sitting in water and rotting. Leave at least one or two leaves at the top intact.
5. Place in Water or Soil
You have two options: water propagation or soil propagation.
-
Water Propagation: Place the cutting in a glass of water, ensuring the nodes are submerged. Change the water every week to prevent bacterial growth. Roots should begin to appear within 1-2 weeks.
-
Soil Propagation: Dip the cut end of the stem into rooting hormone (optional, but aids root development) and plant it in a pot filled with a well-draining potting mix. Water lightly and cover with a plastic bag to maintain humidity, but ensure it’s ventilated to prevent mold.
6. Provide Proper Conditions
Place the cutting in a warm, bright area but out of direct sunlight to avoid leaf scorch. A temperature between 65-75°F (18-24°C) is ideal.
7. Transplanting
Once the roots are about 2 inches long in water, or if you notice new growth in soil, it’s time to transplant the Arrowhead plant to a pot with fresh soil. Ensure it is large enough to accommodate the growing roots but not so large that it retains too much moisture.
Common Issues and Tips
- Root Rot: Overwatering is a common issue, especially in soil propagation. Ensure the pot has good drainage holes and water only when the top inch of soil feels dry.
- Leaf Yellowing: This can occur if the cuttings receive too much direct sunlight or inadequate watering. Adjust care accordingly.
- Humidity: Arrowhead plants appreciate humidity; consider misting the plant occasionally, especially if the air in your home is dry.
Additional Advice
- Patience is Key: Some cuttings may take longer to root than others, so be patient and resist the urge to disturb the growing roots.
- Label Your Cuttings: If propagating multiple plants at once, consider labeling them to avoid confusion.
By following these steps and tips, you’ll be well on your way to successfully propagating and fostering healthy growth for your Arrowhead plants, ensuring a lush and thriving indoor plant display.

Troubleshooting Common Propagation Issues
Propagating an arrowhead plant (Syngonium podophyllum) can be a rewarding experience for both beginner and experienced gardeners. This versatile houseplant is renowned for its easy propagation, and following a few straightforward steps will ensure success.
Step-by-Step Guide to Propagate an Arrowhead Plant
1. Choosing the Right Time
The best time to propagate arrowhead plants is during the growing season, typically in spring or early summer. This ensures the plant is actively growing and can recover quickly from the cuttings.
2. Gather Necessary Tools
For a smooth propagation process, gather the following:
- A sharp, sterilized pair of scissors or pruning shears
- A glass of water or a small pot with fresh potting soil
- Optional: a rooting hormone for encouraging faster root development
3. Selecting a Healthy Cutting
Look for a healthy stem with at least two to three nodes and a few leaves. Nodes are the points on the stem where leaves grow and are crucial for root formation. Cut the stem about 1/4 inch below a node.
4. Preparing the Cutting
If you’re planning to use rooting hormone, dip the cut end of the stem into it to promote root growth.
5. Rooting Method
Water Propagation:
- Submerge the node end of the cutting in a glass of water.
- Place the glass in a bright, indirect light location.
- Refresh the water every few days to keep it clean and oxygenated.
Soil Propagation:
- Insert the cutting into a pot filled with well-draining potting mix.
- Water the soil lightly, maintaining it moist but not soggy.
- Place the pot in an area with bright, indirect light.
6. Monitoring the Progress
For either method, check for root development in about 2-3 weeks. If propagating in water, roots should be a few inches long before planting into soil. For soil propagation, gently tug the cutting to feel for resistance, indicating root formation.
Common Propagation Issues and Tips
- Yellowing Leaves: This can indicate overwatering or insufficient light. Ensure your cuttings receive proper lighting and adjust watering as needed.
- Failure to Root: If roots aren’t forming, check the health of the original cutting. Try using a rooting hormone to encourage growth next time.
- Fungus or Rot: Ensure all tools are sterilized to prevent infection. In soil propagation, use a well-draining mix to avoid rot.
Additional Advice for Successful Propagation
- Maintain a humid environment to encourage growth. This can be achieved by placing a clear plastic bag over the pot or glass.
- Be patient. Propagation can take several weeks; each plant’s growth rate varies.
- Multiple cuttings can be propagated simultaneously to increase the likelihood of success.
By following these steps, learning how to propagate an arrowhead plant becomes manageable, leading to thriving new plants that can be shared with friends or added to your indoor garden collection.
In conclusion, propagating an arrowhead plant is a rewarding and straightforward process that can enhance your indoor garden with minimal effort. By following the outlined steps – selecting a healthy mother plant, choosing the right propagation method (whether water, soil, or division), and providing proper care for the new cuttings or divisions – you can successfully grow new plants and expand your green oasis. Remember to be patient and attentive as your new plants develop, ensuring they receive adequate light and moisture to thrive.
We encourage you to apply these guidelines and experiment with propagating your own arrowhead plants, enriching your home with lush, vibrant greenery. As a final tip, consider keeping a propagation journal to note what methods work best for you and your plant’s specific conditions. This can help refine your technique and achieve even better results with future plant propagation projects. Happy planting!