
Do you adore the elegant, architectural beauty of sansevieria, also known as snake plant, and wish to fill your home with more of these low-maintenance wonders without stretching your wallet? You’re in the right place! Propagating sansevieria is not only a rewarding process but an economical way to multiply your plant collection effortlessly. In a world where green thumbs are being hailed as icons of sustainability and interior style, mastering the art of propagation is a skill worth acquiring. This guide delves into the fascinating realm of sansevieria propagation, offering step-by-step insights and expert tips that will empower you to nurture new life from your existing plants. Whether you’re a seasoned plant enthusiast or just starting your indoor garden journey, this blog post will equip you with all the knowledge you need to successfully propagate sansevieria, allowing you to enjoy lush, vibrant greenery throughout your space. Prepare to transform your home into a verdant sanctuary with ease!
Understanding Sansevieria: An Overview of the Basics
Sansevieria, commonly known as snake plant, is a resilient and visually appealing houseplant that has gained popularity among plant enthusiasts. One of its attractive features is its ability to be easily propagated, allowing you to expand your collection or share with others. Here’s a detailed guide on how to propagate sansevieria, including step-by-step instructions and helpful tips for a successful propagation process.
Methods of Propagation
Sansevieria can be propagated through leaf cuttings, division, and occasionally even rhizome cuttings. Each method has its own advantages, depending on your resources and preferences.
1. Leaf Cuttings
This method is the simplest and most popular.
Materials Needed:
- A healthy sansevieria leaf
- Sharp, sterile scissors or a knife
- A well-draining potting mix
- A pot or container
Steps:
-
Select a Leaf: Choose a mature and healthy leaf from the parent plant. It should be at least 4-6 inches long.
-
Cut the Leaf: Use sterile scissors or a knife to cut the leaf close to the base. Then, divide the leaf into smaller sections, each about 2-3 inches long. Ensure you keep track of the original base orientation to plant it correctly, as reversing it will hinder growth.
-
Dry the Cuttings: Leave the cuttings for a couple of days in a dry, warm area. This allows the cut ends to callus over, reducing the risk of rot when planted.
-
Plant the Cuttings: Once the ends have callused, plant them upright in a pot filled with a well-draining potting mix. Insert about one-third of the cutting into the soil.
-
Water Sparingly: Water the cuttings lightly and place the pot in a location with indirect sunlight. Avoid overwatering as this can lead to rot.
-
Wait for Roots: It typically takes several weeks to a couple of months for the cuttings to develop roots. Be patient and check for resistance when gently tugging the cuttings to confirm root development.
2. Division
If your plant has become large and has multiple rosettes, division is an efficient method.
Materials Needed:
- A parent sansevieria plant
- A sharp, sterile knife
- Pots with a good drainage system
Steps:
-
Remove from Pot: Carefully take the entire plant out of its pot and brush away excess soil to expose the roots and rhizomes.
-
Separate the Plant: Examine the plant and identify natural divisions or offshoots with both roots and leaves. Use a sharp knife to cut these sections away from the main plant.
-
Replant the Divisions: Plant each division in a pot with fresh potting mix. Make sure each has enough space to grow.
-
Initial Watering: Water the newly potted plants sparingly and position them in indirect light.
Common Issues and Tips
- Rot: Overwatering is the most common problem during propagation. Always allow the soil to dry out between waterings.
- Pest Prevention: Sansevieria is generally pest resistant, but inspect regularly to catch any unexpected infestations early.
- Light Requirements: While these plants can tolerate low light, bright, indirect light accelerates growth during propagation.
By following these steps and tips, you can successfully propagate sansevieria and enjoy the satisfaction of growing new plants from existing ones. Whether you’re a beginner or a seasoned gardener, this rewarding process is an enriching way to expand your green space.
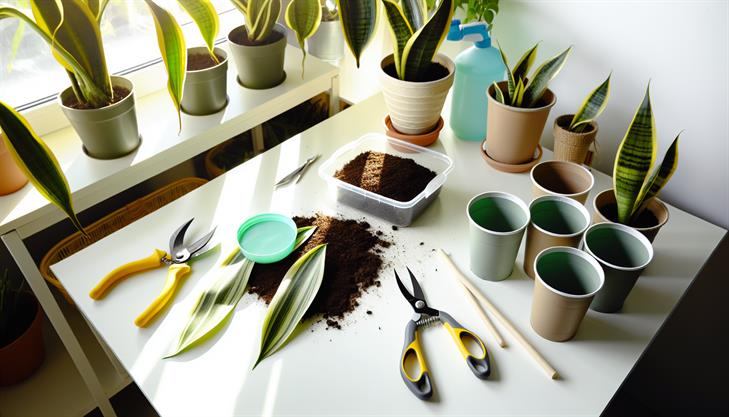
Essential Tools and Supplies for Propagating Sansevieria
Propagating sansevieria, commonly known as snake plant, can be a rewarding process that allows you to expand your plant collection effortlessly. Whether you’re a seasoned gardener or a beginner, understanding how to propagate sansevieria using the right tools and supplies is key to ensuring success. Here’s a comprehensive guide on how to propagate snake plant effectively.
Tools and Supplies Needed
Before diving into the propagation process, gather the following essential tools and supplies:
- Sharp Sterile Knife or Scissors: Necessary for clean cuts to avoid damaging the plant or introducing diseases.
- Potting Soil: Well-draining potting mix is crucial as it mimics the plant’s natural environment.
- Small Pots or Containers: Ensure they have drainage holes to prevent waterlogging.
- Rooting Hormone (Optional): Helps encourage faster root development.
- Watering Can or Spray Bottle: For gentle watering during the early stages.
- Clean Cloth or Paper Towel: To dry the cuttings before planting.
Step-by-Step Guide to Propagate Sansevieria
1. Choosing the Right Leaves
Select healthy, mature leaves from your sansevieria plant. Look for firm, dark green leaves as they tend to root more successfully.
2. Cut the Leaves
Use the sharp, sterile knife or scissors to cut the chosen leaves near the base. Make sure the cut is clean and straight to reduce the risk of infection.
3. Prepare the Cuttings
Divide the leaf into sections about 2-3 inches long. Remember to note the orientation of each section as it’s crucial they are planted in soil the same direction they grew naturally.
4. Dry the Cuttings
Allow the cut leaf sections to dry for 1-2 days. Place them on a clean cloth or paper towel in a dry, shaded area. This step is essential to let the cut ends callous, preventing rotting when planted.
5. Optional Rooting Hormone Application
If you’re using rooting hormone, dip the cut end of each section into the hormone powder just before planting. Though optional, it may speed up the rooting process.
6. Planting the Cuttings
Fill your pots with well-draining potting soil and make a small hole for each cutting. Insert the cuttings upright, ensuring the orientation is correct. Gently firm the soil around the cuttings.
7. Watering
Lightly water the cuttings, but ensure the soil remains just damp — not soaked. Overwatering can lead to rot, a common issue when propagating sansevieria.
8. Placement
Place the pots in a warm, indirect light location. Avoid direct sunlight until the cuttings are well established, as it can desiccate the young plants.
Common Issues and Additional Tips
-
Overwatering: A critical problem in propagating snake plants. Only water when the top inch of soil feels dry.
-
Infection Risk: Ensure all tools are sterile to prevent introducing pathogens.
-
Growth Patience: Sansevieria are slow to root, so patience is necessary. Roots and new shoots may take several weeks to appear.
Final Thoughts
By following these steps and using the proper tools and supplies, you can successfully propagate sansevieria. With careful attention to watering and placement, you’ll soon enjoy your thriving new sansevieria plants. Remember, patience is key, but the reward of a lush indoor plant collection makes the wait worthwhile.
Step-by-Step Guide to Propagating Sansevieria Using Leaf Cuttings
Propagating Sansevieria, also known as Snake Plant or Mother-in-Law’s Tongue, using leaf cuttings is a straightforward process that even beginner gardeners can successfully undertake. Below is a comprehensive, step-by-step guide on how to propagate Sansevieria using leaf cuttings to help you cultivate these sturdy and attractive plants:
Step 1: Choosing the Right Leaf
Begin by selecting a healthy, mature leaf from your existing Sansevieria plant. Look for leaves that are firm, free of disease or damage, and preferably longer than 12 inches. Using sanitized scissors or a sharp knife, carefully cut the leaf at the base.
Step 2: Cutting the Leaf
Once you’ve harvested a leaf or leaves, it’s time to cut them into sections. Each section can develop into a new plant. Cut the leaf horizontally into segments about 3-4 inches long. It’s important to remember which side was closest to the root. For best results, make a small notch or mark the bottom end of each segment to ensure correct orientation when planting.
Step 3: Allowing for Callusing
After cutting, place the leaf sections in a dry, shaded area to allow the cut edges to callus over. This helps prevent rot when the cuttings are later planted. Leave the segments for at least 24-48 hours until the ends have formed a hardened, protective layer.
Step 4: Planting the Cuttings
Prepare a well-draining potting mix — a cactus or succulent mix is ideal for Sansevieria. Fill small pots (about 4-6 inches in diameter) with the mix, ensuring they have drainage holes. Insert the callused ends of the leaf segments into the soil, with about one-third to half of each segment buried. Be sure the marked end is planted downward.
Step 5: Watering and Care
Water the cuttings lightly, being careful not to overwater, as too much moisture can lead to root rot. It’s essential that you allow the soil to dry out between waterings. Position the pots in a warm, bright area, but avoid direct sunlight as it can scorch the leaves. An east or west-facing window is often ideal for providing indirect light.
Step 6: Observing Root Development
Roots usually start to form within four to eight weeks. You can check progress after this period by gently tugging on the cutting — if you feel resistance, roots have likely developed. At this stage, you might also notice small offshoots starting to grow, which confirms successful root development.
Common Issues and Tips
- Rotting Cuttings: To avoid rot, ensure proper drainage and avoid watering excessively.
- Improper Orientation: Planting the top of the leaf in the soil will hinder growth, so mark the segments to prevent this.
- Patience is Key: Sansevieria cuttings take time to root, so be patient and maintain consistent care without disturbance.
Additional Advice
Propagating Sansevieria using leaf cuttings is an excellent way to increase your plant collection without purchasing new ones. It’s also cost-effective and provides the satisfaction of growing new plants from existing ones. This propagation method doesn’t produce the variegated patterns found in some Sansevieria cultivars, as they tend to revert to the original green form. Therefore, if maintaining variegation is important, consider propagating by dividing the plant instead.
By following this step-by-step guide on how to propagate Sansevieria, you will be well on your way to creating a thriving collection of these nearly indestructible houseplants. Enjoy the process and the beauty that these resilient plants bring to your home or garden.
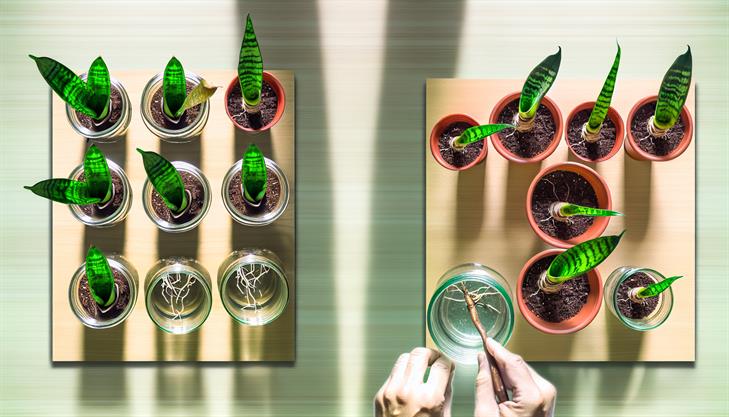
Tips for Propagating Sansevieria in Water vs. Soil
Propagating Sansevieria, commonly known as snake plants, is a rewarding process that provides an easy way to multiply your plants, whether you’re a beginner or seasoned gardener. Sansevieria can be propagated in two primary ways: in water or soil. Both methods are effective but offer slightly different experiences and results. Let’s delve into the step-by-step processes for each method and explore some tips to ensure a successful propagation.
Propagation in Water
Step 1: Select and Prepare the Leaves
- Choose a healthy leaf from the parent plant. Opt for a leaf that is mature, yet free from any blemishes or damage.
- Using a clean and sharp knife or scissors, cut the leaf at the base. For optimal results, make the cut at a 45-degree angle to maximize the surface area for root growth.
Step 2: Root in Water
- Fill a glass container with room temperature, distilled water. This helps avoid contaminants that might be present in tap water.
- Submerge the cut end of the leaf in water, ensuring that only the cut surface is submerged to prevent rot.
- Place the glass in a sunny spot, but avoid direct sunlight which can overheat the cutting.
Step 3: Maintenance
- Change the water every week to keep it fresh and oxygenated.
- Be patient, as root development can take several weeks. You will notice small roots beginning to form from the submerged section.
Common Issues:
- Rotting: Ensure only the cut end is submerged and change the water if it becomes murky to prevent rotting.
Propagation in Soil
Step 1: Cut the Leaf
- As with water propagation, select a healthy leaf and make a clean cut with a sharp knife.
- For soil propagation, it’s beneficial to allow the cut end to callous over for a day or two. This prevents rot when planted.
Step 2: Planting in Soil
- Choose a well-draining potting mix, preferably cactus or succulent soil, to accommodate Sansevieria’s low-water needs.
- Insert the cut end of each leaf into the soil, burying it about 1-2 inches deep.
- Water lightly, ensuring the soil is moist but not soggy.
Step 3: Care and Monitoring
- Place the pot in indirect sunlight. Direct sun can be too harsh for new propagations.
- Water sparingly to prevent over-moisturizing, which can lead to rot.
- Roots should develop over the next month or two.
Common Issues:
- Overwatering: Sansevieria leaves are prone to rot if overly saturated. Adjust watering frequency based on the environment and soil moisture.
Additional Tips
- Label Each Cutting: Particularly when propagating multiple cuttings, labeling can help track each plant’s progress and health.
- Temperature: Keep the propagated cuttings in a warm environment, ideally between 70-90°F, to encourage faster growth.
- Pests: Regularly inspect cuttings for signs of pests such as mealybugs and spider mites, which can hinder growth.
By following these methods, you can successfully propagate your Sansevieria plants, whether you choose water or soil. Both techniques have their own charm and learning curve, and exploring each can expand your gardening skills while multiplying your beloved snake plants. Whichever method you choose, remember that patience is key, as these hardy plants will reward your efforts with robust new growth.
Troubleshooting Common Problems in Sansevieria Propagation
Propagating Sansevieria, commonly known as snake plant, is a rewarding process that allows you to multiply your plants easily. Whether you’re using leaf cuttings or dividing the roots, it’s a relatively straightforward process that can be achieved with a bit of patience and care. Below are step-by-step instructions to guide you through each method, along with tips to troubleshoot common problems.
Leaf Cutting Method
-
Select a Healthy Leaf: Choose a mature, healthy leaf from your sansevieria plant. Avoid using young or wilted leaves as these might not root well.
-
Cut the Leaf: Using a clean, sharp knife or scissors, cut the leaf close to the base of the plant. It’s recommended to cut the leaf into sections of about 3-4 inches in length, remembering the orientation as cuttings planted upside-down will not root.
-
Allow Cuttings to Callus: Lay the leaf sections flat on a paper towel or newspaper in a dry place away from direct sunlight for 1-2 days. This allows the edges to callus over, reducing the risk of rot once they are planted.
-
Plant the Cuttings: Prepare a pot with well-draining potting mix. Insert the callused end of each section upright into the soil, making sure it’s at least half an inch deep. Water the soil lightly and ensure it remains slightly moist, not soggy.
-
Provide Appropriate Conditions: Place the pot in a warm, bright area with indirect sunlight. Consistent warmth helps promote root growth, which can take several weeks.
Division Method
-
Remove the Plant from the Pot: Carefully pull the sansevieria plant out of its pot. If the plant is large, you may need to gently tap the sides or squeeze the pot to loosen it.
-
Divide the Root System: Inspect the root system to identify natural divisions or offshoots. Using a clean knife, cut through the rhizome (root structure) to separate these sections. Ensure each section has a sufficient root system and at least one leaf.
-
Replant the Divisions: Place each new section into its pot filled with a fresh mix. Plant them at the same depth they were growing initially.
-
Post-Planting Care: Water the newly potted plants thoroughly but allow them to dry out between waterings. Position them in a warm area with indirect sunlight.
Troubleshooting Common Problems
-
Rotting Leaf Cuttings: One of the most common issues is leaf rot, often due to overwatering. Ensure your soil is well-draining and you’re allowing the cut ends to callus fully before planting.
-
Slow Root Development: Environmental factors such as insufficient light or too low temperatures can slow down root development. Providing bottom heat with a heating mat can enhance growth.
-
Cuttings Not Rooting: If you find that cuttings are not rooting, ensure they’re planted in the correct orientation. Also, check that the soil remains evenly moist but not waterlogged.
Additional Tips
-
Sterilize Tools: To prevent infection or disease, always sterilize your cutting tools before and after use.
-
Ideal Conditions: Snake plants thrive in temperatures between 60-85°F (15-29°C). Humidity levels should be moderate, as overly humid environments can encourage rot.
-
Be Patient: Propagating snake plants takes time. Depending on the method used, it can take several weeks to see new growth or root development.
By following these guidelines and addressing common problems, you’ll be well-equipped to propagate sansevieria successfully. Whether you’re looking to expand your collection or share plants with friends, these methods provide a simple way to achieve that.
In conclusion, propagating sansevieria is a rewarding and straightforward process that can enhance your plant collection and share the joy of these resilient beauties with others. By understanding and implementing the different propagation techniques—whether through leaf cuttings, division, or rhizome separation—you can easily multiply your snake plants. Remember to provide the right conditions, including well-draining soil, indirect light, and minimal watering, to ensure the successful growth of your propagated plants.
Now that you’re equipped with these insights, don’t hesitate to roll up your sleeves and give propagation a try. By doing so, you can not only expand your indoor garden but also contribute to the sustainability of plant care.
As a final tip, consider labeling your newly propagated sansevieria with the date of propagation. This will help you track their growth journey and make any necessary adjustments to their care regime over time. Happy propagating!