
Imagine transforming your indoor space into a verdant oasis, where walls come alive with cascading greenery and natural beauty. One of the most striking ways to achieve this lush aesthetic is by mounting a staghorn fern – a plant that is as intriguing as it is visually stunning. With fronds that bear an uncanny resemblance to a stag’s antlers, the staghorn fern is a conversation starter and a testament to the artistry of nature itself.
But while these exotic epiphytes may look like delicate works of art, they are astonishingly hardy and adaptable, making them the perfect houseplant for those looking to add a unique touch to their indoor décor. However, the true magic lies in how you mount these ferns, turning a simple wall into a vertical canvas of green. Whether you’re a seasoned plant enthusiast or a budding gardener curious about expanding your home garden’s horizons, learning the art of mounting a staghorn fern is an invaluable skill.
In this comprehensive guide, we’ll walk you through the process step-by-step, ensuring even novices can achieve professional-looking results. Discover the tools you’ll need, the best mounting techniques, and insider tips to keep your staghorn thriving for years to come. Prepare to breathe new life into your home as you master the captivating world of staghorn ferns and elevate your interior design to a whole new level. Let’s get started on this botanical journey!
Getting Started: Understanding Staghorn Ferns
Mounting a staghorn fern can be a rewarding gardening endeavor, offering a unique and natural piece of art for your home or garden. Staghorn ferns, known for their distinctive antler-like fronds, are epiphytic plants, which means they grow naturally on other surfaces rather than in soil. Here’s a step-by-step guide on how to mount a staghorn fern, ensuring your plant thrives and becomes a stunning focal point.
Step 1: Gather Your Materials
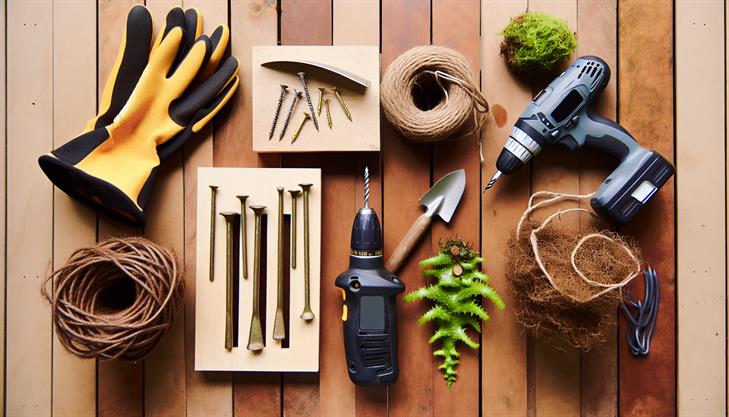
To successfully mount a staghorn fern, you’ll need the following materials:
- A healthy staghorn fern
- A wooden board, log, or plaque (cedar, oak, or pine work well)
- Sphagnum moss
- Fishing line or nylon string
- A hammer and a few nails
- Optional: Wire hanger or mounting hardware for wall hanging
Step 2: Prepare the Mount
Start by selecting a wooden surface that is large enough to accommodate the root ball of your staghorn fern. If using a board, ensure it has pre-drilled holes or attach hardware that will allow you to hang it on a wall later. This foundation will serve as the base where the fern will attach and grow.
Step 3: Soak the Sphagnum Moss
Before mounting your staghorn fern, soak a generous amount of sphagnum moss in water. This moss will provide essential moisture and nutrients to the plant. Wring out the excess water from the moss after soaking. The damp moss will also help in forming a soft cushion under the fern’s roots.
Step 4: Position the Fern
Take the soaked sphagnum moss and form it into a mound on your wooden board. Place your staghorn fern on top of the moss, ensuring the base of the plant is seated securely against the mound. It’s important that the fern’s shield fronds (the brown, disc-like leaves at the base) are facing outward, as these will help anchor the plant over time.
Step 5: Secure the Fern
Using your fishing line or nylon string, begin wrapping it around the mount, the moss, and the fern. Secure the string by tying it at the back of the board. Make sure the string is tight enough to hold the fern securely in place but not too tight that it damages the plant. Nails can be lightly hammered on the edges of the board to give the string something to grip if needed.
Step 6: Hang Your Fern
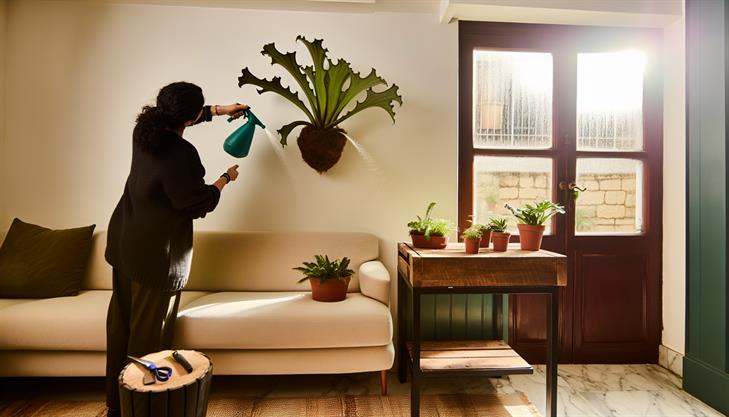
Once your staghorn fern is secure, find an ideal location to hang your mounted fern. It should be positioned in a place that emulates its natural habitat: bright, indirect sunlight is best. You can either install a hook on a sturdy wall or attach a wire hanger to the back of the board for easy hanging.
Step 7: Care and Maintenance
A mounted staghorn fern requires consistent care. Mist the fern with water or soak the mount weekly, ensuring it stays adequately moist, but not soaked, to prevent root rot. Fertilize monthly with a balanced liquid fertilizer during the growing season to encourage healthy growth.
Common Issues and Tips
- Air Circulation: Staghorn ferns thrive with good air circulation. Avoid placing them in enclosed spaces that might trap moisture and encourage mold.
- Overwatering: Be cautious of overwatering; the plant should feel dry to the touch before re-moistening.
- Position Adjustments: If brown spots appear, it may be receiving too much direct sunlight; adjust its position as needed.
By following these steps on how to mount a staghorn fern, you can enjoy a strikingly beautiful plant that serves as a natural statement piece. Keep these tips in mind to provide optimal conditions and help your staghorn fern flourish.
Essential Tools and Materials for Mounting a Staghorn Fern
Mounting a staghorn fern is a rewarding project that enhances the aesthetic appeal of any indoor or outdoor space. This guide will explore the essential tools and materials you’ll need and provide step-by-step instructions on how to mount a staghorn fern effectively.
Essential Tools and Materials
Before you begin, gather the following tools and materials:
- Staghorn Fern: Choose a healthy fern with vibrant, undamaged leaves.
- Mounting Board: Common options include wooden boards, plaques, or bark slabs. Ensure it is sturdy and appropriately sized for the fern.
- Sphagnum Moss: Acts as a base to retain moisture for the fern’s roots.
- Fishing Line or Floral Wire: Used for securely attaching the fern to the mount.
- Nails or U-hooks: These will anchor the fishing line or wire to the board.
- Hammer (if using nails) or Screwdriver (if using U-hooks)
- Scissors: For cutting the fishing line or wire and trimming excess materials.
Step-by-Step Instructions
-
Prepare the Mounting Board:
- Start by selecting a board made from a material that can withstand moisture, such as cedar or oak. Drill small holes or attach U-hooks around the center where the fern will be placed. This will make it easier to wrap and secure the fern.
-
Pre-Soak the Sphagnum Moss:
- Immerse the sphagnum moss in water until it becomes fully hydrated. Squeeze out the excess water, leaving it damp but not dripping. This moisture will help keep the fern hydrated.
-
Position the Fern:
- Take the staghorn fern and gently check its root ball for any dead material, trimming if necessary. Place a generous mound of the damp sphagnum moss on your prepared board. Position the fern on top of the moss, ensuring its basal fronds (the shield-like fronds) are close to the surface of the moss.
-
Secure the Fern:
- Using the fishing line or floral wire, create loops around the basal fronds and the board to secure the fern. Start by tying one end of the fishing line or wire to a nail or U-hook. Gently but firmly wrap it around the fern and anchoring points, ensuring it holds the fern in place without cutting into the plant. Continue wrapping in an X or star pattern for even support.
-
Finalize and Hang:
- Once secured, trim any excess line or wire and make sure there are no sharp ends protruding. Attach a hanging mechanism like a picture hook or wire to the back of your mounting board. Hang the mounted fern in a spot with bright, indirect light.
Additional Tips and Common Issues
-
Light and Location: Staghorn ferns thrive in environments mimicking their natural habitat, which includes bright, indirect sunlight. Avoid direct sunlight, which can burn the fronds.
-
Watering Tips: Water the fern by soaking its moss base thoroughly about once a week. In more humid environments, this frequency may be reduced.
-
Maintaining Humidity: If placing indoors, maintain humidity to prevent the fern from drying out. Consider misting the fern regularly or using a humidifier in drier climates.
-
Troubleshooting Common Issues:
- If the fern’s fronds turn brown, it might be receiving too much sun.
- Yellowing fronds can indicate overwatering or poor drainage.
By following these steps and tips, you’ll successfully create a beautiful display of a mounted staghorn fern, adding a unique touch of greenery to your space.
High-Quality Techniques for Preparing and Positioning
Mounting a staghorn fern can transform this striking plant into a beautiful, living piece of art. These ferns, which are naturally epiphytic, make excellent candidates for mounting as they typically grow on trees in their native habitats. Here’s a step-by-step guide to help you successfully mount a staghorn fern and enjoy its unique beauty.
Materials You’ll Need:
- A healthy staghorn fern
- Mounting board (wood slab, cork board, or tree branch)
- Sphagnum moss
- Fishing line or nylon string
- Hardware for wall mounting (e.g., hook, wire)
- Scissors
- Spray bottle for misting
Step-by-Step Instructions:
1. Choose Your Mounting Surface:
Select a sturdy board or tree branch to serve as the base for your fern. Wood slabs and cork pieces are popular due to their natural look and ability to simulate the fern’s natural environment. Ensure the surface is large enough to support the fern as it grows.
2. Moisten the Sphagnum Moss:
Before mounting, soak the sphagnum moss in water until thoroughly damp. This provides initial moisture for the fern and helps it adhere to the base.
3. Prepare the Staghorn Fern:
Gently remove loose soil from the fern’s roots, taking care not to damage them. It’s common for these plants to arrive with a small amount of potting medium attached to their roots.
4. Position the Moss and Fern:
Arrange a handful of sphagnum moss in the center of your chosen mounting surface. Place the fern’s root ball directly on top of the moss. The plant’s shield fronds should face outward, as these fronds will eventually help secure the fern to the mount.
5. Secure the Fern:
Wrap additional moss around the fern’s roots, then use fishing line or nylon string to anchor the plant and moss to the mount. Wrap the string around several times, ensuring the plant is secure but not too tightly bound. Tie off the string on the back of the mount.
6. Mount the Board:
Attach hardware to the back of the mount for easy hanging. Ensure that whatever method you choose (hook, wire, or bracket) can support the weight of the mount and fern.
7. Care and Maintenance:
Mount your fern in a location that receives bright, indirect light. Staghorn ferns thrive in humid environments, so mist them regularly to maintain adequate moisture. Depending on the humidity of your home, you may need to soak the moss-wrapped roots in water every 1-2 weeks to keep them adequately hydrated.
Common Issues and Solutions:
- Wilting or Browning Fronds: This may indicate under-watering. Ensure the moss remains damp and the fern is misted regularly.
- Rotting Fronds or Mold Growth: This indicates over-watering or poor ventilation. Allow the moss to dry out slightly before re-watering and ensure there’s good air circulation around the fern.
- Slow Growth: If your staghorn fern seems stagnant, it might need more light. Ensure it’s placed in a spot with bright, indirect light.
Additional Tips:
- Rotate your staghorn fern occasionally to ensure even light exposure and growth.
- Fertilize gently with a balanced, water-soluble fertilizer once a month during the growing season. Avoid over-fertilization, which can damage the plant.
- As your fern grows, it may naturally begin to adhere itself to the mount. Adjust or remove the string if necessary to accommodate growth.
Mounting a staghorn fern can create a captivating focal point in any home. By following these steps, you’ll set the stage for your fern to thrive, adding a touch of the exotic to your decor with minimal maintenance.
Care and Maintenance Tips for a Healthy Staghorn Fern
Mounting a staghorn fern not only enhances its visual appeal but also mimics its natural growing conditions. Follow these step-by-step instructions to mount your staghorn fern effectively, ensuring its health and vitality.
Materials Needed:
- A healthy staghorn fern
- Wooden board or plaque
- Sphagnum moss or peat moss
- Fishing line or nylon string
- Small nails or staples
- Hammer or staple gun
- Drill with a small drill bit (optional for hanging)
- Water sprayer
Step 1: Select a Suitable Mount
Begin by choosing a wooden board or plaque that complements the size of your staghorn fern. Cedar or redwood are excellent choices since they resist decay. Make sure the board is sturdy enough to support the fern as it grows.
Step 2: Prepare the Plant
Remove the staghorn fern from its pot carefully, ensuring minimal root disturbance. Gently shake off excess soil to expose the root ball.
Step 3: Create a Base Layer
Soak a handful of sphagnum moss in water until fully saturated. This moss layer will act as a cushion and moisture reservoir. Gently squeeze out excess water and mold the moss into a slight mound on the selected board.
Step 4: Position the Fern
Place the root ball of the staghorn fern onto the bed of soaked moss. Ensure that the thicker, basal fronds (shield fronds) are pressed against the moss, allowing the green fertile fronds to hang freely.
Step 5: Secure the Fern
Using fishing line, nylon string, or garden wire, secure the staghorn fern to the board. Start by anchoring the line to the board using small nails or staples around the edges. Loosely wrap the line around the base of the fern and moss, ensuring it’s snug but not damaging to the plant. You can cross the line in an “X” pattern for added stability.
Step 6: Hang Your Fern
If you plan to hang your mounted staghorn fern, drill two small holes at the top of the board and thread a durable wire or cord through them. This creates a hanging mechanism compatible with hooks or nails on your wall.
Common Issues and Tips:
- Overwatering: Staghorn ferns prefer to dry out between waterings. Mist the moss and fronds regularly, but let the moss dry before re-wetting.
- Light Conditions: Place your mounted staghorn fern in bright, indirect light. Direct sunlight can scorch the fronds, while too little light can hinder growth.
- Temperature: Keep the environment warm and humid, mimicking tropical conditions. Avoid drafts or sudden shifts in temperature.
Additional Advice:
To encourage healthy growth, feed your fern monthly with a diluted liquid fertilizer during the growing season (spring through fall). With these care and mounting tips, your staghorn fern should thrive beautifully, becoming a striking feature in your home.
Troubleshooting Common Issues When Mounting Staghorn Ferns
Mounting a staghorn fern can be an exciting project for plant enthusiasts, as these unique plants add a stunning touch to indoor and outdoor spaces. Here’s a step-by-step guide on how to mount a staghorn fern, along with some troubleshooting tips for common issues that may arise.
Materials Needed
- A healthy staghorn fern
- Mounting board (wooden plaques are popular, but cork or wire grids work too)
- Sphagnum moss or peat
- Small nails, hooks, or screws
- Soft wire or fishing line
- A hammer
- Water for soaking the moss
Step-by-Step Instructions
-
Choose the Mounting Board:
Select a sturdy, rot-resistant board or surface that can support the weight of the fern as it grows. Cedar and redwood are excellent choices due to their durability. -
Prepare the Moss:
Soak sphagnum moss in water until it is fully hydrated. This will provide the moisture source necessary for the fern to thrive. Once soaked, wring out the excess water. -
Prepare the Staghorn Fern:
Gently remove the staghorn fern from its pot, being careful not to damage the roots. Trim any dead or damaged fronds using clean scissors or pruning shears. -
Position the Moss:
Layer a generous amount of the soaked sphagnum moss on the center of your mounting board. This acts as a cushion and moisture source for the plant. -
Mount the Fern:
Place the fern’s root ball on top of the moss mound. Position it centrally so that the plant looks aesthetically pleasing once mounted. -
Secure the Plant:
Use soft wire, fishing line, or even jute twine to gently but securely fasten the fern to the board. Wrap the material around the base of the plant and board, ensuring it doesn’t cut into the fronds. -
Attach to Wall:
Add hooks or screws at the top back side of the mounting board for easy wall attachment. Ensure these are sturdy enough to support the plant’s weight. -
Initial Care:
Once mounted, mist the fern regularly to maintain humidity, mimicking its natural rainforest environment. It’s also best to soak the entire structure (without submerging the board) once every week or two to ensure proper hydration.
Troubleshooting Common Issues
Drying Out:
If you notice browning tips or a droopy appearance, your fern may be too dry. Increase the humidity by regular misting and ensure the moss base stays damp.
Overwatering:
Yellowing of fronds could indicate overwatering. Make sure you allow the moss to dry slightly in between waterings and ensure good drainage.
Poor Attachment:
If the fern is not securing well to the board, ensure the wire or line is snug but not too tight. Adjust and reattach as needed to prevent the plant from slipping.
Inadequate Light:
Staghorn ferns require bright, indirect light. If the fronds become pale, consider relocating the mount to a brighter location but avoid direct sunlight, which can scorch the fronds.
Additional Advice
To maintain the health and appearance of your mounted staghorn fern, continue to monitor its environment closely. Adjust water, light, and humidity levels as needed to mimic the plant’s natural habitat. Regularly check the mounting materials for signs of wear and replace them if necessary to ensure your fern remains well-supported as it grows.
By following these steps and tips, you can successfully mount a staghorn fern, adding a captivating vertical element to your space. Enjoy the beauty and uniqueness that these epiphytic plants bring to your decor.
In conclusion, mounting a staghorn fern is a rewarding and visually striking way to bring greenery into your home or garden. By choosing the right materials, whether wood or wire mesh, and selecting the healthiest fern, you set the foundation for a thriving plant display. Preparing the fern and mounting it securely with moss ensures that your staghorn fern receives the right balance of moisture and air flow, allowing it to flourish. Regular care through proper watering, feeding, and positioning in an area with bright, indirect light will help your mounted fern thrive for years to come.
We encourage you to embrace this creative process and bring a touch of nature’s elegance to your space. By applying the steps outlined in this blog post, you’ll gain practical skills that not only enhance your home decor but also deepen your connection with plant care.
As a final tip, consider rotating your mounted staghorn fern periodically to ensure even growth and prevent lopsided development. Happy mounting!