In the lush world of indoor gardening, the prayer plant stands out with its vibrant foliage and unique habit of folding its leaves like praying hands at dusk. This captivating plant, scientifically known as Maranta leuconeura, has captured the hearts of plant enthusiasts both for its beauty and its spiritual symbolism. With its growing popularity, many plant lovers are eager to expand their green collection without constantly buying new plants. Propagating your prayer plant not only allows you to enjoy more of its stunning foliage but also offers a sustainable way to share its beauty with friends and family. However, propagation can seem daunting to beginners. Fear not; this comprehensive guide will walk you through every step of the process, ensuring a successful outcome. By the end, you’ll have the knowledge and confidence to multiply your prayer plants, creating a thriving indoor garden oasis. So, roll up your sleeves and get ready to discover the rewarding world of plant propagation.
Understanding the Prayer Plant’s Propagation Needs
Propagating a prayer plant can be a rewarding way to expand your indoor garden. The Maranta leuconeura, commonly known as the prayer plant, is known for its beautiful foliage and interesting behavior of folding its leaves upward, resembling praying hands. The propagation process is straightforward and a great way for plant enthusiasts to grow their collection. Here’s a step-by-step guide on how to propagate prayer plants effectively.
What You Need:
- A healthy parent prayer plant
- Clean, sharp scissors or pruning shears
- A small pot with drainage holes
- Fresh potting mix
- A clear plastic bag or plastic wrap
- Rooting hormone (optional)
- Water
Step-by-Step Guide to Prayer Plant Propagation:
-
Select the Right Stem:
Choose a healthy stem with several leaves. Ideally, select a stem with nodes, as these points serve as the growth areas for new roots. -
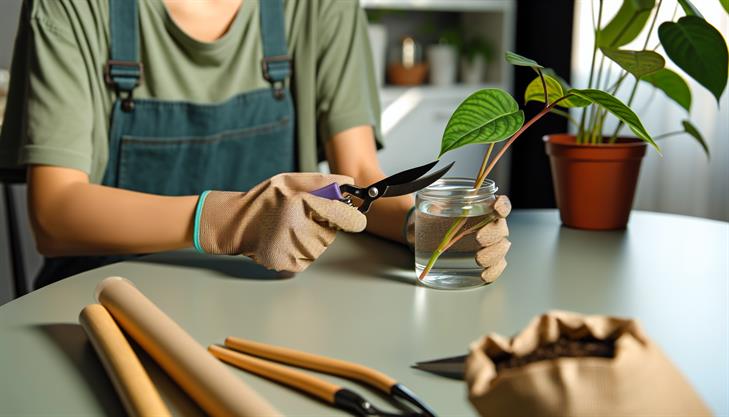
Make the Cut:
Use clean, sharp scissors or pruning shears to cut the stem below a node. Aim for a cutting that’s about 4-6 inches long. Cutting at an angle can increase the surface area for root development. -
Prepare for Rooting:
Remove the leaves from the lower third of the cutting to prevent them from rotting when placed in water or soil. If you’re using rooting hormone, dip the cut end into the powder to encourage faster rooting. -
Choose Your Growing Medium:
- In Water: Place your cutting in a glass of water ensuring that the nodes are submerged but leaves remain above the waterline.
OR - In Soil: Prepare a small pot with a well-draining potting mix. Insert the cutting into the soil, making sure nodes are covered. Water lightly.
- In Water: Place your cutting in a glass of water ensuring that the nodes are submerged but leaves remain above the waterline.
-
Create a Humid Environment:
If rooting in soil, cover the cutting with a clear plastic bag or wrap to maintain humidity. Ensure the cover doesn’t touch the leaves by propping it up with sticks if needed. This mimics the plant’s natural humid environment. -
Choose the Right Location:
Place your cuttings in a warm, well-lit area with indirect sunlight. Avoid direct sunlight, which can scorch the delicate new leaves. -
Monitor and Maintain:
If rooting in water, change the water every few days to keep it fresh and oxygenated. For soil propagation, ensure the soil remains moist but not waterlogged.
Transplanting New Plants:
Once the cuttings develop a robust root system, typically after 4-6 weeks, they are ready to be transplanted into individual pots with fresh potting soil. Handle the roots gently to prevent damage.
Common Issues and Troubleshooting:
- Mold and Rot: If you notice the cutting or leaves turning mushy or black in soil or water, it’s likely a sign of overwatering or too much humidity. Adjust as needed, ensuring proper ventilation and moisture levels.
- Stunted Growth: Ensure your cuttings receive adequate light and warmth. A lack of light can slow root development.
- Rooting Takes Longer: Conditions like lower temperatures or insufficient humidity can delay rooting. You may need to adjust the environment to speed up the process.
Additional Tips:
- Propagate in spring or summer when the plant is in its active growth phase for best results.
- Be patient. Root growth can take several weeks; avoid disturbing the plant during this period.
- Regularly checked rooted cuttings for any signs of stress and address them promptly to encourage healthy growth.
By following these steps on how to propagate prayer plant, you can enjoy an expanded collection of these unique houseplants, all while honing your skills as a plant enthusiast.
Step-by-Step Process to Propagate Prayer Plant from Cuttings
Propagating a prayer plant, known scientifically as Maranta leuconeura, is a rewarding and straightforward task, perfect for both novice and seasoned plant enthusiasts. This step-by-step guide will walk you through the process of propagation from cuttings, ensuring you can successfully expand your collection or share with friends.
Materials Needed
Before you begin, gather the following materials:
- A healthy prayer plant
- Sharp, clean scissors or pruning shears
- A jar or glass of water or a small pot with potting mix
- A plastic bag or clear plastic container (for humidity, if using potting mix)
- Optional: Rooting hormone
Step 1: Select and Prepare the Cutting
Choose a healthy, vibrant stem with at least two to three leaves. The stem should be about 3-4 inches long. Using sharp, clean tools is crucial to prevent the transmission of diseases. Make a cut just below a node — the point on the stem where leaves emerge. If you wish, dip the cut end into rooting hormone to encourage faster rooting, though it’s not necessary for prayer plants.
Step 2: Rooting in Water
Place your cuttings in a jar or glass of water, ensuring the node is submerged while the leaves remain above the waterline. Position the container in indirect sunlight; too much sun can harm the cuttings. Change the water every few days to keep it fresh and encourage faster root growth. You should see roots start to develop within two to four weeks.
Step 3: Rooting in Soil
Alternatively, you can root the cutting in soil. Fill a small pot with well-draining potting mix. Plant the cutting deep enough that the node is covered with soil, and firm it gently to hold the plant in place. Water the soil lightly to avoid waterlogging. Cover the cutting with a plastic bag or place it under a clear plastic container to maintain humidity, creating a mini greenhouse effect.
Step 4: Transplanting
Once the roots are approximately 1 to 2 inches long, it’s time to transplant your new plants into individual pots. Select a pot with good drainage and use a peat-based potting mix. Water thoroughly after transplanting and place the new plants in an environment with bright, indirect sunlight.
Troubleshooting Common Issues
- Yellow Leaves: This may indicate overwatering or stress. Ensure your water container or soil has proper drainage.
- Root Rot: If propagating in soil, avoid overly damp conditions which can cause root rot. Maintain balance by allowing the soil to dry slightly between waterings.
- No Root Growth: Ensure the cuttings are receiving adequate light and that nodes are submerged in water. Patience is key.
Additional Tips
- Spring or early summer are the ideal times to propagate prayer plants, as they are in their active growth phase.
- Be cautious with temperature; avoid placing your cuttings in direct drafts or where temperatures fluctuate dramatically.
- Feed newly propagated plants with a diluted general-purpose fertilizer once they show signs of growth.
Following these steps on how to propagate prayer plants from cuttings will help ensure you cultivate healthy, thriving new plants. Whether you choose to root in water or soil, the key is consistent care and attention. With time, your propagated prayer plant will grow, adding beauty and vibrancy to any indoor space.
Tips for Enhancing Root Growth and Success Rates
Propagating a prayer plant (Maranta leuconeura) is a rewarding activity that involves nurturing a new plant from stem cuttings or division. This indoor plant, admired for its beautiful leaves and unique behavior of folding its leaves at night, can be propagated with relative ease. Here’s a step-by-step guide to help you propagate your prayer plant successfully.
Propagate by Division
One of the easiest methods to propagate a prayer plant is by dividing the root ball. This is best done when you’re repotting your plant or when it has outgrown its current container.
-
Prepare the Plant: Choose a healthy, mature prayer plant to begin. Water the plant a day or two before dividing it to ensure the roots are hydrated.
-
Remove from Pot: Gently remove the plant from its pot, being careful not to damage the roots.
-
Identify Natural Divisions: Look for natural sections or clumps in the plant’s root system. These are typically spots where the plant can be cleanly divided.
-
Separate the Plant: Carefully separate the divisions using your fingers or a sharp, sterilized knife, ensuring each division has a healthy amount of roots and foliage.
-
Repot the Divisions: Plant each division in a well-draining potting mix, ideally in a container with proper drainage. Water them lightly and position them back in their growing spot.
Propagation by Cutting
Another popular method is using stem cuttings to propagate your prayer plant. This method is great during the spring or early summer when the plant is thriving.
-
Select a Stem: Choose a healthy stem with a few leaves. Ensure the cutting is at least 4-6 inches long for optimal growth.
-
Make the Cut: Use sterile scissors or pruning shears to make a clean cut just below a node, which is the site where roots will develop.
-
Prepare the Cutting: Remove the lower leaves near the cut end to prevent rotting when submerged in water or soil.
-
Root the Cutting: You can place the cutting in water or directly in moist potting soil.
- Water Propagation: Place the cutting in a jar of water, ensuring nodes are submerged. Change the water every few days to prevent bacteria build-up. Roots should appear in a few weeks.
- Soil Propagation: Plant the cutting about an inch deep in moist potting soil. Cover the pot with plastic to maintain humidity, if needed.
-
Transition to a Pot: Once the roots are a few inches long (4-6 weeks later), you can transfer the water-rooted cuttings to a pot with soil.
Additional Tips and Troubleshooting
-
Environment: Prayer plants prefer indirect sunlight and humid conditions. Make sure your propagating cuttings avoid direct sun rays which can scorch the leaves.
-
Humidity: Maintaining higher humidity can improve the success rate of propagation. Mist the cuttings or use a humidity tray to keep the environment humid.
-
Temperature: Keep your plant in a warm location, ideally between 65°F to 75°F (18°C to 24°C).
-
Common Issues: If the cutting’s leaves start yellowing, it might be over-watered or receiving too much light. Adjust watering habits and light exposure accordingly.
Understanding how to propagate prayer plants effectively can enhance your gardening experience and increase the success rate of developing new healthy plants. With the right care, conditions, and patience, you’ll soon see new foliages flourishing in your home.
Tools and Supplies for Successful Prayer Plant Propagation
Propagating a prayer plant, or Maranta leuconeura, can be a rewarding experience for plant enthusiasts looking to expand their collection or share with friends. This process involves creating new plants from an existing one, and it’s not as daunting as it may sound. By following these steps and ensuring you have the right tools and supplies, your propagation efforts can lead to healthy, thriving new plants.
Tools and Supplies Needed for Prayer Plant Propagation
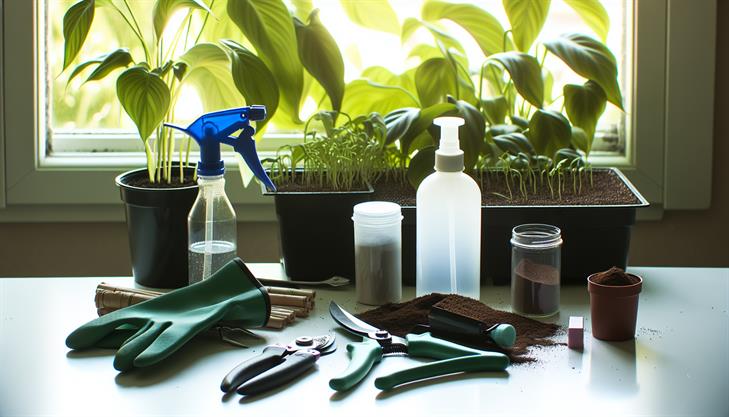
Before you begin, gather the following tools and supplies:
- Sharp scissors or pruning shears: Ensures clean cuts, reducing damage to the plant.
- Clean glass jar or clear vase: Ideal for water propagation, allowing easy monitoring of root growth.
- Potting soil mix: A well-draining soil mix, often one labeled for African violets, is perfect.
- Small pots or containers: For planting rooted cuttings in soil.
- Rooting hormone (optional): Can be used to encourage faster root growth in soil propagation.
- Spray bottle: To maintain humidity levels around the plant.
Step-by-Step Instructions for Propagating a Prayer Plant
-
Select a Healthy Parent Plant: Choose a mature prayer plant with abundant, healthy foliage. Avoid plants showing signs of disease or stress.
-
Identify and Cut a Stem: Look for a stem with at least one node — the knobby part of the stem where leaves emerge. Using your sharp scissors or pruning shears, cut just below a node. Aim for a cutting that’s around 3-4 inches long.
-
Remove Lower Leaves: Remove any leaves from the lower inch of the stem. This area will be submerged in water or soil and helps prevent leaf rot.
-
Decide on Water or Soil Method:
- Water Propagation: Place the cutting in a glass jar filled with water, ensuring the node is submerged but not the leaves. Place the jar in a warm, bright location with indirect sunlight. Change the water every few days to prevent bacteria build-up.
- Soil Propagation: Dip the cut end of the stem into rooting hormone if desired, then plant it into a pot filled with a moist potting mix. Cover the pot with a plastic bag to retain humidity, ensuring the leaves do not touch the bag.
-
Monitor and Wait for Roots:
- In water, you’ll typically see roots forming within a couple of weeks. In soil, it might take a bit longer; gently tugging on the cutting can indicate root development if there is resistance.
-
Potting the New Plant: Once roots are a few inches long, transfer water-propagated cuttings to soil. For soil-propagated plants, wait until you see considerable new growth before removing any humidity covers.
Tips and Common Issues
- Humidity and Temperature: Prayer plants prefer a humid environment and temperatures between 65°F and 80°F. Consider misting the plant or using a humidity tray.
- Avoid Overwatering: Be careful not to overwater the cuttings, especially in soil propagation, to prevent root rot.
- Yellow Leaves: If your cutting’s leaves turn yellow, this might be a sign of too much moisture or insufficient light. Adjust the watering schedule and move the plant to a brighter spot if needed.
By understanding how to propagate prayer plants effectively and using the right tools and supplies, you can enjoy watching your cuttings grow into beautiful, mature plants. With a little patience and care, propagation not only enhances your gardening skills but also allows you to share the joy of plant care with others.
Troubleshooting Common Issues in Prayer Plant Propagation
Propagating a prayer plant, known botanically as Maranta leuconeura, can be a rewarding endeavor for plant enthusiasts and hobbyists alike. These visually striking plants, with their dramatic, patterned leaves, are relatively easy to propagate with the right guidance. Here’s a streamlined, step-by-step guide on how to propagate prayer plant successfully, along with troubleshooting tips for common issues you might encounter.
Step-by-Step Guide to Propagate a Prayer Plant
Materials Needed
- A healthy parent prayer plant
- Clean, sharp scissors or pruning shears
- A glass container or jar for water
- Potting soil and a small pot (if propagating in soil)
- Water
Method One: Water Propagation
-
Select a Healthy Stem:
- Choose a stem with several leaves and ensure it is at least 3-4 inches long. The stem should be healthy and free from any signs of disease or pests.
-
Cut the Stem:
- Using clean and sharp scissors, make a diagonal cut just below a node, where leaves and roots tend to grow.
-
Prepare the Cutting for Water:
- Remove any lower leaves from the stem to prevent them from rotting in the water.
-
Place in Water:
- Submerge the cut end and nodes in a jar filled with water. Ensure that the leaves stay above water to avoid rot. Place the jar in a bright, indirect light spot, avoiding direct sunlight.
-
Monitor Growth:
- Change the water every few days to keep it fresh and monitor the cutting. Roots typically appear within two to four weeks.
-
Transfer to Soil:
- Once roots are a few inches long, transfer the cutting to a pot filled with a well-draining potting mix. Keep soil moist but not waterlogged.
Method Two: Soil Propagation
-
Prepare the Cutting:
- As described above, cut a healthy stem below a node and remove any lower leaves.
-
Plant in Soil:
- Insert the cutting into a small pot filled with pre-moistened potting soil, ensuring the node is buried beneath the surface to encourage rooting.
-
Maintain Moisture:
- Water the soil lightly to maintain moisture but avoid water-logging. Covering the pot with a plastic bag can create a mini-greenhouse effect, enhancing humidity.
-
Monitor and Care:
- Place the pot in a warm area with indirect sunlight. Roots should develop within several weeks.
Common Troubleshooting Tips
-
Wilting Leaves:
- If leaves appear wilted after propagation, ensure enough humidity and moisture without overwatering. Mist the leaves occasionally if needed.
-
Lack of Root Growth:
- Not observing root growth could be due to insufficient light or using water with high mineral content. Ensure bright, indirect sunlight and change the water regularly if using the water method.
-
Rotting:
- To avoid stem or root rot, always use sterile tools and pots. Ensure drainage is adequate and avoid over-saturating the soil or water.
Additional Advice
-
Use Rooting Hormone:
- For a boost in success, you may dip the cut end into rooting hormone before planting in soil.
-
Consistent Environment:
- Maintain a consistent environment, avoiding drastic temperature changes, which can stress the cuttings.
By following these methods and tips, you should be able to propagate prayer plants effectively and enjoy more of these lush beauties in your space. Remember, patience and care are key to successful propagation!
In conclusion, propagating a prayer plant can be a rewarding and fulfilling endeavor for any plant enthusiast. By following the key steps of selecting healthy parent plants, properly cutting and preparing stem cuttings or divisions, and providing the necessary conditions for growth—such as appropriate humidity, temperature, and light—you’re setting yourself up for success. Whether you’re using the water or soil method, patience and attention to detail are your best allies in nurturing these vibrant and beautiful houseplants.
We hope this guide has empowered you with the knowledge and confidence to start your propagation journey. Remember, the beauty of growing prayer plants lies not only in their unique aesthetic but also in the learning and growth process involved. So, roll up your sleeves, gather your tools, and watch as your care and dedication breathe new life into your home.
As a final tip, consider keeping a plant journal to track your progress and any variables you adjust during propagation. This will not only help you learn what works best for your prayer plants but also become a valuable resource for future plant endeavors. Happy propagating!