Have you ever walked past a charming garden wall draped in lush green vines and wondered how you could bring that same enchanting touch to your own home? English Ivy, with its timeless appeal and versatile nature, is the perfect plant to transform any space into a verdant oasis. But here’s the secret that will set your garden apart: mastering the art of ivy propagation. Not only does propagating English Ivy provide the satisfaction of nurturing new life, but it also offers a cost-effective way to expand your greenery without constant trips to the nursery. In this guide, we’ll unveil the simple yet effective methods to propagate English Ivy, ensuring your home is cloaked in its elegant, sprawling beauty year-round. Ready to immerse your green thumb in a rewarding gardening technique? Let’s delve into the world of plant propagation and unlock the secrets to abundant, thriving ivy.
Preparing Your English Ivy for Propagation
Propagating English ivy is a rewarding activity that can help you expand the greenery in your home or garden with minimal investment. By following these simple steps, you can effectively propagate English ivy using the cutting method, ensuring a healthy growth of new plants.
Step-by-Step Guide on How to Propagate English Ivy
-
Select Healthy Parent Plants: Start by choosing a healthy English ivy plant. Look for vines that are vigorous, free from disease, and have plenty of leaves. The ideal time for propagation is during the spring or early summer when the plant is actively growing.
-
Gather Your Tools: You’ll need a pair of sharp, sterilized pruning shears or scissors for clean cuts, a small pot or container, potting soil or water, and optional rooting hormone.
-
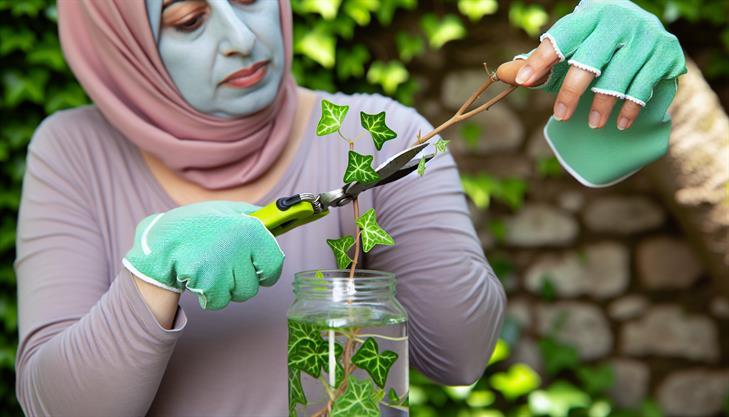
Take Cuttings: Identify a vine with at least 3-4 sets of leaves. Make a cut 4-6 inches below a leaf node (the point where leaves attach to the stem), ensuring the cutting includes two to three nodes. These nodes are essential as they will develop into roots.
-
Prepare the Cuttings: Remove the leaves from the bottom node to expose the area where roots will form. If you are using rooting hormone, dip the cut end of the ivy into the hormone powder to enhance root development.
-
Root in Water or Soil:
- Water: Place the prepared cuttings in a container filled with water, ensuring that at least one node is submerged. Position the container in a spot with indirect sunlight. Change the water every few days to prevent stagnation and encourage rooting.
- Soil: Fill a small pot with a well-draining potting mix. Insert the cuttings into the soil up to the first set of leaves, making sure the soil remains consistently moist. Cover the pot with a plastic bag or place it in a greenhouse environment to retain humidity.
-
Maintain the Right Environment:
- Ensure your cuttings receive bright, indirect light. Direct sunlight can scorch tender cuttings, while too little light will hinder root development.
- Maintain consistent moisture levels to prevent the cuttings from drying out; however, avoid overwatering to prevent root rot.
-
Transplanting: Roots should begin to develop in 4-6 weeks. Once the roots are about an inch long in water propagations, or resistance is felt when you gently tug soil cuttings, they are ready to be transplanted to a larger pot with fresh potting mix.
Common Issues and Tips
- Poor Root Development: This can be caused by insufficient light or waterlogged conditions, so ensure proper setup.
- Leaf Yellowing: This could indicate overwatering, so adjust the water amount accordingly.
- Fungal Growth: Keep cuttings in a well-ventilated space to minimize humidity-induced fungus.
Additional Advice
- Using organic rooting stimulators can promote stronger and quicker root growth if available.
- Labeling your cuttings with the date propagated can help in tracking growth progress.
By following these guidelines, you can successfully propagate English ivy, adding much beauty and freshness to your surroundings. This method offers a sustainable way to grow your ivy collection or share plants with friends and family, all while gaining valuable experience in plant care.
Step-by-Step Guide to Propagate English Ivy
Propagating English ivy is a rewarding way to multiply your plants and enhance your home or garden space. With its lush, trailing vines and adaptability, English ivy (Hedera helix) is a popular choice for indoor and outdoor growth. Follow this step-by-step guide to successfully propagate English ivy.
Choose the Right Time
The best time to propagate English ivy is during the spring or early summer when the plant is actively growing. This increases the chances of the cuttings rooting successfully.
Gather Necessary Materials
Before you begin, ensure you have the following materials:
- A healthy English ivy plant
- Sharp scissors or pruning shears
- A clean glass container or jar
- Room temperature water
- Small pots and potting soil (for planting rooted cuttings)
- Rooting hormone (optional, but can increase success rate)
Step-by-Step Instructions
1. Select Healthy Cuttings
Locate a healthy vine on your existing English ivy plant. Look for a section that’s abundant with leaves and appears vigorous. Cut a 4-6 inch length of the stem, making sure it has at least two to three sets of leaves. Ensure the cutting tool is clean to prevent transferring diseases to the plant.
2. Prepare the Cuttings
Trim the cutting slightly below a leaf node, the area where leaves attach to the stem. Remove the leaves from the bottom set of nodes, leaving only the top two or three leaves intact. This helps the cutting focus energy on root development.
3. (Optional) Apply Rooting Hormone
Dip the cut end in rooting hormone powder or gel if desired. While not essential, rooting hormone can speed up the rooting process and improve success rates.
4. Place the Cuttings in Water
Fill a clean glass container with room temperature water and submerge the cut end of the ivy cutting. Make sure at least one node is underwater. Place the container in a bright, indirect sunlight location. Change the water every few days to keep it fresh.
5. Monitor Root Development
Roots should start forming in 2-4 weeks. Once the roots reach a length of a couple of inches, they are ready to be planted in the soil.
6. Plant the Rooted Cuttings
Prepare small pots with good-quality potting soil. Gently plant each cutting into its pot, covering the roots and ensuring the plant is secure. Water the soil lightly to settle it around the roots, but avoid overwatering.
Common Issues and Tips
- Overwatering: Be cautious with watering. Too much moisture can lead to root rot. Ensure the soil or water container allows excess water to drain away.
- Lighting: English ivy thrives in bright, indirect sunlight. Direct sunlight can scorch the leaves, while too little light can inhibit growth.
- Pests: Keep an eye out for spider mites or aphids, common pests for English ivy. Regularly inspect your plants and use appropriate treatments if necessary.
Additional Advice
- Variegated Varieties: Some types of English ivy, like variegated varieties, might grow slower or struggle more with root development. Exercise patience, as they can be more finicky.
- Repotting: Once your new ivy plants are established and outgrow their pots, it’s time to repot them to encourage further growth.
By following these steps, you’ll enhance your skills in how to propagate English ivy and grow a thriving collection of these beautiful, leafy vines. As your new plants develop, enjoy the added greenery in your space.
Tips for Successful Root Development
Propagating English ivy (Hedera helix) is a rewarding process that is suitable for gardeners of all experience levels. This versatile plant is known for its lush, evergreen foliage and ability to thrive in a variety of environments, making it a popular choice for both indoor and outdoor landscaping. Whether you want to expand your indoor garden or fill a bare outdoor space, propagating English ivy is a straightforward task. Follow these steps for successful root development and healthy new plants.
Step 1: Choose a Healthy Parent Plant
Begin by selecting a robust English ivy plant. Look for vigorous growth and healthy leaves, avoiding any that show signs of disease or pest infestation. The healthier the parent plant, the more successful your propagation efforts will be.
Step 2: Prepare the Cuttings
Using clean, sharp scissors or pruning shears, cut a 4-6 inch section of vine just below a node, which is the point where leaves attach to the stem. Select a cutting with at least two leaves and ensure that it’s free from disease. If you’re wondering how to propagate English ivy effectively, starting with a clean cut is vital for preventing infections.
Step 3: Prepare the Cuttings for Rooting
Remove the leaves from the bottom third of the cutting to expose the nodes, as these are the areas that will develop roots. If desired, dip the cut end in rooting hormone to promote faster root development, although this step is optional.
Step 4: Root the Cuttings in Water or Soil
English ivy can develop roots in either water or soil. If rooting in water, place the cuttings in a glass of clean water, ensuring that the exposed nodes are submerged. Change the water every few days to prevent bacterial growth. If using soil, plant the cuttings in a pot filled with well-draining potting mix, burying them deep enough to cover the nodes. Water the soil lightly to keep it moist but not waterlogged.
Step 5: Provide Optimal Growing Conditions
Place the cuttings in a warm environment with indirect sunlight. English ivy prefers temperatures between 60-70°F. Whether in water or soil, ensure that the environment is humid, as this encourages root growth. Covering soil-rooted cuttings with a plastic bag can help retain moisture, creating a mini greenhouse effect.
Step 6: Monitor Growth and Transfer
Roots typically develop within a few weeks. For water-propagated cuttings, transfer them to soil once roots are at least an inch long. Carefully transplant soil-rooted cuttings to larger pots once they’ve developed sufficient root systems, allowing them to continue growing.
Common Issues and Solutions
-
Root Rot: Overwatering or stagnant water can cause root rot. Make sure to change the water regularly and use well-draining soil to prevent this issue.
-
Slow Root Development: If cuttings are slow to root, ensure they’re receiving enough sunlight and warmth. Using a heat mat can encourage faster growth, especially in cooler months.
-
Pest Control: Naturally, English ivy can attract pests such as spider mites and aphids. Regularly inspect your cuttings and use insecticidal soap if necessary.
With these steps, you’ll successfully propagate English ivy, enriching your green spaces with minimal effort. Keep experimenting with different methods to see which works best for you, and soon you’ll have thriving new plants to beautify your environment.
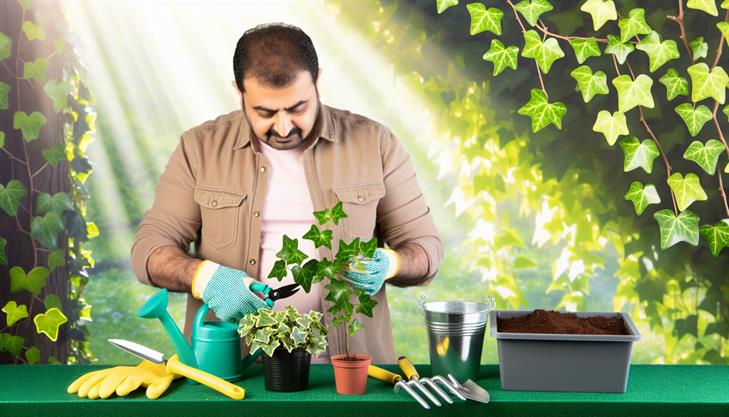
Tools and Materials Needed for Propagation
To propagate English ivy effectively, you’ll need a few basic tools and materials, along with some helpful tips to ensure success. English ivy is a versatile plant that can be propagated easily through cuttings, allowing you to grow more plants for your garden or indoor spaces. Below, we outline a detailed guide to help you master the art of propagating English ivy.
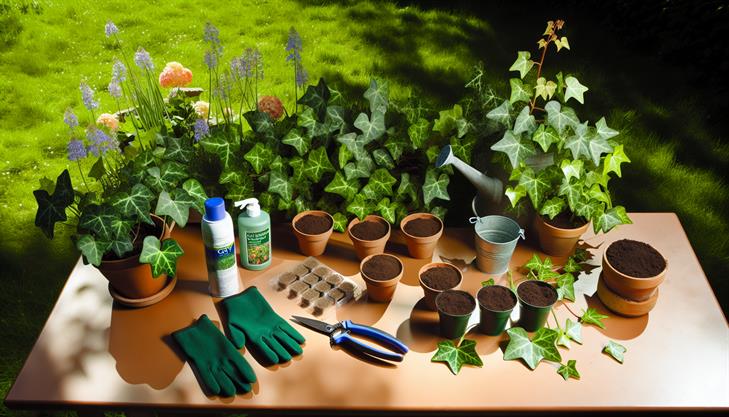
Tools and Materials Needed
-
Pruning Shears or Scissors: Choose sharp, clean tools to make precise cuts without damaging the plant.
-
Rooting Hormone (optional): While not necessary, rooting hormone can boost the chances of successful root development.
-
Small Pots or Seed Trays: These containers will house your cuttings until they establish roots.
-
Potting Mix: A well-draining soil mix or a combination of peat moss and perlite is ideal for young ivy plants.
-
Plastic Bags or Dome Covers: These help maintain humidity around the cuttings.
-
Watering Can or Spray Bottle: Use this to moisten the soil without over-watering.
-
Labels and Marker: Keeping track of your propagation attempts is easier with labels.
Step-by-Step Guide
1. Selecting the Cuttings:
- Choose a healthy, mature English ivy vine to take your cuttings from.
- Look for stems that are about 4-6 inches long with several leaves.
- Avoid stems that appear diseased or weak, as they may not root well.
2. Making the Cut:
- Using your pruning shears or scissors, cut the vine just below a leaf node, as this is where roots are most likely to develop.
- Remove the leaves from the lower part of the cutting, leaving a few leaves at the tip.
3. Applying Rooting Hormone (Optional):
- Dip the cut end of the stem into the rooting hormone powder, tapping off any excess. This step can promote faster root growth.
4. Planting the Cuttings:
- Fill your pots or trays with the potting mix.
- Insert the cutting into the soil, ensuring that at least one node is buried.
- Firm the soil gently around the cutting to ensure good contact.
5. Creating a Humid Environment:
- Place a plastic bag or dome cover over the pot to create a humid microenvironment. This helps prevent the cuttings from drying out.
- Ensure that the covering does not touch the leaves directly.
6. Watering:
- Mist the cuttings lightly with a spray bottle.
- Keep the soil consistently moist but not waterlogged, as this can lead to rot.
7. Providing Optimal Conditions:
- Place the cuttings in a location with bright, indirect sunlight. Direct sunlight can be too harsh and may damage the young plants.
- Maintain a temperature between 60-70°F to encourage rooting.
Troubleshooting and Additional Tips
Common Issues:
- Wilting or Yellowing Leaves: This can be due to excessive moisture or insufficient light. Adjust your watering routine and check light levels.
- No Root Development: Patience is key. Some cuttings may take several weeks to root. Ensure the environment stays humid and check that cuttings are firm and healthy.
Additional Advice:
- Regularly check for mold under the plastic covering and ensure ventilation if needed.
- Once roots have developed, which usually takes 4-6 weeks, transplant the cuttings to larger pots.
By following these steps and using the right tools and materials, you can successfully propagate English ivy, enhancing your collection with minimal effort. This rewarding process not only saves money but also adds a personal touch to your plant collection.
Troubleshooting Common Propagation Problems
Propagating English ivy is a rewarding process that allows you to expand your greenery collection with minimal effort. English ivy is known for its hardy nature and vining beauty, making it a popular choice for both indoor and outdoor settings. This guide will walk you through the steps on how to propagate English ivy successfully, addressing common propagation problems and offering helpful tips for best results.
Step-by-Step Guide to Propagate English Ivy
**1. Choosing the Right Time:
- The best time to propagate English ivy is during its active growing season, which is usually in spring or early summer. During this period, the plant is more likely to root successfully.
**2. Collecting Cuttings:
- Select a healthy ivy plant to take cuttings from. Look for stems that are mature but not too woody, as these will root more easily.
- Use clean, sharp scissors or a knife to cut a 4-6 inch section of stem with at least three to four leaves.
**3. Preparing the Cuttings:
- Remove the leaves from the lower half of the cutting. This portion will be submerged in water or inserted into the soil, depending on your chosen propagation method.
- If you’re looking to boost rooting, consider dipping the cut end in rooting hormone powder. This is optional but can enhance success rates.
**4. Rooting Methods:
- Water Method: Place the cuttings in a glass or jar of water, ensuring that the leaves are not submerged. Position the container in a bright location with indirect sunlight. Change the water every few days to prevent stagnation and bacterial growth.
- Soil Method: Fill a small pot with a well-draining potting mix or a mixture of sand and peat moss. Insert the cuttings into the soil, cover the base gently, and water lightly. Ensure the soil remains moist but not waterlogged.
**5. Patience and Observation:
- For both methods, roots generally begin to form within 3 to 6 weeks. In the water method, you can watch the roots grow; in soil, you can check for root development by gently tugging the cutting—resistance indicates root growth.
Common Problems and Tips
Yellowing Leaves:
- This issue commonly arises from overwatering or lack of light. Ensure your cuttings receive enough indirect light and adjust watering accordingly.
Mold or Rot:
- Mold can develop if the environment is too humid or cuttings are submerged too deeply in water. Ensure proper air circulation and change the water frequently to prevent this issue.
Slow Root Development:
- If roots aren’t appearing, consider increasing the cuttings’ exposure to light or using a heating mat to improve the environment’s temperature.
Additional Advice
- When transplanting rooted cuttings from water to soil, handle them gently to avoid stressing the new roots.
- After initial rooting, feed your ivy plant with a diluted all-purpose liquid fertilizer to encourage growth.
- Be patient and attentive. Regularly check your cuttings for signs of growth or distress, making adjustments to the conditions as necessary.
Following these steps will ensure you know how to propagate English ivy successfully, leading to flourishing new plants that enhance your home or garden. By understanding and addressing propagation problems, you’ll create an ideal environment for your ivy cuttings to thrive.
In conclusion, propagating English ivy can be a rewarding and straightforward process that enhances your home or garden with lush, verdant foliage. By understanding the two primary methods—stem cuttings and layering—you can effectively multiply your plants. Remember to choose healthy parent plants, use clean and sharp tools for cutting, and provide the right conditions for rooting, such as proper moisture levels, indirect light, and the right temperature.
Applying what you’ve learned about propagation not only allows you to expand your plant collection economically but also equips you with skills to maintain the health and vibrancy of your ivy through proper cultivation techniques.
As a final tip, consider placing your newly propagated ivy in various locations around your home or garden to experiment with different lighting conditions. This will help you identify ideal spots where your ivy thrives best and adds beauty to your spaces. Happy propagating!