In the vibrant world of houseplants, the croton stands out like a dazzling jewel, with its bold, multi-colored leaves injecting life into any indoor space. However, maintaining the croton’s visual splendor isn’t just about watering and sunlight; it requires a precise touch with pruning shears. Pruning your croton isn’t merely a routine chore; it’s an art form that influences the plant’s health, growth, and overall aesthetic appeal. Yet, many plant enthusiasts shy away from this task, fearing they might inadvertently harm their beloved greenery. Fear not! This comprehensive guide unveils the secrets of pruning your croton house plant, empowering you to transform your indoor garden into a lush, thriving oasis. Whether you’re a seasoned plant parent or a budding hobbyist, mastering these pruning techniques will not only keep your croton looking its best but will also enhance your overall gardening prowess. So go ahead, grab those shears, and let’s dive into the world of croton care with confidence and flair.
Understanding When to Prune Your Croton
Pruning a croton house plant is an essential practice for maintaining its vibrant appearance and encouraging healthy growth. While crotons are renowned for their colorful foliage, they require occasional trimming to keep them looking their best. Understanding when and how to prune your croton can make a significant difference in its overall health and aesthetic appeal.
When to Prune Your Croton
The best time to prune a croton plant is during the growing seasons of spring and summer. During these periods, the plant is actively growing and can recover more quickly from pruning. However, you can also perform light pruning in late winter to remove any dead or damaged leaves before the new growth begins.
How to Prune a Croton House Plant: Step-by-Step Guide
-
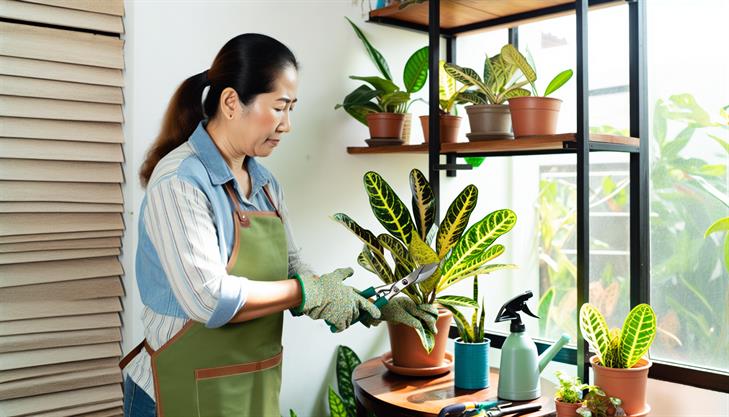
Gather Your Tools: Ensure you have a pair of sterilized pruning shears or scissors. Sterilizing is crucial to prevent the spread of disease from any previous cuts.
-
Inspect the Plant: Before you start, look for any diseased, dead, or damaged leaves and stems. These should be your primary targets for pruning to promote healthier growth and prevent any potential pest issues.
-
Make the Cuts:
- Start by removing any yellowed or dead leaves at their base. This will not only enhance the plant’s appearance but also redirect energy to healthy parts.
- Trim back any overly long or leggy stems to promote a bushier shape. Cut just above a leaf node to encourage new growth from that point.
- If the croton has multiple stems, consider trimming some back to the base to maintain balance and encourage new offshoots.
-
Shape the Plant: Aim for a uniform, rounded shape by cutting longer shoots and stems that disrupt the aesthetic form of the plant. This practice helps in maintaining a compact and full appearance.
-
Clean Up Debris: Remove any fallen leaves or stems from around the base of the croton to prevent pest and disease issues. These can serve as a hiding place or breeding ground for unwanted insects.
Common Pruning Issues and Tips
- Over-pruning: Avoid removing more than one-third of the plant at a time. Over-pruning can stress the plant, leading to reduced growth and potential dieback.
- Leaf Drop: After pruning, some crotons might experience leaf drop due to stress. Ensure the plant receives adequate light, water, and care to aid recovery.
Additional Advice
- Post-Pruning Care: After pruning, provide your croton with optimal care to promote recovery. This includes placing it in bright, indirect sunlight and maintaining consistent watering without over-saturating the soil.
- Fertilization: Consider using a general houseplant fertilizer during the growing season to support new growth post-pruning.
- Regular Checks: Make a habit of regularly inspecting your croton for signs of pests or disease. Early detection can prevent more severe problems that might complicate the pruning process.
By following these guidelines on how to prune a croton house plant, you can ensure it remains healthy, vibrant, and beautifully shaped. With regular maintenance, your croton can thrive and continue to be a stunning focal point in your home.
Essential Tools for Effective Croton Pruning
Pruning a croton house plant is a rewarding task that encourages healthy growth, maintains the plant’s desired shape, and allows it to flourish in its indoor environment. Following a systematic approach not only helps achieve these goals but also ensures optimal results without harming the plant. Here’s a step-by-step guide on how to effectively prune a croton house plant and the essential tools needed to do so.
Step-by-Step Guide to Pruning a Croton House Plant
Step 1: Gather Essential Tools
Before you begin, it’s crucial to have the right tools on hand to ensure clean cuts and avoid damage to the plant. Essential tools include:
- Sharp Pruners or Scissors: A pair of clean, sharp pruners or scissors is vital for making precise cuts. Dull tools may crush or tear the stems, leading to potential disease and slow healing.
- Sanitizing Solution: A simple mixture of one-part bleach to nine-parts water can sanitize your cutting tools. This step prevents the spread of diseases between plants.
- Gloves: While not essential, gloves protect your hands from sap that can cause irritation.
Step 2: Identify the Right Time
The best time to prune a croton house plant is during the growing season, typically in spring or early summer. Pruning during this period helps the plant recover more quickly and encourages new growth.
Step 3: Inspect the Plant
Before making any cuts, examine the croton for any signs of dead, damaged, or discolored leaves. These sections should be the primary focus when pruning to ensure the plant maintains its health and vibrancy.
Step 4: Make the Cuts
- Remove Dead or Damaged Leaves: Start by removing any leaves that are brown, shriveled, or clearly dead. Cut as close to the main stem as possible without damaging the remaining healthy tissue.
- Shape the Plant: To shape your croton, focus on the longer, more unruly branches. Cut above a leaf node—where the leaf joins the stem—to encourage bushier growth.
- Thinning Out Dense Areas: If certain areas of your croton are particularly dense, thinning these out can improve air circulation and reduce the risk of disease. Selectively trim some of the interior branches.
Step 5: Clean Up
After pruning, dispose of any plant debris to prevent pests or disease. Clean your tools with the sanitizing solution to keep them in pristine condition for future use.
Common Issues and Additional Tips
- Over-Pruning: Avoid cutting more than one-third of the plant at once. Over-pruning can stress the plant and hinder its natural growth processes.
- Sap Management: Crotons exude a sticky sap when cut. Use gloves to protect your hands and wipe the sap off your tools and skin immediately.
- Encouraging Fullness: Regularly pinch back new growth to encourage your croton to become bushier and fuller over time.
By following these carefully outlined steps, you’ll ensure that your croton remains healthy and aesthetically pleasing. Regular maintenance and attention to its growth patterns will promote a vibrant indoor plant that adds beauty to your home.

Step-by-Step Instructions for Pruning Your Croton
Pruning a croton house plant is an essential part of maintaining its vibrant appearance and overall health. With their bold colors and striking foliage, crotons can quickly become the centerpiece of your indoor garden. However, to keep them in top condition, regular pruning is required. Below is a detailed, step-by-step guide on how to prune a croton house plant effectively.
Step 1: Gather Your Tools
Before starting the pruning process, ensure you have the proper tools on hand. You will need a pair of sharp, clean pruning shears or scissors. Sterilizing your shears with rubbing alcohol will help prevent disease spread to your croton plant.
Step 2: Identify the Right Time for Pruning
The ideal time to prune your croton is during its growing season, usually in the spring or early summer. This allows the plant to recover and grow more robustly. Avoid pruning during the dormant winter months as this can stress the plant.
Step 3: Inspect Your Plant
Take a moment to carefully examine your croton to identify which parts need trimming. Look for any dead, diseased, or damaged leaves, as well as any leggy or overgrown branches. Pruning these areas will help encourage new, healthy growth.
Step 4: Trim Dead or Diseased Leaves
Start by cutting away any brown, yellow, or drooping leaves at their base. Make clean, diagonal cuts to promote healing. If you notice leaves with signs of disease, remove them immediately to prevent it from spreading to other parts of the plant.
Step 5: Shape Your Croton
Once the unhealthy leaves are removed, focus on shaping your croton. Begin by cutting back any excessively long stems to maintain a balanced shape. Trim about 1/3 of the length of overgrown branches to stimulate fuller foliage. Always cut just above a leaf node, which is where new leaves will emerge.
Step 6: Encourage Bushier Growth
If you desire a bushier croton, pinch back the tips of some of the longest remaining branches. This encourages the plant to branch out, resulting in a thicker, more lush appearance.
Step 7: Post-Pruning Care
After pruning, provide your croton with the right care to aid recovery. Ensure it has adequate sunlight, ideally indirect bright light, as crotons thrive in well-lit conditions. Water your plant thoroughly but wait until the top inch of soil is dry before the next watering to avoid root rot.
Common Issues and Additional Tips
- Common Mistakes: Avoid cutting too much at once; this can shock the plant. Only remove up to 1/3 of the plant’s foliage at a time.
- Watch for Pests: Pruning can sometimes attract pests. Monitor your croton for common pests like mealybugs or spider mites and address quickly if spotted.
- Seasonal Adjustments: Reduce pruning during colder months when the plant’s growth slows, focusing on minimal trimming to maintain shape.
By following these step-by-step instructions, you can ensure your croton house plant remains healthy, vibrant, and beautifully shaped. Regular attention to its pruning needs will help your croton thrive, showcasing its colorful foliage for years to come.
Tips for Maintaining a Healthy Croton Post-Pruning
Pruning a croton house plant is an essential care step to encourage bushy growth, remove dead or damaged leaves, and maintain its vibrant appearance. Here’s a comprehensive guide on how to effectively prune your croton and keep it looking its best.
1. Understand When to Prune:
The best time to prune a croton is during its active growth period, typically in the spring or early summer. This timing allows the plant to recover quickly and promotes vigorous regrowth.
2. Gather Necessary Tools:
Before you begin, ensure you have the right tools on hand. You’ll need a pair of sharp, clean pruning shears or scissors to make precise cuts without damaging the plant. It’s important to clean your tools with rubbing alcohol or a disinfectant to prevent disease transmission.
3. Identify What Needs Pruning:
Look for any dead, damaged, or diseased leaves and stems. These parts not only detract from the plant’s beauty but can also drain its resources. Additionally, consider trimming back healthy branches that have become too long or leggy to encourage fuller growth.
4. Make the Cut:
To prune a croton house plant properly, make clean cuts just above a leaf node or branch junction. This encourages new growth in these areas. For dead or sick leaves, remove them entirely, cutting as close to the main stem as possible without damaging it.
5. Shape Your Plant:
While pruning, you can also shape your croton by trimming to your desired look. If you want a thicker bush, trim back the top branches to encourage side growth.
6. Address Common Issues:
After pruning, your croton may experience some shock, leading to temporary leaf droop. This is normal and can be mitigated by ensuring it is placed in an ideal environment: indirect sunlight, consistent warmth (no drafts), and high humidity.
7. Aftercare Tips:
- Watering: After pruning, water your croton less frequently for the next few weeks as it’s in recovery. Only water when the top inch of soil feels dry.
- Fertilizing: Avoid fertilizing immediately after pruning. Wait a month to resume feeding with a balanced, liquid fertilizer.
- Pest Monitoring: Pruning can expose your croton to pests. Regularly check for common insects like spider mites or scale, and treat promptly if they appear.
8. Encouraging Growth:
To maximize the benefits of pruning, maintain optimal care routines, including proper lighting and regular humidity boosts. Consider misting the plant or placing a humidifier nearby to mimic its native tropical environment.
Pruning is not just a maintenance task, but a vital component in keeping your croton thriving and visually appealing. By following these steps on how to prune a croton house plant, you can ensure your plant remains healthy, vibrant, and an eye-catching addition to your home.

Troubleshooting Common Croton Pruning Issues
Pruning a croton house plant is an essential part of its care, ensuring it maintains a vibrant appearance and grows healthily. Whether you are a beginner or an experienced gardener, following these simple steps will help you prune your croton effectively:
How to Prune a Croton House Plant
-
Gather Your Tools:
- Use a pair of sharp, clean pruning shears or scissors to make precise cuts.
- Keep a pair of gloves handy to protect your hands from the plant’s sap.
-
Identify the Parts to Prune:
- Look for dead or damaged leaves, which are typically brown or shriveled.
- Examine for leggy growth, which could disrupt the plant’s shape or lead to uneven growth.
- Identify any branches that cross each other or appear overly dense; these can restrict light and air flow.
-
Prepare Your Croton:
- Water the plant a day before pruning to ensure it is well-hydrated, which can aid recovery.
- Ensure your croton is in a well-lit area, allowing you to see its structure clearly.
-
Make the Cuts:
- Start by removing dead leaves and branches at their base. Use your pruning shears to make clean cuts.
- Trim any leggy or overgrown stems just above a node or leaf set. Cutting above a node encourages bushier growth.
- Thin out dense areas by selectively removing some branches to allow more light penetration and airflow.
-
Shape Your Croton:
- Prune to maintain the desired shape and size. Aim for a balanced look with no part of the plant disproportionately large or small.
- Regularly rotate your cropped croton to ensure even growth on all sides.
Common Issues and Troubleshooting
1. Regrowth Problems:
- If your croton does not seem to regrow after pruning, check the light source. Crotons thrive in bright, indirect sunlight. Ensure they have enough light to recover and grow.
2. Sap Exposure:
- Croton sap can cause skin irritation, so wearing gloves is essential. Wash any exposed skin immediately to prevent reaction.
3. Over-pruning:
- Avoid cutting more than one-third of the plant at once. Excessive pruning can stress the plant, impacting its growth and health.
4. Dull Tools:
- Using dull tools can crush stems rather than cut them cleanly, leading to potential infections. Regularly sharpen your pruning tools.
Additional Tips
- Pruning is best done in spring or summer when the croton is actively growing.
- Regularly wipe the leaves with a damp cloth to keep them dust-free and check for signs of pests or disease.
- After pruning, give your croton a gentle water if the soil feels dry to help it bounce back.
By following these guidelines on how to prune a croton house plant, you will keep your plant looking its best and encourage vibrant, healthy growth throughout the year. Regular maintenance and attentive care will reward you with a stunning croton that enhances your living space.
In conclusion, pruning a croton house plant is an essential practice to maintain its lush, colorful foliage and overall health. By understanding when and how to prune, using the right tools like sharp, clean shears, and focusing on removing dead or overgrown stems, you can ensure your croton thrives indoors. Remember to start pruning in the early spring to encourage robust growth during the growing season, and always prioritize the plant’s natural shape as you trim to keep it aesthetically pleasing.
Now that you are equipped with the know-how, it’s time to put these tips into practice and watch your croton house plant flourish. As a final tip, consider rotating your croton periodically to ensure even light exposure. This simple action can promote balanced growth and prevent your plant from leaning in one direction. Happy pruning!