Imagine transforming your living space into a lush, green sanctuary where nature thrives all around you, breathing life and tranquility into every corner. One of the most charming ways to achieve this is by propagating your own houseplants, and what better candidate than the robust and versatile philodendron? With its cascading vines and heart-shaped leaves, the philodendron not only adds aesthetic elegance to any room but also purifies the air, making it an essential component of a serene home environment. However, the thought of propagation can be daunting to many plant parents, leaving them wondering where to start. Fear not, for in this guide, we will unravel the seemingly mysterious art of philodendron propagation. Whether you have a penchant for greenery or simply wish to expand your botanical collection without breaking the bank, learning how to propagate philodendron is a skill that offers endless rewards. Dive into our step-by-step instructions and tips, and discover how to nurture your plant into a thriving masterpiece that keeps on giving. Embrace your inner horticulturist and turn your home into the verdant oasis you’ve always dreamed of!
Understanding Philodendron Propagation Basics
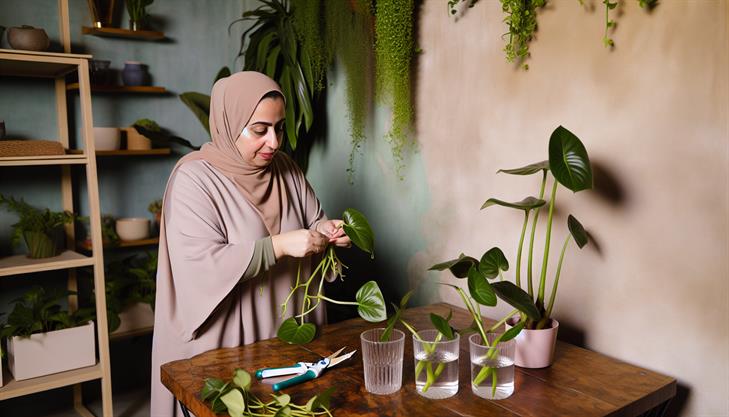
Propagating a philodendron is a rewarding endeavor, especially for plant enthusiasts looking to expand their green collection with ease. Known for their lush foliage and resilience, philodendrons are popular houseplants that can be propagated through several simple methods. Whether you’re a beginner or an experienced gardener, following these straightforward steps will help you propagate your philodendron successfully.
Step-by-Step Guide to Philodendron Propagation:
-
Choosing the Right Time:
For optimal results, propagate your philodendron during the growing season, typically spring or early summer, when the plant is naturally producing new growth. -
Selecting a Healthy Stem:
Begin by identifying a healthy mother plant. Look for a stem that is at least 4 to 6 inches long, has a few leaves, and features a visible node (a small bump where roots are likely to develop). -
Making the Right Cut:
Using clean, sharp scissors or pruning shears, make a clean cut just below a node. Removing any excess leaves from the lower part of the cutting will ensure the node is ready for rooting. -
Preparing for Rooting:
You have two main options here—water or soil propagation.Water Propagation:
- Submerge the node and about half the cutting in a water-filled container.
- Place the container in a warm, well-lit area away from direct sunlight to prevent leaf scorch.
- Replace the water every few days to prevent stagnation and promote healthy root development.
Soil Propagation:
- Prepare a small pot with well-draining potting mix, preferably one that’s airy and rich in organic matter.
- Create a small hole in the soil and insert the cutting, ensuring that the node is covered.
- Water the soil lightly until it’s evenly moist but not waterlogged.
-
Creating the Right Environment:
For both methods, maintaining humidity is crucial. You can cover the cutting with a plastic bag or place it in a mini greenhouse to retain moisture, fostering quicker root growth. -
Monitoring Progress:
Within 2 to 4 weeks, you should notice new roots forming. In water, they will visibly grow from the node, whereas in soil, new leaf growth signals successful root development.
Common Issues and Tips:
- Avoid Overwatering: Both water and soil propagation require careful attention to moisture. Make sure not to overwater soil cuttings, as this can lead to rot.
- Patience is Key: Propagation takes time. If roots aren’t visible immediately, remain patient and continue providing consistent care.
- Use Clean Tools and Containers: Always use sterilized tools and containers to prevent diseases or infections in cuttings.
Additional Advice:
Consider using rooting hormone, especially for soil propagation, to encourage rapid root growth. This isn’t strictly necessary, but it can be beneficial in speeding up the process.
By following these detailed steps on how to propagate philodendron, you’ll soon have a thriving new plant to enjoy. Whether propagating for personal satisfaction or to share with others, these lush beauties are sure to bring life and color to any space.
Step-by-Step Guide to Propagating Philodendron from Cuttings
Propagating philodendrons from cuttings is an excellent way to expand your indoor plant collection or share plants with friends. This process is not only rewarding but also straightforward, making it perfect for both novice and experienced plant enthusiasts. Here’s a step-by-step guide to ensure successful propagation of your philodendron.
Step 1: Gather Your Tools and Materials
Before you begin, gather all necessary materials. You will need:
- A healthy philodendron plant
- A sharp, sterilized pair of scissors or pruning shears
- A clean container or glass
- Water (if water-propagating) or a pot with well-draining soil
- Rooting hormone (optional)
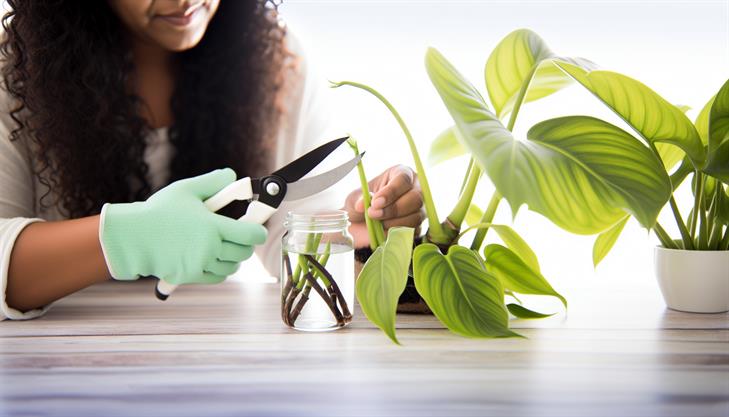
Step 2: Select a Healthy Stem
Choose a healthy stem from the philodendron plant. Look for a stem that is at least 4-6 inches long and has several leaves and nodes. Nodes are crucial as they are the points where new roots will grow from.
Step 3: Make the Cut
Using your sterilized scissors or shears, make a clean cut about a quarter inch below a node. Ensure the cutting has at least two to three leaves and at least one node, which will be submerged in water or inserted into soil.
Step 4: Prepare the Cutting
If you’re using rooting hormone, this is the time to dip the cut end of your philodendron cutting into the powder. While optional, rooting hormone can accelerate root growth and increase your success rate.
Step 5: Choose Your Propagation Method
Water Propagation:
- Fill a clean glass or container with water, ensuring it covers at least one node.
- Place the cutting in the water-filled container, keeping it in a warm, bright area away from direct sunlight.
- Change the water every few days to keep it fresh and free from bacteria.
Soil Propagation:
- Fill a small pot with well-draining soil.
- Poke a hole in the soil and gently insert the cutting, ensuring at least one node is buried.
- Water the soil lightly, keeping it moist but not soggy.
- Place the pot in a warm, bright location out of direct sunlight.
Step 6: Monitor and Wait for Root Growth
Roots should start developing within 2 to 4 weeks. For water-propagated cuttings, you’ll notice roots emerging from the nodes submerged in water. Soil-propagated cuttings may take slightly longer, so patience is key.
Step 7: Transplanting (if Water-Propagated)
Once the roots are about 1-2 inches long, it’s time to transfer your cutting into soil:
- Prepare a pot with well-draining soil.
- Create a hole for the cutting and gently place it in, covering the roots and node with soil.
- Water the plant thoroughly and place it in its permanent location.
Tips for Success
- Lighting: Bright, indirect light is ideal for both propagation and the new plant. Too much direct sunlight can scorch the cuttings, while insufficient light may slow root development.
- Temperature: A warm environment around 70-75°F (21-24°C) encourages faster growth.
- Humidity: Higher humidity levels can improve success rates. Consider misting the cutting or using a humidity tray.
Common Issues
- Yellowing Leaves: Often a sign of overwatering. Ensure the water is refreshed regularly during water propagation, and soil isn’t waterlogged.
- Slow Root Growth: Low light or temperatures might be the cause. Adjust location to a brighter spot and check the room temperature.
By following these steps meticulously, you can propagate philodendron plants with ease, allowing them to thrive and enhance your green space. Enjoy watching your new plants grow and enhance the ambiance of your home!
Tips for Using Soil and Water Methods Effectively
Propagating a philodendron is a rewarding and straightforward process that allows you to expand your indoor garden quickly and easily. Whether you’re a seasoned plant enthusiast or a beginner, this guide will help you successfully propagate your philodendron using both soil and water methods.
Step-by-Step Guide to Propagate Philodendron
Materials You Will Need:
- A healthy philodendron plant
- Clean, sharp scissors or pruning shears
- Small glass jar or container (for water propagation)
- Small pot with drainage holes (for soil propagation)
- Potting soil (preferably a mix designed for houseplants)
- Optional: rooting hormone
Method 1: Water Propagation
-
Select a Cutting: Choose a healthy vine from your philodendron that has at least one node (the knobby part where leaves and roots will sprout). A cutting of about 4-6 inches long is ideal.
-
Cut the Vine: Use your clean scissors or pruning shears to make a cut just below a node. Ensure it’s a clean cut to prevent damage to the plant.
-
Prepare the Water Jar: Fill a glass jar or container with water. Make sure the water is at room temperature and change it every few days to keep it fresh.
-
Place the Cutting in Water: Submerge the cut end of the vine in the water, ensuring the node remains submerged as that’s where roots will form. Position the jar in a spot with bright, indirect sunlight.
-
Wait for Roots to Develop: Over the next few weeks, watch for new roots to grow. This typically takes 2-4 weeks. Once the roots are about 2 inches long, your cutting is ready for potting.
-
Transition to Soil: After roots have developed, plant your cutting in a pot filled with houseplant soil. Water thoroughly and maintain in indirect sunlight.
Method 2: Soil Propagation
-
Select and Cut a Vine: Like water propagation, select a healthy vine from the plant with at least one node and cut below the node.
-
Prepare the Potting Mixture: Use a well-draining soil mix, preferably one suited for houseplants. Filling a small pot with this mixture ensures good support and moisture management for the cutting.
-
Optional: Apply Rooting Hormone: To promote root growth, dip the cut end of the vine in rooting hormone before planting. This step is optional but can enhance success rates.
-
Plant the Cutting: Make a small hole in the soil and insert the cutting with the node below the soil surface. Firmly press soil around the cutting to stabilize it.
-
Water the Cutting: Water the soil thoroughly just after planting. Ensure the pot has proper drainage to prevent waterlogging, which could lead to rot.
-
Provide Optimal Conditions: Place the pot in a warm spot with indirect sunlight. Keep the soil slightly moist but not soggy, checking regularly to prevent over or under-watering.
Common Issues and Tips
-
Yellowing Leaves: If leaves yellow, it might indicate overwatering. Allow the soil to dry slightly between waterings.
-
No Root Growth: Ensure the cuttings are in indirect sunlight and have the node submerged or buried correctly.
-
Root Rot: Avoid overwatering the soil or letting water sit too long in the jar by refreshing it every 2-3 days.
Propagating philodendrons using soil and water methods can greatly enlarge your plant collection. By following these simple steps and monitoring your new cuttings, you’ll enjoy the lush beauty of philodendrons in various parts of your home.
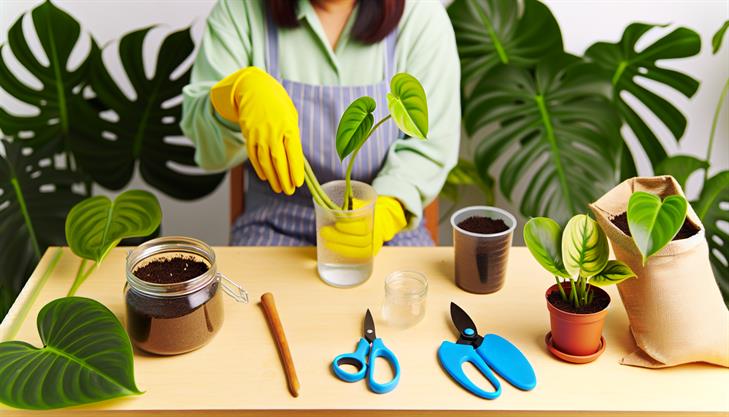
Tools and Materials Needed for Successful Propagation
Propagating philodendrons is a rewarding process that can help you grow new plants from cuttings with relative ease. By following these steps and understanding the needed tools and materials, you can ensure successful propagation.
Tools and Materials Needed:
- Sharp, Sterilized Pruning Shears or Scissors: Essential for making clean cuts, reducing the chance of infection to the plant.
- Water Container or Potting Mix: Depending on whether you are using the water method or soil method for rooting.
- Rooting Hormone (optional): This can speed up the rooting process and increase the success rate.
- Small Pots: Used for planting rooted cuttings, with adequate drainage holes.
- Clear Plastic Bag (optional): Helps create a mini greenhouse effect to maintain humidity.
- Label and Marker: To keep track of propagation attempts.
Step-by-Step Guide to Propagating Philodendron:
-
Choose the Right Stem: Look for a healthy philodendron stem with at least two or three leaf nodes (small bumps along the stem where leaves and roots grow).
-
Make the Cut: Using your sterilized pruning shears, cut a 4-6 inch section of the stem. Ensure you make the cut just below a leaf node, as this is where roots will develop.
-
Prepare the Cutting:
- Remove Lower Leaves: Trim off the leaves on the lower part of the cutting, leaving a couple of leaves at the top. This prevents leaf rot in water or soil.
- Optional Step: Dip the cut end into rooting hormone to accelerate root growth.
-
Choose a Propagation Method:
-
Water Method: Place the cutting in a jar of water, ensuring nodes are submerged but leaves are above the waterline. Change the water every week to prevent bacterial growth.
-
Soil Method: Plant the cutting in a well-draining potting mix. Water the soil lightly to keep it moist but not waterlogged.
-
-
Monitor and Wait:
-
Water Method: Roots usually begin to develop within a few weeks. Look for roots that are 1-2 inches long before transferring to soil.
-
Soil Method: Keep the soil consistently moist and place the pot in a warm, bright area out of direct sunlight. Roots will typically develop within 4-6 weeks.
-
-
Transplanting: Once a healthy root system is established, plant the cutting into a small pot with well-draining potting soil. Ensure the pot has drainage to prevent overwatering.
Common Issues and Tips:
- Yellowing Leaves: Often a result of overwatering, especially in the soil method. Ensure proper drainage and let the soil dry out slightly between waterings.
- Rotting Cuttings: May occur if leaves are submerged in water or due to overwatered soil. Make sure to maintain good hygiene by sterilizing tools and changing water regularly.
- Slow Root Growth: Temperature and humidity play crucial roles. Keep cuttings in a warm environment and consider using a plastic bag to trap humidity.
- Usage of Rooting Hormone: While not necessary, it can be helpful to enhance root development.
By following these steps and keeping these tips in mind, you’ll effectively propagate your philodendron, allowing you to expand your green oasis with ease. Happy propagating!
Troubleshooting Common Propagation Problems
Propagating philodendron is an enjoyable and rewarding process, perfect for plant enthusiasts looking to expand their greenery collection. This guide will walk you through the steps of how to propagate philodendron successfully, along with useful tips for overcoming common challenges you might encounter.
Step-by-Step Guide to Propagate Philodendron
-
Select the Right Time and Tools
- The best time to propagate philodendron is during the spring or early summer when the plant is actively growing. Use a clean pair of scissors or pruning shears to avoid transferring diseases to your plant.
-
Choose a Healthy Stem for Cutting
- Identify a healthy stem with at least two or three nodes (small bumps where leaves meet the stem). Nodes are crucial as they are where new roots will develop. Ensure the chosen stem is free from signs of disease or pest infestations.
-
Make a Clean Cut
- Cut the stem just below a node using your prepared tools. The cutting should be about 4-6 inches long and include several leaves. Remove any leaves from the bottom node that will be submerged in water or soil.
-
Rooting Method Choice: Water or Soil
- Water Propagation: Place the cutting in a clear jar or glass of water, ensuring the bottom node is submerged. Use filtered water and replace it every few days to prevent stagnation. This method allows easy monitoring of root development.
- Soil Propagation: Dip the cut end of the stem in rooting hormone (optional) and plant it in a pot filled with moist, well-draining soil. Keep the soil consistently moist until the cutting establishes roots.
-
Provide the Right Environment
- Position your cutting in a location with bright, indirect light, as direct sunlight can be too harsh. Maintain a warm environment, ideally around 70-75°F (21-24°C), to encourage root development.
-
Be Patient and Monitor Growth
- Rooting can take several weeks. Check regularly for root growth if using the water method; roots should be at least 1-2 inches long before transitioning to soil.
Common Propagation Problems and Solutions
-
Cuttings Failing to Root: This issue often occurs if the cutting size is too small or if it’s not taken from a node. Always ensure nodes are included in your cuttings, as they are crucial for root formation.
-
Leaf Browning or Yellowing: This can be due to overexposure to direct sunlight or improper watering. Ensure your philodendron cutting is in a spot with indirect light and adjust your watering habits as necessary.
-
Rotting Stems: Often resulting from overly wet conditions. Prevent this by ensuring proper drainage and avoiding over-watering when using soil propagation.
Additional Tips for Success
-
Hydrogen Peroxide: Adding a small amount of hydrogen peroxide to the water can prevent the growth of bacteria in water propagation.
-
Humidity: Increase humidity around your cuttings using a humidity dome or by placing the pot on a tray of wet pebbles, which can help promote faster root growth.
By following these instructions and addressing potential issues proactively, you can successfully propagate your philodendron, making it a lush addition to your home or garden space.
In conclusion, propagating philodendron is a rewarding endeavor that can be easily accomplished with a bit of patience and care. By choosing the right method, whether it’s water propagation, soil transfer, or air layering, you can successfully multiply your plants and enjoy the beauty of philodendrons throughout your home. Remember to select healthy cuttings, pay close attention to watering and lighting conditions, and be patient as your new plants establish their roots.
Now that you’ve armed yourself with these essential techniques and tips, it’s time to put them into practice. Not only will you enhance your skills as a plant parent, but you’ll also expand your collection and perhaps share cuttings with friends or fellow plant enthusiasts.
As a final recommendation, experiment with various propagation methods to see which works best for you and your philodendron varieties. Additionally, consider keeping a journal to document your propagation successes, challenges, and plant growth over time. This will not only bolster your confidence but serve as a helpful reference for future propagation projects. Happy planting!