If you’re a lover of lush, indoor greenery, then you’ve likely admired the elegant umbrella-like foliage of the Schefflera plant. Not only does this tropical beauty add a touch of sophistication to any space, but its adaptability and low-maintenance nature make it a favorite among both novice and experienced plant enthusiasts. However, what if one Schefflera just isn’t enough to satisfy your botanical ambitions? Enter the art of propagation—a cost-effective and rewarding way to multiply your favorite houseplant. In this guide, we’ll delve into the step-by-step process of propagating a Schefflera, allowing you to expand your green oasis effortlessly. By mastering this skill, not only can you increase your plant collection, but you’ll also gain a deeper understanding of plant care, enjoying the satisfaction of nurturing life from a single cutting. Read on to discover the secrets of successful propagation and transform your home into a thriving verdant paradise.
Preparing Your Schefflera Plant for Propagation
Propagating a Schefflera plant, often known as the umbrella plant, is a rewarding process that allows you to multiply your greenery and bring more life into your space. Whether you’re a beginner or a seasoned gardener, the following step-by-step guide will ensure you successfully propagate your Schefflera plant using cuttings.
Selecting the Right Time and Tools
The best time to propagate a Schefflera plant is during the growing months of spring or early summer. During this time, the plant’s natural growth cycle can enhance root development.
Tools You’ll Need:
- Sharp pruning shears
- Clear plastic bag or a plastic propagation cover
- Small pot with drainage holes
- High-quality potting soil or a soilless mix
- Rooting hormone (optional)
- Water spray bottle
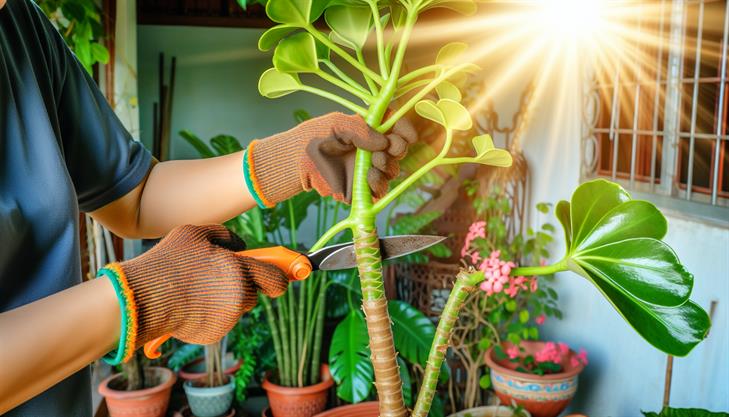
Step 1: Choose a Healthy Stem
Select a healthy stem from your Schefflera plant, ideally one that is new and vibrant. The stem should be about 4 to 6 inches long and have several leaves.
Step 2: Make the Cut
Use your sharp pruning shears to make a clean cut just below a leaf node on the chosen stem. A clean cut ensures less damage to the plant, making the cutting process smoother and enhancing rooting success.
Step 3: Prepare the Cutting
Remove the lower leaves of the cutting, leaving a few at the top. If you have rooting hormone, dip the cut end of the stem into it to encourage quicker root development.
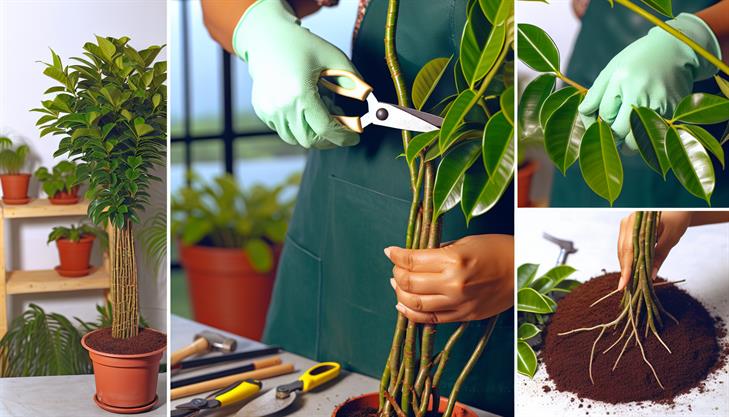
Step 4: Plant the Cutting
Fill a small pot with a well-draining potting mix or a soilless mix. Insert the cutting into the soil, ensuring the lower nodes are covered. Gently press the soil around the stem to provide stability.
Step 5: Create a Humid Environment
Cover the potted cutting with a clear plastic bag or use a plastic propagation cover to retain humidity. This mimics a greenhouse environment, which is crucial for root development.
Step 6: Provide Proper Care
-
Watering: Keep the soil consistently moist but not waterlogged. You can use a spray bottle to mist the soil regularly.
-
Light: Place the cutting in a bright, indirect light location. Avoid direct sunlight as it can scorch the young plant.
-
Temperature: Maintain a warm environment, ideally between 65°F to 75°F (18°C to 24°C) for optimal growth.
Monitoring and Troubleshooting
Within a few weeks, you should notice new growth, indicating successful rooting. However, be cautious of the following potential issues:
-
Leaf Droop or Yellowing: This may suggest overwatering or insufficient light. Adjust water levels and ensure the plant receives adequate indirect sunlight.
-
Mold: If you notice mold, it might be due to excess moisture and poor ventilation. Remove the plastic cover occasionally to allow air circulation.
-
Root Rot: Check for proper drainage and reduce watering frequency if you suspect root rot.
Additional Tips
- Patience is key; rooting can take several weeks to months, depending on environmental conditions.
- If propagation is unsuccessful, try using water propagation by placing the cutting in a jar with water until roots establish, then transfer it to soil.
By following these steps and monitoring your plant’s needs, you can easily propagate your Schefflera plant, expanding your indoor garden with ease. Enjoy nurturing each new plant and watch as your home grows greener!
Methods for Propagating Schefflera: Cutting and Layering
Propagating a Schefflera plant can be a rewarding way to multiply your collection and share these lush, tropical plants with others. Two popular methods for propagating Schefflera are through cuttings and layering, each offering unique benefits. Here’s how you can effectively propagate Schefflera using these methods, along with some tips and advice for success.
Propagating Schefflera Through Cuttings
Taking stem cuttings is a straightforward approach to propagate a Schefflera plant. Follow these steps for optimal results:
-
Select a Healthy Parent Plant: Choose a mature, healthy Schefflera to take cuttings from. Look for vigorous stems with healthy leaves, as these will provide the best chance for successful propagation.
-
Prepare the Tools and Cuttings: Sterilize a sharp pair of scissors or pruning shears with rubbing alcohol to prevent the transfer of diseases. Cut a 4-6 inch length stem from the parent plant, ensuring there are at least two leaf nodes on the cutting.
-
Remove Lower Leaves: Strip the leaves from the lower half of the cutting. This helps direct the plant’s energy to root development rather than sustaining extra foliage.
-
Apply Rooting Hormone (Optional): Dip the cut end of the stem in rooting hormone powder to encourage faster root development. While optional, it can significantly improve the success rate.
-
Plant the Cutting: Fill a small pot with a well-draining potting mix, making a hole in the center with a pencil or your finger. Insert the cutting into the hole, firming the soil around it to hold it upright.
-
Create a Humid Environment: Cover the pot with a plastic bag or a clear plastic dome to maintain humidity. This simulates a greenhouse effect, crucial for cuttings until roots develop.
-
Provide Proper Care: Place the pot in a warm area with bright, indirect light. Water the soil lightly, keeping it consistently moist but not soggy, checking regularly to prevent drying out or overwatering.
-
Root Development and Transplanting: In about 4-6 weeks, gently tug the cutting to feel for resistance indicating root growth. Once established, you can transplant your new Schefflera into a larger pot and care for it as you would a mature plant.
Propagating Schefflera Through Layering
Layering is another method to propagate a Schefflera, allowing new roots to develop while remaining attached to the parent plant. This technique is less stressful for the cutting and often results in a stronger propagated plant.
-
Choose the Layering Spot: Identify a pliable stem that can be bent down to the ground easily. Ensure the selected branch is healthy and growing actively.
-
Wound the Stem: With a sterilized knife, make a small cut halfway through the stem at the point where you intend roots to grow. Dust the cut with rooting hormone if desired.
-
Secure the Layering: Bend the wounded stem down to the soil level and secure it using a U-shaped pin or by burying it with a small amount of potting mix. Ensure the cut stays in contact with the soil continuously.
-
Maintain Moisture: Consistent moisture is crucial. Water the area to keep the soil damp but not waterlogged. The stem being layered should be checked periodically to ensure it’s thriving.
-
Root Formation: After a few weeks to months, roots should develop at the wound site. Once you see sufficient root growth, you can cut the new plant free from the parent.
-
Transplanting the Layered Plant: Carefully dig up the new plant, ensuring minimal disturbance to the roots, and transfer it to a separate pot with quality potting soil.
Additional Tips and Advice
- Common Issues: Watch out for leaf yellowing or wilting, which can indicate problems like overwatering or insufficient light. Adjust care protocols to address these issues.
- Optimal Conditions: Schefflera plants prefer warm, humid environments. Keeping the temperature around 65-75°F and avoiding cold drafts can improve propagation success.
- Pest Prevention: Regularly check your new plants for pests and diseases, and treat promptly with appropriate measures to ensure healthy growth.
Through these propagation techniques, anyone can multiply their Schefflera plants, enhancing their indoor greenery while learning more about plant care and maintenance. Whether you choose cutting or layering, patience and attention to detail will yield gratifying results.
Essential Tools and Materials Needed for Schefflera Propagation
Propagating a Schefflera plant, commonly known as the umbrella plant, can be a rewarding process, especially for those looking to expand their collection or share plants with friends. To ensure success, it’s essential to have the right tools and materials on hand and to follow a systematic approach. Here’s a complete guide to help you get started.
Materials and Tools Required
- Healthy Schefflera Plant: Choose a mature plant with several stems to ensure successful propagation.
- Sharp Pruning Shears or Scissors: Essential for making clean cuts, reducing damage to both parent and cuttings.
- Small Pots or Containers: These should have good drainage to prevent waterlogging.
- Rooting Hormone (Optional): Can increase rooting success rates, especially for beginners.
- Potting Mix or Perlite: Use a well-draining mix suitable for houseplants.
- Plastic Bags or Clear Covers: To maintain humidity around the cuttings.
- Watering Can or Spray Bottle: For keeping the medium moist.
- Labels and a Marker: To identify different cuttings if propagating multiple plants.
Step-by-Step Propagation Guide
1. Preparing the Cuttings
- Select a Stem: Look for a healthy, non-flowering stem with several leaves. Ideally, it should be 4 to 6 inches long.
- Make the Cut: Using your disinfected pruning shears, make a clean cut just below a leaf node, where new roots are likely to form.
- Prepare the Cutting: Remove the lower leaves, leaving some at the top. You want to minimize leaf surface to reduce water loss while allowing the cutting to photosynthesize.
2. Rooting the Cuttings
- Optional: Dip in Rooting Hormone: Gently dip the cut end in rooting hormone. This step is optional but can help in accelerating root development.
- Plant in Potting Mix: Insert the cutting about an inch deep into a moistened potting mix or perlite, ensuring it stands upright.
- Cover for Humidity: Cover the pot with a plastic bag or clear dome to create a mini greenhouse effect, retaining moisture.
3. Placement and Care
- Lighting: Place the pot in a well-lit area but away from direct sunlight, which can scorch delicate cuttings.
- Watering: Keep the soil consistently moist but not overly wet. Use a spray bottle to mist the cuttings daily, maintaining humidity.
- Temperature: Rooting typically requires warmth, so aim for a temperature between 65°F to 75°F (18°C to 24°C).
Additional Tips and Common Issues
- Check for Roots: After about 4 weeks, gently tug on the cuttings. Resistance often indicates root development.
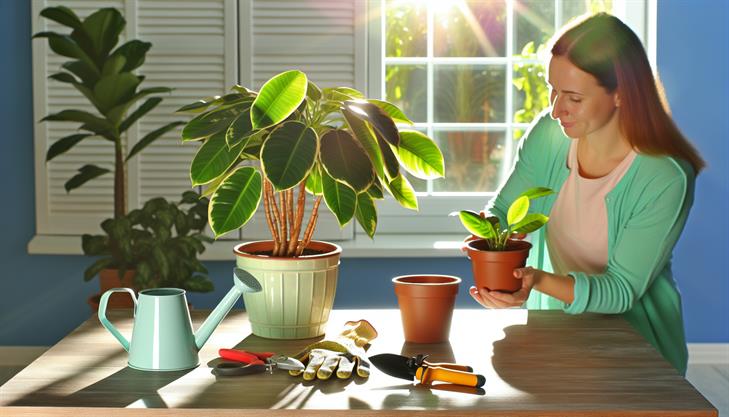
- Transplanting: Once roots have formed, transfer the cuttings to individual pots with a more permanent soil mix.
- Watch for Rot: Overwatering is a common issue, leading to rot. Ensure proper drainage and avoid waterlogged conditions.
By following these steps, you can successfully propagate your Schefflera plant, expanding your green space or sharing with others. Remember, patience and careful attention to your cutting’s environment are key to achieving healthy, thriving new plants.
Tips for Successful Growth After Propagation
Propagating a Schefflera plant, commonly known as the umbrella plant, can be a rewarding endeavor. Follow these detailed steps to ensure a high success rate for propagating your plant:
Step 1: Choose the Right Time and Tools
For optimal results, propagate your Schefflera plant during the spring or early summer when the plant is actively growing. Gather necessary tools, including sharp pruning shears, a small pot with drainage holes, potting mix, and rooting hormone (optional).
Step 2: Select a Healthy Stem
Identify a healthy stem with vibrant leaves, ideally one that is 4-6 inches long. Ensure the chosen stem is free from disease or pests, as healthier starts increase the likelihood of successful propagation.
Step 3: Take a Cutting
Using your pruning shears, make a clean cut below a node (the point where leaves attach to the stem). Remove any leaves from the lower part of the cutting to prevent rot when placed in soil.
Step 4: Prepare the Cutting
Dip the cut end of the stem in water, tipping off any excess, and then into rooting hormone powder, if desired. This step encourages root development but is not strictly necessary for a Schefflera cutting to root.
Step 5: Plant the Cutting
Fill a small pot with a well-draining potting mix. Insert the cutting into the soil approximately 1-2 inches deep, ensuring the node is buried and the bare stem is secured upright. Firmly press the soil around the cutting to support its stability.
Step 6: Care for the Cutting
Water the soil lightly to maintain moisture without making it soggy, as excessive water can lead to rot. Position the pot in a warm, bright location with indirect sunlight. Avoid direct sunlight, as it can stress the cutting and hinder growth.
Step 7: Monitor Growth
Regularly check the soil moisture and avoid letting it dry out completely. Roots should begin developing in a few weeks. Gently tug the cutting after around four weeks; resistance indicates root growth.
Common Issues:
- Overwatering: Schefflera cuttings are prone to root rot if kept too wet. Ensure the potting mix is only slightly damp and the container has good drainage.
- Lack of Rooting: If after 4-6 weeks the cutting shows no signs of rooting, try using a different, healthier stem and ensure proper conditions are met, such as adequate humidity and warmth.
Additional Tips:
- Maintain high humidity by placing a clear plastic cover, like a bag or a cut soda bottle, over the cutting. Ensure it doesn’t touch the leaves.
- If using water development, replace the water every week to prevent stagnation and ensure healthy root growth.
Successfully propagating a Schefflera plant is a straightforward process with the right conditions and care. By following these steps, you should see your new Schefflera begin to flourish, adding a touch of lush greenery to your space.
Troubleshooting Common Schefflera Propagation Issues
Propagating a Schefflera plant, also known as an umbrella plant, can be a rewarding way to expand your collection or share with friends. Here’s a comprehensive guide to successfully propagate your Schefflera plant using stem cuttings, which is the most effective method.
Materials Needed:
- Sharp, clean pruning shears or scissors
- A small container or pot
- Potting soil or a soilless mix
- Rooting hormone (optional)
- A plastic bag or a humidity dome
- Clean water
Step-by-Step Guide:
Step 1: Choose the Right Stem
Select a healthy stem from your existing Schefflera plant for propagation. Ideally, it should be about 4-6 inches long, with a few leaves at the top. Avoid using flowering stems, as they divert energy away from root development.
Step 2: Make the Cut
Using sharp and sterilized pruning shears, make a clean cut just below a node (the point where leaves attach to the stem). This is crucial for encouraging root growth. Ensure the cut is at a 45-degree angle to increase the surface area for rooting.
Step 3: Prepare the Cutting
Remove any leaves from the lower half of the cutting to prevent them from rotting once planted. Dip the cut end into rooting hormone to enhance the chances of successful rooting, although this is an optional step.
Step 4: Plant the Cutting
Fill a small pot with well-draining potting soil or a soilless mix. Create a hole in the center using a pencil or your finger, and gently insert the stem cutting into the hole. Firm the soil around the base to support the cutting.
Step 5: Provide the Right Environment
Water the cutting lightly to moisten the soil, ensuring it is evenly damp but not soaked. Cover the pot with a clear plastic bag or a humidity dome to retain moisture, but ensure it does not touch the leaves. Place the setup in a warm, bright location with indirect sunlight.
Step 6: Maintain and Monitor
Check the moisture level regularly, watering as needed to keep the soil slightly damp. Avoid overwatering, as this can cause rot. Within a few weeks, roots should begin to develop. You can gently tug on the cutting to see if it has taken root.
Common Issues and Troubleshooting
- Wilting or Yellowing Leaves: These can indicate overwatering or poor drainage. Ensure the pot has adequate drainage holes and allow the soil to dry slightly between waterings.
- Failure to Root: This may result from using an improper stem type. Always use young, healthy stems and consider using a rooting hormone to boost success rates.
- Mold or Rot: Can occur if the environment is too humid or if air circulation is poor. Adjust the plastic bag to allow some ventilation if this issue arises.
Tips for Success:
- Temperature: Maintain a consistent temperature between 70-85°F (21-29°C) for optimal growth.
- Lighting: Avoid direct sunlight that can scorch leaves. Bright but indirect light is ideal for propagation.
- Patience: Schefflera cuttings may take several weeks to root, so patience and consistent care are key.
By following these steps and being mindful of the potential issues, you should be well on your way to propagating a healthy Schefflera plant. Whether you’re doing it to expand your own collection or share the beauty with others, the effort will surely be worth it.
In conclusion, propagating a schefflera plant is a rewarding and straightforward process that can be accomplished with a little patience and the right techniques. By choosing healthy stems for cuttings, ensuring they have sufficient nodes, and providing the right conditions for root growth, you can successfully expand your collection of these lovely plants. Remember to use well-draining soil, maintain consistent moisture levels, and offer ample indirect sunlight to encourage robust development. As you become more familiar with the propagation process, you’ll find that each new plant you nurture brings a unique sense of satisfaction and pride.
Now that you have a solid understanding, we encourage you to apply these techniques and watch as new life sprouts from your efforts. As a final tip, consider keeping a propagation journal where you can track the progress of your schefflera cuttings, noting any challenges and successes. This not only helps improve your skills but also enriches your gardening journey with valuable insights for future propagation projects. Happy gardening!