Are you enchanted by the strikingly vivid leaves of Aglaonema and yearning to expand your collection? Or perhaps you’re looking to share their lush beauty with friends and family? Welcome to the world of propagating Aglaonema, where cultivating a thriving indoor garden just got simpler and more rewarding. Known as the “evergreen of China,” this resilient houseplant is not just aesthetically pleasing but also a symbol of longevity and good fortune, making it a cherished addition to any space. By mastering the art of propagation, you’re not only nurturing new life but also enhancing your green thumb skills and potentially saving on your plant expenses. This comprehensive guide will walk you through each step with expert precision, ensuring that your Aglaonema journey is both successful and satisfying. Dive in to discover how you can transform a single plant into a flourishing family of houseplants!
Understanding Aglaonema: A Beginner’s Guide
Propagating Aglaonema, also known as the Chinese Evergreen, is a rewarding process that allows you to grow new plants from an existing one. This hardy houseplant is not only popular for its attractive foliage but also for how easy it is to propagate. Below is a step-by-step guide to help you understand how to propagate Aglaonema successfully:
Choosing the Right Time and Tools
The best time to propagate Aglaonema is during the warmer months, preferably spring or early summer, when the plant is actively growing. Before you begin, gather the necessary tools: a sharp, sterile knife or scissors, a small pot with drainage holes, fresh potting mix, and rooting hormone (optional).
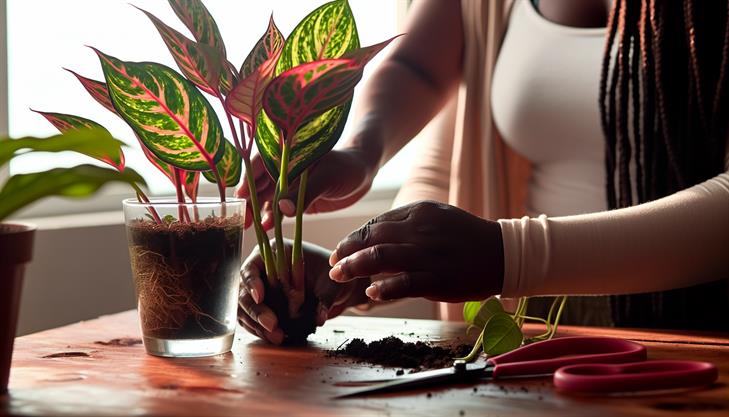
Step 1: Select a Healthy Mother Plant
Start by choosing a mature and healthy Aglaonema plant. Look for a plant with multiple stems or has become leggy, as these are ideal for propagation. A healthy mother plant ensures better success rates and robust new growth.
Step 2: Decide on a Propagation Method
Aglaonema can be propagated via division or stem cuttings.
Division Method:
- Gently remove the Aglaonema from its pot and inspect the roots.
- Identify sections with their own root systems for division.
- Carefully separate these sections, ensuring each has roots and leaves.
- Repot each section in a new pot filled with fresh potting mix.
Stem Cutting Method:
- Cut a 4-6 inch stem section from the plant. Ensure that it has at least two to three leaves.
- Remove the lower leaves, leaving the top ones intact.
- Optionally, dip the cut end in rooting hormone to encourage root growth.
- Plant the cutting in a pot filled with a moist, well-draining soil mixture.
Step 3: Create the Ideal Growing Environment
After potting, place your new Aglaonema in a warm, humid environment with indirect light. Avoid direct sunlight as it can scorch the leaves. You can cover the pot with a clear plastic bag to create a greenhouse effect, which helps maintain humidity.
Step 4: Watering and Care
Keep the soil consistently moist but not waterlogged. Water your propagated Aglaonema when the top inch of soil feels dry. Be cautious of overwatering as this can lead to root rot—a common issue in plant propagation.
Troubleshooting Common Issues
- Yellowing Leaves: This can indicate either overwatering or underwatering. Adjust your watering schedule accordingly.
- No Root Growth: If you notice no root development after a few weeks, double-check light and humidity conditions, and consider using a rooting hormone.
Additional Tips
- Be patient, as root development can take several weeks.
- Ensure good drainage to prevent water accumulation, which increases the risk of root rot.
- Regularly check for pests like spider mites or aphids, which can affect young plants, and treat them promptly.
By following these steps and tips, you’ll increase your chances of successfully propagating Aglaonema and enjoy the satisfaction of seeing a new plant thrive. This process not only expands your plant collection but also enhances your understanding of plant care, making you a more confident plant enthusiast.
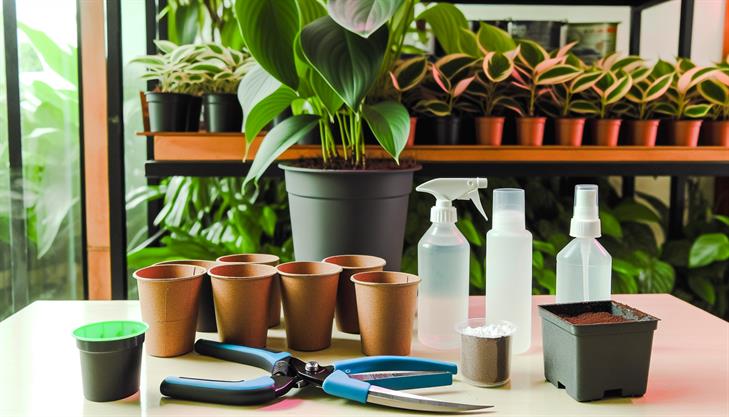
Essential Tools and Materials for Propagation
Propagating aglaonema plants, often referred to as Chinese evergreens, can be a fulfilling process for both novice and experienced plant enthusiasts. This guide will walk you through the essential tools and materials needed, along with detailed step-by-step instructions, to ensure successful propagation of aglaonema.
Essential Tools and Materials:
- Healthy Aglaonema Plant: Start with a healthy, mature plant. Look for one with firm stems and lush foliage.
- Sharp Pruning Shears or Scissors: These should be sterilized before use to prevent any potential transfer of disease.
- Container or Pot with Drainage Holes: Ensure it is clean and appropriately sized for the cuttings.
- Potting Mix: Use a well-draining soil mix; a combination of peat, perlite, and sand works well.
- Rooting Hormone (Optional): Can enhance root development but is not mandatory.
- Water: For watering the soil and maintaining moisture.
- Plastic Bag or Cloche (Optional): To create a mini greenhouse effect to retain humidity.
Step-by-Step Instructions:
Step 1: Selecting the Cutting
- Choose a stem with at least two to three leaves and appear healthy. Ensure it is approximately 4-6 inches long.
Step 2: Cutting the Stem
- Using sterilized pruning shears, cut the selected stem at a 45-degree angle. This increases the surface area for roots to develop.
Step 3: Prepping the Cutting
- Remove any leaves at the lower end of the cutting to prevent them from rotting in the soil.
- (Optional) Dip the cut end into a rooting hormone powder to encourage faster root growth.
Step 4: Planting the Cutting
- Fill your container with the potting mix, leaving space for the cutting.
- Insert the cutting into the soil, ensuring no leaves are submerged.
- Gently firm the soil around the cutting to provide support.
Step 5: Watering and Covering
- Water the soil lightly until it is moist, not soggy.
- (Optional) Cover the container with a plastic bag or cloche to create humidity, a key factor for root development. Ensure there is some airflow to prevent mold growth.
Step 6: Placing the Pot
- Place the pot in a warm, brightly lit area, avoiding direct sunlight which can scorch the cutting.
- Maintain consistent moisture in the soil, but avoid overwatering.
Common Issues and Tips:
Root Rot: This is a common issue due to overwatering. Ensure proper drainage and use a well-aerated soil mix.
Fungal Growth: If using a plastic bag for humidity, monitor regularly for any fungal growth and ensure adequate ventilation.
Patience is Key: It may take a few weeks to months for roots to develop noticeably. Resist the urge to disturb the cutting excessively.
Check for Root Growth: After a few weeks, gently tug the cutting to see if there is resistance, indicating root growth.
By following these steps and using the right tools and materials, you can successfully propagate aglaonema plants. Observing proper care for your plants will result in healthy growth, offering more foliage to enjoy or share with others. Happy gardening!
High-Quality Propagation Methods: Step by Step
Propagating aglaonema, also known as Chinese evergreen, is a rewarding way to expand your plant collection. With its lush foliage and low maintenance requirements, aglaonema is a favorite among houseplant enthusiasts. Here’s a step-by-step guide on how to propagate aglaonema successfully.
Method 1: Stem Cuttings
Step 1: Choose the Right Time and Tools
The best time to propagate aglaonema through stem cuttings is during spring or early summer when the plant is actively growing. Gather a sharp, sterilized knife or pair of scissors, a small pot, and well-draining potting mix.
Step 2: Select a Healthy Stem
Look for a mature stem with at least four to six leaves. Ensure the selected stem is healthy, pest-free, and shows no signs of disease.
Step 3: Make the Cut
Cut the stem below a node, which is the point where leaves attach to the stem. Aim for a cutting that is 3-5 inches long, ensuring each cutting has a couple of leaves intact to support photosynthesis.
Step 4: Prepare the Pot
Fill a small pot with a well-aerated and moist potting mix, such as a peat-based mix or a combination of peat and perlite. This provides good drainage and simulates the natural habitat of aglaonema.
Step 5: Plant the Cutting
Insert the cutting into the soil so that at least half of the node is buried in the mix. Gently firm the soil around the base of the cutting to stabilize it.
Step 6: Create the Right Environment
Place the pot in a warm location with indirect light. Keep the soil consistently moist but not waterlogged to prevent rot. Covering the pot with a plastic bag can create a mini-greenhouse effect, retaining humidity which aids root development.
Method 2: Division
Step 1: Remove the Parent Plant
Carefully remove the aglaonema from its pot and gently separate the roots to identify natural divisions. This method works best with mature plants.
Step 2: Divide the Plant
With clean hands or sterilized tools, carefully divide the rootball into two or more sections. Ensure each section has a healthy portion of roots and stems.
Step 3: Repot Each Section
Prepare separate pots with an appropriate potting mix. Plant each division in its own pot, ensuring the roots are well-covered and the plant is stable.
Step 4: Care for the New Plants
Water the newly potted plants lightly and place them in a warm spot with indirect light. Regular misting can help maintain necessary humidity.
Common Issues and Tips
- Root Rot: Overwatering can lead to root rot. Use a pot with drainage holes and avoid leaving the plant in standing water.
- Pests and Diseases: Inspect both parent plants and cuttings for pests regularly. Neem oil or insecticidal soap can help manage infestations.
- Temperature and Light: Aglaonema prefers temperatures between 65-75°F (18-24°C). While they tolerate lower light, bright, filtered sunlight promotes healthier growth.
Propagating aglaonema can be a straightforward process when following these steps. With patience and the right care, you’ll enjoy seeing your aglaonema plants thrive and multiply.
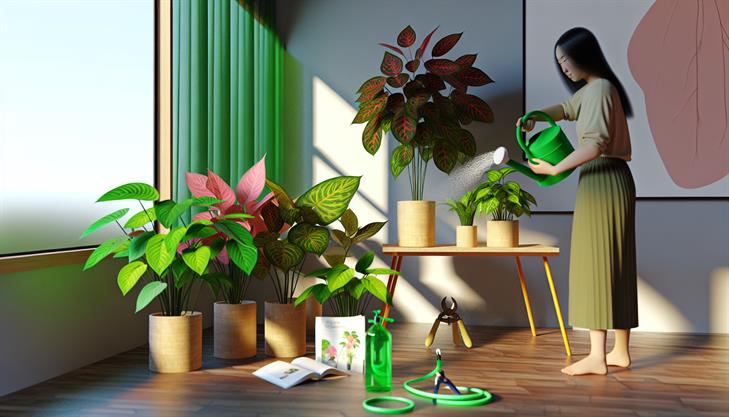
Tips for Ensuring Healthy Growth and Care
Propagating aglaonema, commonly known as the Chinese evergreen, is a rewarding process that allows you to expand your indoor plant collection effortlessly. This eye-catching houseplant is not only easy to care for but also straightforward to propagate, making it an ideal choice for both novice and experienced plant enthusiasts. Here’s a detailed, step-by-step guide on how to propagate aglaonema successfully.
Step 1: Gather Your Materials
Before diving into the propagation process, it’s essential to have the right tools and materials on hand. You will need:
- A healthy aglaonema plant
- Clean, sharp scissors or pruning shears
- A small pot with drainage holes
- Well-draining potting mix (a mix that includes peat moss or perlite works well)
- Rooting hormone (optional, but can enhance success rates)
- A small container of water (if opting for water propagation)
Step 2: Choose the Propagation Method
There are two main methods to propagate aglaonema: soil propagation and water propagation. Each method has its own benefits, and your choice depends on personal preference and available resources.
Soil Propagation
-
Prepare the Pot: Fill a small pot with a well-draining potting mix. Moisten the soil slightly to create a conducive environment for root development.
-
Select a Healthy Stem: Look for a robust stem on the mother plant, ideally one with a few leaves. Using clean scissors or shears, make a cut just below a node (the area where leaves meet the stem).
-
Optional – Use Rooting Hormone: Dip the cut end into rooting hormone to promote quicker root growth, although this step is optional.
-
Plant the Cutting: Insert the cut end into the prepared soil. Ensure at least one node is buried beneath the surface as roots will sprout from these nodes.
-
Care for the Cutting: Place the pot in a warm, bright location but away from direct sunlight. Keep the soil consistently moist but not waterlogged. Expect roots to develop in about 4-6 weeks.
Water Propagation
-
Cut and Prepare the Stem: Similar to soil propagation, cut a healthy stem just below a node.
-
Submerge the Cutting: Place the cutting in a small container of water, ensuring at least one node is submerged. This method allows you to see the roots as they form, providing a visual indicator of progress.
-
Monitor Water Levels: Place the container in bright, indirect light. Change the water every few days to prevent bacterial growth. Roots typically appear within 3-4 weeks.
-
Transfer to Soil: Once roots are a few inches long, transfer the cutting to a pot with well-draining soil to encourage further growth.
Step 3: Address Common Issues
- Yellow Leaves: Overwatering or underwatering can cause leaf yellowing. Adjust watering schedules accordingly.
- Root Rot: Ensure the pot has drainage holes and the soil allows excess water to escape. Avoid letting the plant sit in soggy soil.
- Lack of Root Development: If the cutting isn’t rooting, try using rooting hormone or provide more humidity by covering the setup with a plastic bag.
Additional Tips
- Use gloves when handling aglaonema as its sap can be irritating to the skin.
- Maintain an ambient temperature of around 70-85°F (21-29°C), as aglaonema prefers warm conditions.
- Be patient; propagation can take time, but with consistent care, your efforts will yield new growth.
In summary, propagating aglaonema is a simple and satisfying process that can be successfully achieved with either soil or water methods. By following these guidelines, you’ll boost your confidence in plant propagation and expand your collection of these lush, vibrant houseplants.
Troubleshooting Common Propagation Challenges
Propagating aglaonema, also known as Chinese evergreen, can be a rewarding experience for plant enthusiasts looking to expand their collection. This popular houseplant is known for its striking foliage and hardy nature, making it a great candidate for propagation. Here is a step-by-step guide on how to propagate aglaonema successfully, along with tips to troubleshoot common issues you might encounter along the way.
Steps to Propagate Aglaonema
1. Choose a Healthy Parent Plant
- Select a Vibrant Specimen: For successful propagation of aglaonema, start with a healthy parent plant. Look for a plant with lush, green leaves and no signs of disease or insects.
2. Propagation Method Options
Aglaonema can be propagated through division and stem cuttings. Here’s how:
-
Division:
- Timing: The best time to divide your aglaonema is during the spring when new growth is beginning.
- Procedure: Gently remove the plant from its pot and carefully separate the root clumps. Each segment should have several leaves and a portion of roots. Replant these divisions in individual pots with well-draining soil.
-
Stem Cuttings:
- Cut Selection: Choose a healthy stem with several leaves and make a cut using clean, sharp scissors or a knife. Ensure the cutting is about 4-6 inches long.
- Preparation: Remove the bottom leaves to expose at least two nodes (points where leaves emerge). This is where roots will develop.
- Rooting: Place the cutting in a glass of water or plant it directly into moist, well-draining potting soil. If using water, wait until roots are 1-2 inches long before transferring to soil.
3. Optimal Growing Conditions
- Light: Aglaonema cuttings need bright, indirect light for optimal growth.
- Temperature and Humidity: Maintain a warm environment (around 70-80°F) and high humidity to encourage root growth.
- Watering: Keep the soil consistently moist but not waterlogged. Overwatering can lead to root rot, while underwatering can dehydrate the plant.
Troubleshooting Common Propagation Challenges
Propagating aglaonema might not always go smoothly. Here are common problems and solutions:
- Root Rot: This often occurs from overwatering. Ensure pots have sufficient drainage and only water when the topsoil feels dry.
- No Root Development: If the cutting doesn’t develop roots, it might be a light issue. Move the cutting to a brighter, but indirect light source.
- Leaf Yellowing: This can happen if humidity levels are too low. Consider placing the pot on a tray of pebbles with water or use a humidifier to increase moisture in the air.
Additional Advice
- Patience is Key: Propagation is a slow process. It may take several weeks to see new growth, especially if you’re propagating in lower light conditions.
- Using Rooting Hormone: While not necessary, dipping cuttings in rooting hormone can improve your chances of success by accelerating root development.
By following these guidelines, you should be well on your way to successfully propagating aglaonema. Remember to monitor your plants closely and adjust care as needed, tailoring the process to fit your specific environment. With practice, propagating aglaonema can become a gratifying part of your plant care routine.
In conclusion, propagating Aglaonema is a rewarding process that allows you to expand your collection of these beautiful plants with ease. By following the key steps of selecting a healthy parent plant, preparing the right tools, and choosing between methods such as division, stem cuttings, or water propagation, you can successfully grow new Aglaonema plants. Remember to provide proper care throughout the propagation process by ensuring adequate light, water, and humidity levels to encourage healthy growth.
Now that you are equipped with the knowledge and techniques, feel confident to apply what you’ve learned and start your propagation journey. Experiment with different methods to find what works best for you and your plants.
As a final tip, always practice patience and attentiveness. Keep an eye on your cuttings or divisions and make adjustments as needed to cater to their growth needs. With time and care, your efforts will be rewarded with lush new Aglaonemas to brighten your space. Happy propagating!